While installing Internet Explorer (any version), you may get a message saying that Internet Explorer did not finish installing, before the installation terminates. This indicates that something prevented the installation package from installing Internet Explorer on your machine. The following article explains how to fix the issue and install Internet Explorer.
Windows 7 Standard And Windows 7 E Edition
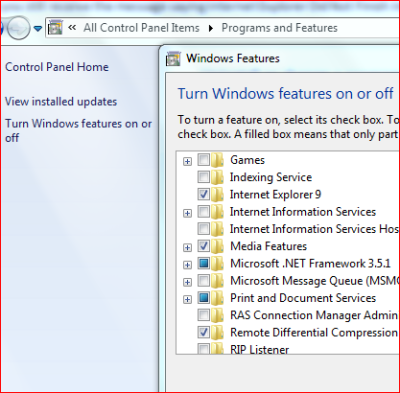
For Windows 7 Standard Edition, Internet Explorer 8 comes as the default browser. This means you need not struggle with installation as it is preinstalled. If you removed IE (Internet Explorer) from Windows Components in Control Panel->Programs and Features, you cannot install Internet Explorer using a downloaded IE installation package. You have you use Control Panel -> Programs and Features -> Windows Components to get it back. This applies even if you are trying to install Internet Explorer 9. Remember that IE9 comes as an update package so you need to have IE8 present before you can get IE9.
In Windows 7 E edition, you do not have a built-in Internet Explorer. If you have already uninstalled IE, you need to reinstall it using a downloaded installation package of IE8 and then run the downloaded package of IE9 or IE10. That means, for installing IE9 on Windows 7 E, which does not already have IE8, you will have to perform an IE8 installation and then, an upgrade to IE9 using an IE9 installation package.
Internet Explorer Did Not Finish Installing
If you still receive the message saying Internet Explorer Did Not Finish Installing, proceed to the following steps.
Turn Off Antivirus And Firewall
More than often, it is the antivirus that presumes temporary files to be malicious and deletes them even as they are created by the installation package. Turn off your antivirus temporarily for installing Internet Explorer on Windows 7. After you turn off both antivirus and firewall, try to install Internet Explorer:
- In Windows 7 Standard and Windows 7 N edition, use the Control Panel -> Programs and Features -> Windows Components to get back the default Internet Explorer and then proceed to upgrade it.
- In Windows 7 E edition, download and run IE installation for IE8 first. This done, download, and run the installation package for IE9.
If successful, turn on the antivirus and firewall. If not, proceed to the next section.
Locate And Run XML Related To Internet Explorer
The IE9 exe file is in fact a compressed zip folder containing a number of files, including an XML file that tells Windows 7 about the whereabouts of the files related to IE installation.
- When you receive the message saying Internet Explorer Did Not Finish Installation, leave the message box open.
- Open Windows Explorer and go to the C drive
- You will see a folder whose name is just a string of random numbers and alphabets
- Open that folder and look for the XML file (There should be only one).
- Double click the XML file to execute it.
This should bypass all other checks and install the Internet Explorer to your computer.
Note:
- You will not be able to find the folder if you close the dialog box as the installation executable will delete it as soon as you press OK on the message.
- The folder is created only when you are using a downloaded installation package and not when you are trying to upgrade to IE9 using Windows Updates.
If you still receive a message saying Internet Explorer did not finish installing or Internet Explorer installation did not complete, let us know using the comment section below.
