The Magnifier tool in Windows 11/10 lets you easily enlarge text and images on any section of your screen through a mouse cursor. If your mouse does not have a wheel, Windows key and + or – can be used to increase or decrease magnification. This makes reading easier and convenient. By default, the tool offers two screen magnifying modes:
- Full-screen magnification
- Lens magnification
A change introduced in Windows Magnifier now allows users to keep the mouse cursor in the center of the screen, or within its edges while using it in full-screen view. Let’s see how it works!
Keep Magnifier mouse cursor in the center of the screen in Windows
You can keep the mouse cursor centered on the screen or within the edges of the screen using Windows Settings or Registry. You can configure the Magnifier mouse cursor to remain centered on the screen in two ways.
- Using Windows Settings
- Using Registry Tweak.
Let us take a look at them.
1] Using Windows Settings
Windows 11
If you do not prefer using a mouse, you can use the Windows key alongside the + and – keys to increase or decrease magnification. This makes reading easier and convenient. If you’ve recently moved to Windows 11, finding settings related to Magnifier can be a bit difficult as earlier, it was present under the Ease of Access section. Now, it has been placed directly under the Accessibility settings.

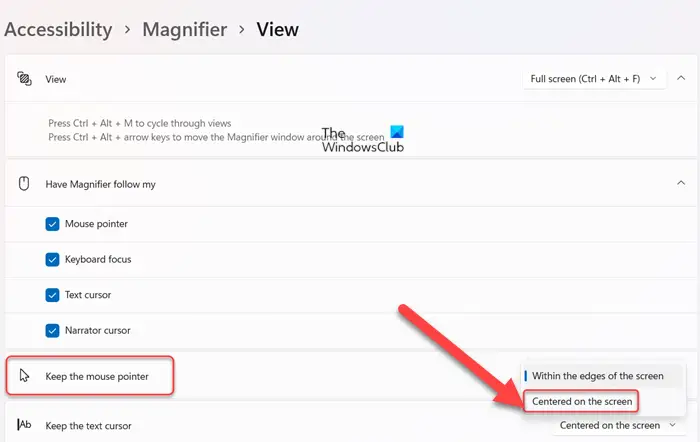
- Press Win+I in combination to open the Settings.
- From the side panel on the left, choose Accessibility.
- On the right, find the Magnifier heading and click to expand its menu.
- Scroll down to the View section.
- When directed to a new screen, look for the Keep the mouse pointer entry.
- When found, hit the drop-down button adjacent to it and select Centered on the screen option.
Windows 10

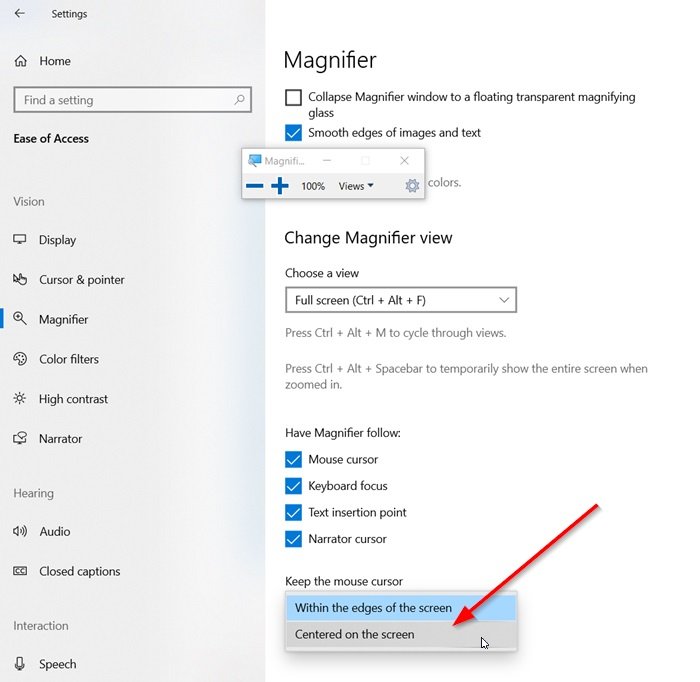
If you have Windows 10 installed, open the Settings app and select ‘Ease of access’ tile.
Under Vision section, scroll down and select the ‘Magnifier’.
Switch to the right-pane and scroll down to find the ‘Keep the mouse cursor’ option.
Hit the drop-down list and you will see two options:
- Centered on the screen
- Within the edges of the screen.
Select ‘Centered on the screen’.
You are done.
Alternatively, you can configure the same setting via a Registry tweak.
2] Using Registry Tweak
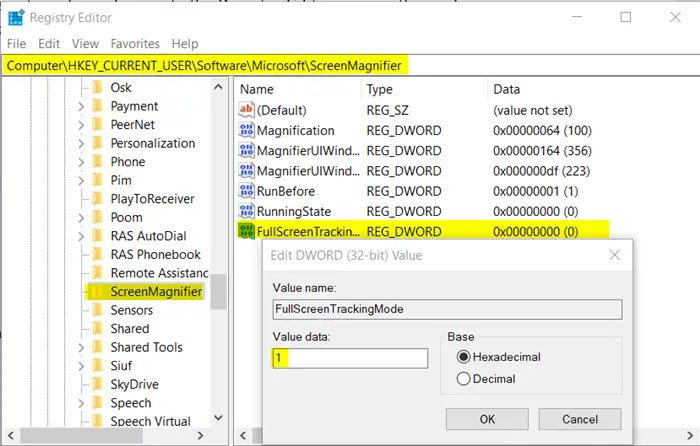
Open the Registry Editor and go to the following path address –
HKEY_CURRENT_USER\Software\Microsoft\ScreenMagnifier

Here, modify the value of FullScreenTrackingMode:
- 0 = Within the edge of the screen
- 1 = Centered on the screen
If the entry does not exist create the new 32-bit DWORD. Even if you are running 64-bit Windows you must still create a 32-bit DWORD value.
Finally, to allow the changes to take effect, close the Registry Editor and restart your computer.
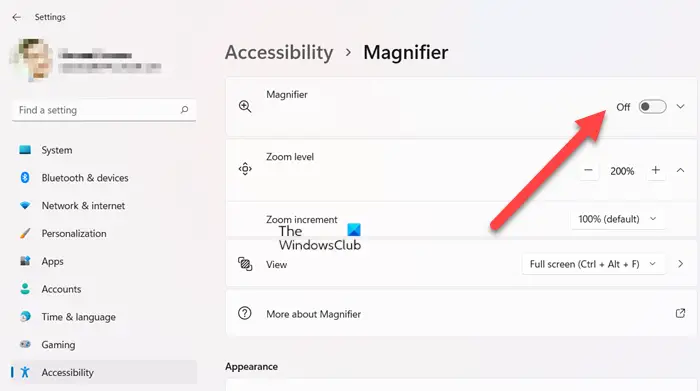
How do I turn off Magnifier in Windows 11?

It’s simple! Open Windows 11 Settings and go to the Accessibility heading. Switch to the right and slide the toggle next to the Magnifier option to the Off position.
That’s all!
Leave a Reply