Many apps that work on Windows 11/10 need to control the Radio in order to function properly. Therefore, Microsoft has given you, the user, control over this feature. You can choose which app you want to give permission to control radios. In this post, we are going to see how to allow apps to control device radios in Windows 11/10.
Let Windows apps control Radios in Windows 11/10
There are three methods by which we are going to see how to let Windows apps control Radios in Windows 11/10. They are.
- Via Settings
- By Group Policy Editor
- By Registry Editor
Let us talk about them in detail.
1] Allow apps to control device radios via Settings

To control your computer’s Radios settings, follow the given steps.
- Launch Settings by Win + I.
- Click Privacy > Radios
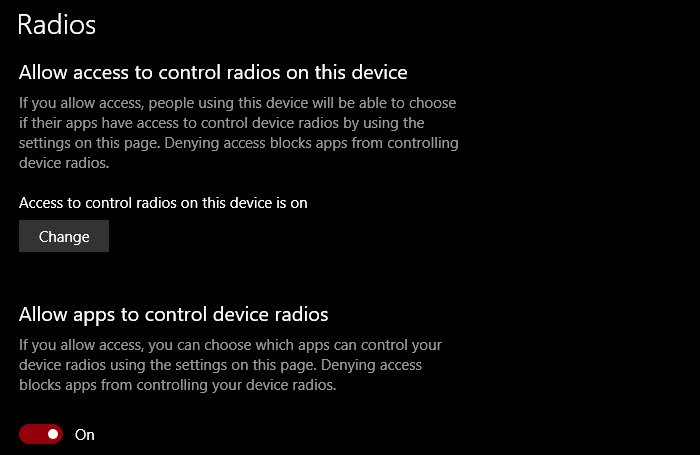
- To enable Radio completely, click Change and turn the toggle on.
- To allow all apps to access radios, turn on the toggle of Allow apps to control device radios.
- To manage access of radios for individual apps, select the app from Choose which app can control your device radio.
This way you can manage radios settings from the Settings app in Windows 10.
2] By Group Policy Editor

There is a policy, Let Windows apps control radios, that allows you to control how the radios will function. So, launch Group Policy Editor from the Start Menu and navigate to the following location.
Computer Configuration > Administrative Templates > Windows Components > App Privacy
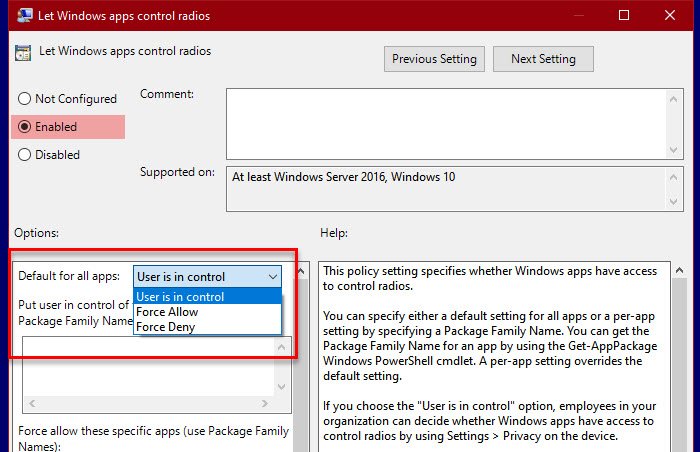
Now, double-click on Let Windows apps control Radio, select Enabled, and then change Default for all apps to any of the following options.
- User is in control: All the users who are part of your organization can decide if they want to give Windows apps permission to access radios.
- Force Allow: All the Windows apps of all computers attached to your domain will have permission to access radios.
- Force Deny: None of the Windows apps of any computers attached to your domain will have permission to access radios.
After configuring the policy you need to restart your computer once to see the effect.
3] By Registry Editor

If you don’t have Window 10 Pro, you won’t have Group Policy Editor. So, in that case, we can use Registry Editor for the same effect. So, launch Registry Editor from the Start Menu and navigate to the following location.
Computer\HKEY_CURRENT_USER\SOFTWARE\Policies\Microsoft\Windows
Right-click on Windows, select New > Key and name it AppPrivacy.
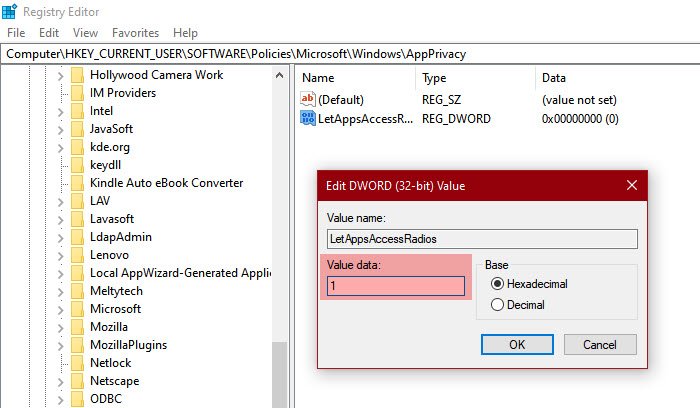
Now, right-click on AppPrivacy, select New > Dword (32-bit) Value, and name it LetAppsAccessRadios.
Double-click on LetAppsAccessRadios and set the Value data to.
- 0 for User is in Control option
- 1 for Force Allow option
- 2 for Force Deny option
This is how you can configure the Radios settings on Windows 10 with the help of Registry Editor.
Hopefully, now you know how to control your computer’s Radio Settings.
Read Next: How to change Location settings in Windows.
Leave a Reply