The new Microsoft Edge browser is embedded with multiple advanced features, provides new updates and features to improve things in a regular way for its users. On users’ high demand, one such great service that has been newly added by Microsoft is to limit media autoplay. It is a new framework for blocking media autoplay by default in the Edge browser. However, this feature is currently available in Canary versions, but it will be rolled out to the Stable version soon.
The new Chromium-based Microsoft edge browser provides a faster and simplified user interface, with an enhanced surfing experience supported by multiple extensions. The media autoplay feature is useful on video sites, uses low bandwidth, and can play video links in the background without running the video. This post will guide you to limit media autoplay by default in the Microsoft Edge browser.
Limit Media Autoplay in Microsoft Edge
Though media autoplay being a useful tool that helps users to limit while using the Edge browser. It is important to know the limit option will not stop the video playing in the background but only mute it once the window is switched but the user. So, if you’re willing to use this service, follow the below suggestions:
- Open the Microsoft Edge browser.
- Go to the edge://flags page.
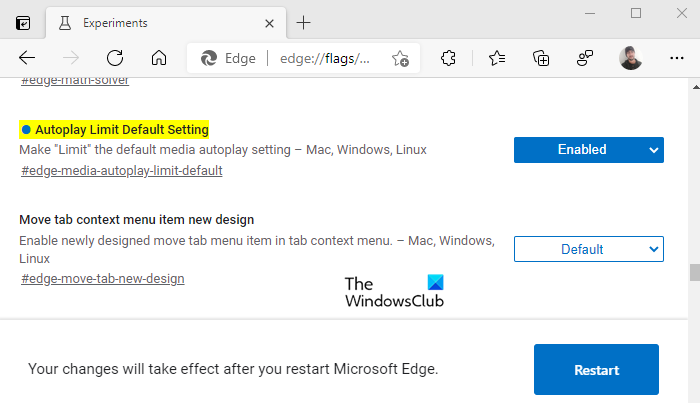
- Search flags for Autoplay Limit Default Setting.
- Click on the drop-down arrow and change the value from Default to Enabled.
- Restart your browser to apply the changes.
To limit the media autoplay by default open the Microsoft Edge browser, open the Chrome browser first, and make sure you have updated it to the latest version.
In the address bar, type edge://flags, and press enter.
Then go to the search box, type Autoplay Limit Default Setting, and see the related flag in the Experiments section.
Alternatively, you can type the following text code in the Chrome address bar and hit Enter to open the flag directly.
edge://flags/#edge-media-autoplay-limit-default
The web page with an option of Autoplay Limit Default Setting will open on the window.

Next to the corresponding flag, click on the drop-down menu, and switch it from Default to the Enabled option.
Then click on the Restart button so that the changes will take effect the next time you open the browser and now you are ready to go.
If you ever need to disable this feature, open the Edge browser and go to the Autoplay Limit Default Setting flag. Then click on the drop-down menu and switch it to Disabled. Finally, restart your browser so that the changes you made could be implemented.
Block autoplaying videos completely in Edge
The above process can only limit autoplay, so if you want to completely stop videos from playing automatically in Edge, follow the below procedure:
- Open the Microsoft Edge browser.
- Go to the address bar, type edge://flags, and hit Enter.
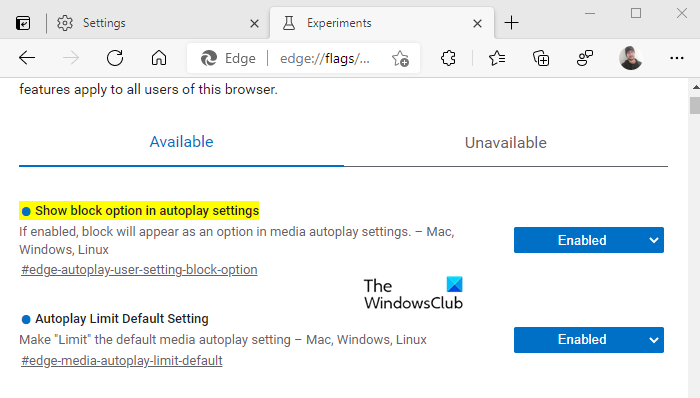
- Search for the Show block option in autoplay settings flag.
- Click on the drop-down arrow and change the value from Default to Enabled.
- Then restart the browser.
- On starts up, open the Edge browser and go to Settings.
- Select Cookies and site permissions from the left.
- Under Site permissions, go to the All permissions section.
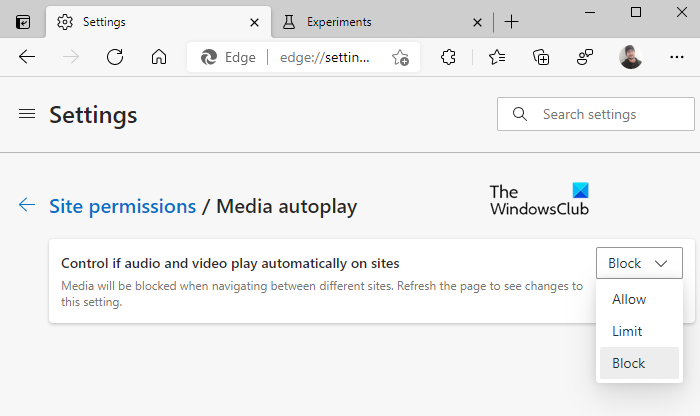
- Scroll down to the Media autoplay and then open it.
- Next to the Control if audio and video play automatically option, click on the drop-down menu and select Block.
Now let’s understand the above steps in detail:
To get it started, open the Microsoft Edge browser first.
Once it opens, go to the address bar, type the following command, and press Enter:
edge://flags
Then go to the search box, type the Show block option in autoplay settings, and see the related flag in the Experiments section.
Alternatively, you can type the following text code in the Edge address bar and hit Enter to make the flag appear on the screen.
edge://flags/#edge-autoplay-user-setting-block-option
It appears with the description –
If enabled, block will appear as an option in media autoplay settings. – Mac, Windows, Linux

As the flag comes with the Default mode, so you need to make it enable, click on the drop-down menu and select Enabled.
After that, click on the Restart button to take effect on the changes you made.
Now open the Edge browser, click on the three dots (available in the top right corner), and select the Settings option from the list.
From the left pane, select Cookies and site permissions. Under Site permissions, you will see all the permissions listed for the sites you visit. Scroll down to Media autoplay and open it.
On the next page, you will see that the control of automatic audio and video play on sites is by default enabled.

Therefore, to block the auto-playing audio and videos completely, click on the drop-down arrow, next to the Control if audio and video play automatically option and then change it from Allow to Block. Now the Media will be blocked when you navigate between different sites.
This post will show you how to stop videos from playing automatically on websites using Chrome or Firefox.
Hope it helps.
Leave a Reply