Some Windows 11/10 users when trying to connect to a remote desktop are seeing the following error message:
An authentication error has occurred. The Local Security Authority cannot be contacted.
In this article, we are going to see why this error message appears and how you can resolve it.

Why am I seeing Local Security Authority cannot be contacted error?
This error is usually seen in computers with a disabled Remote Connection policy. This can be easily configured with the Group Policy Editor that we will be seeing later in this article. But sometimes, it can also be because of conflict in IPs or wrongful DNS configuration, etc. That’s why we will be looking at all the possible solutions to resolve the issue.
Fix Local Security Authority cannot be contacted error in Windows 11/10
If you are seeing the ‘The Local Security Authority cannot be contacted’ error, use the following solutions to resolve the error.
- Configure DNS
- Enable Remote Connection Policy
- Flush DNS
Let us talk about them in detail.
1] Configure DNS

The issue can be because of wrongful DNS Configuration. Hence, we ought to configure it properly and see if the issue persists.
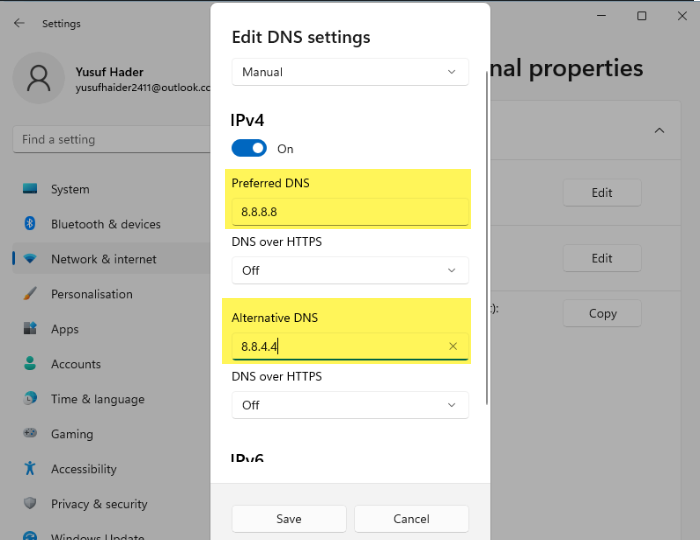
To configure DNS for Windows 11 follow the given steps.
- Open Settings by Win + I.
- Go to Network & internet and click Advanced network settings.
- From the Network adapter section, select the network that you are connected to.
- Click View additional properties.
- Click Edit from the DNS Server Assignment section.
- Set, Preferred DNS server to be 8.8.8.8 and the Alternate DNS server to be 8.8.4.4.
To configure DNS for Windows 10 follow the given steps.
- Open Control Panel from the Start Menu.
- Make sure that View by is set to Large icons.
- Click Network & Sharing > Change adapter setting.
- Select Internet Protocol version 4(TCP/IPv4) and click Properties.
- Tick Use the following DNS server addresses and change the Preferred DNS server to be 8.8.8.8 and the Alternate DNS server to be 8.8.4.4.
Finally, check if the issue persists.
Read: Local Security Authority database contains an internal inconsistency
2] Enable Remote Connection Policy

You won’t be able to connect your computer remotely if the policy is turned off. Therefore, we have to see if the policy is disabled and enable it in that case.
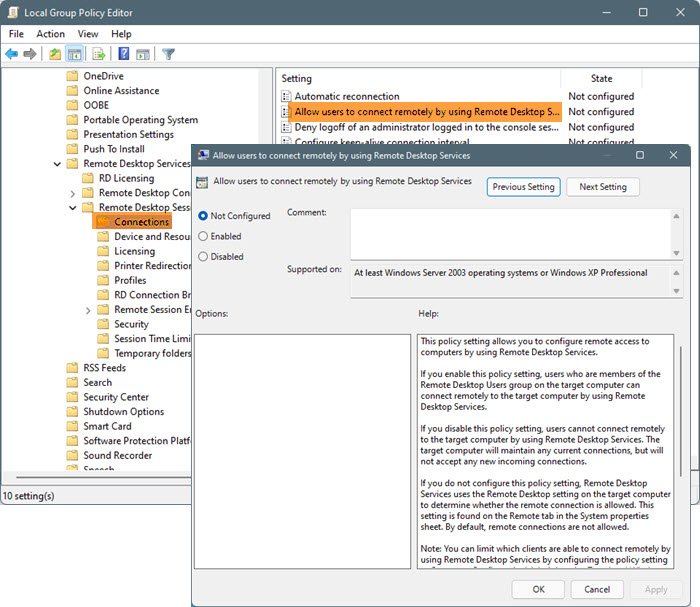
Open Group Policy Editor from the Start Menu.
Navigate to the following location
Windows Components > Remote Desktop Services > Remote Desktop Session Host > Connections
Look for Allow users to connect remotely by using Remote Desktop Services, open it, select Enabled
This policy setting allows you to configure remote access to computers by using Remote Desktop Services.
If you enable this policy setting, users who are members of the Remote Desktop Users group on the target computer can connect remotely to the target computer by using Remote Desktop Services.
If you disable this policy setting, users cannot connect remotely to the target computer by using Remote Desktop Services. The target computer will maintain any current connections, but will not accept any new incoming connections.
If you do not configure this policy setting, Remote Desktop Services uses the Remote Desktop setting on the target computer to determine whether the remote connection is allowed. This setting is found on the Remote tab in the System properties sheet. By default, remote connections are not allowed.
Note: You can limit which clients are able to connect remotely by using Remote Desktop Services by configuring the policy setting at Computer Configuration\Administrative Templates\Windows Components\Remote Desktop Services\Remote Desktop Session Host\Security\Require user authentication for remote connections by using Network Level Authentication.
You can limit the number of users who can connect simultaneously by configuring the policy setting at Computer Configuration\Administrative Templates\Windows Components\Remote Desktop Services\Remote Desktop Session Host\Connections\Limit number of connections, or by configuring the policy setting Maximum Connections by using the Remote Desktop Session Host WMI Provider.
Click Apply > Ok.
3] Flush DNS
If the previous method didn’t work, or if you find it too long then this is what you need. If the issue is because of DNS conflict then try flushing your DNS. To do that, open Command Prompt as an administrator and run the following command.
ipconfig/flushdns
Wait for the command to execute and see if the issue persists.
Hopefully, you are able to resolve the error and connect to a remote computer with these solutions.