Some Windows 11/10 PC users are reportedly having trouble changing their lock screen. According to affected users, when they boot up their PC, it is always the default lock screen, however, when they lock the PC, it shows up as the custom lock screen selected.
Lock Screen picture keeps changing when Windows boots up
If your Windows 11/10 Lock Screen is showing the wrong or a different image or keeps changing to the default image, then you can try our recommended solutions below in no particular order and see if that helps to resolve the issue.
- Create a new user account
- Use Ultimate Windows Tweaker
- Configure Group Policy setting
Let’s take a look at the description of the process involved concerning each of the listed solutions.
Lock Screen Background Reverts to default on Windows 11
Before you proceed with the solutions, do the following:
On Settings > Personalization > Lock screen you need to scroll down and make sure the Show lock screen background picture on the sign-in screen option at the bottom of the page, is toggled to On. If it’s set to On but the issue remains, you can continue with the suggestions below.
1] Create a new user account
This solution to resolve the issue is an easy one. It entails you create a new user account and then transfer from the old user profile to the new one.
2] Use Ultimate Windows Tweaker

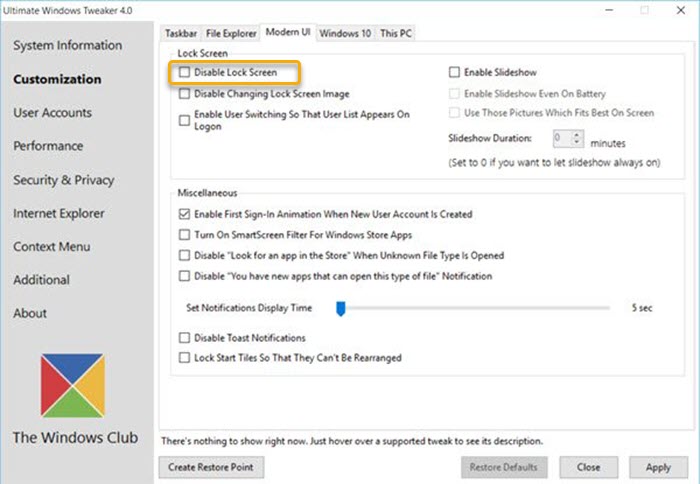
Another viable solution is to use the Ultimate Windows Tweaker.
After you have downloaded our free portable utility, launch the program.
In the program UI, look for the Disable Lock Screen option and uncheck it. You will see it under the Customization > Modern UI tab.
Now, when you boot your PC, it goes straight to your lock screen with your own picture choice.
3] Configure Group Policy setting

- Press Windows key + R to invoke the Run dialog.
- In the Run dialog box type gpedit.msc and hit Enter to open Group Policy Editor.
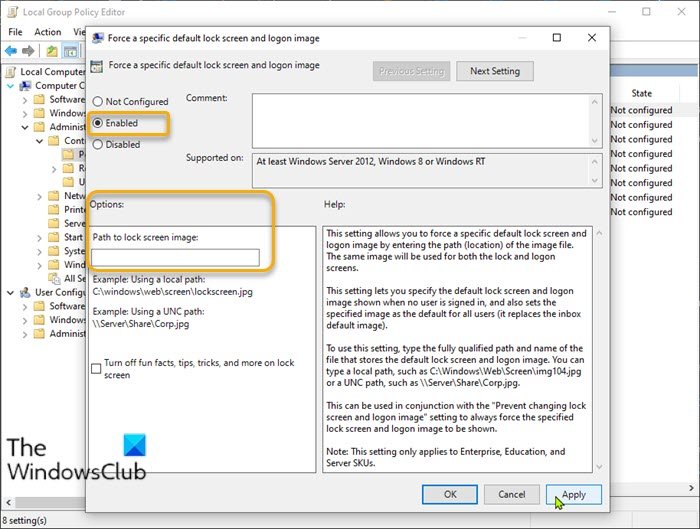
- Inside the Local Group Policy Editor, use the left pane to navigate to the path below:
Computer Configuration > Administrative Templates > Control Panel > Personalization
- On the right pane, double-click on Force a specific default lock screen image to edit its properties.
- In the policy window, set the radio button to Enabled.
- Next, scroll down to the Options section.
- In the Path to lock screen image field, type in the path to where the image you want to use is saved on the local disk.
- Click Apply > OK to save the changes.
- Exit Local Group Policy Editor.
For Windows 11/10 Home users, you can add Local Group Policy Editor and then carry out the instructions as provided above.
I hope this helps!
Why does my lock screen wallpaper keep changing?
Your lock screen wallpaper keeps changing because the Background setting is configured to Windows Spotlight or Slideshow. These settings automatically rotate images on your lock screen. Set the Background to “Picture” in the Settings to stop the automatic changes. This will keep a single image as your lock screen wallpaper.
How do I stop my lock screen from automatically changing wallpaper?
To stop your lock screen from automatically changing wallpaper in Windows 11, go to Settings > Personalization > Lock screen. Under Background, select Picture or Windows Spotlight instead of Slideshow. This setting change will keep the lock screen wallpaper constant instead of cycling through images.
Leave a Reply