When preparing a document, it is essential to have high-quality images. It not only makes sure that others can read it clearly, but also leaves an impression. However, if you notice, every time you add an image, the quality changes. It looks blurred, the text in the picture doesn’t look sharp, etc. This post will show how you can fix the loss of image quality after you save it in Word, Excel, and PowerPoint.

Preserve image quality when saving in Word, Excel, PowerPoint
As more and more media is added to documents, the size increases. That’s why the Office applications compress the image to reduce the overall size. However, if you have enough bandwidth and are ok with the large-size document, disable the option.

- Open a Word or Excel, or PowerPoint document
- Click on File > Options
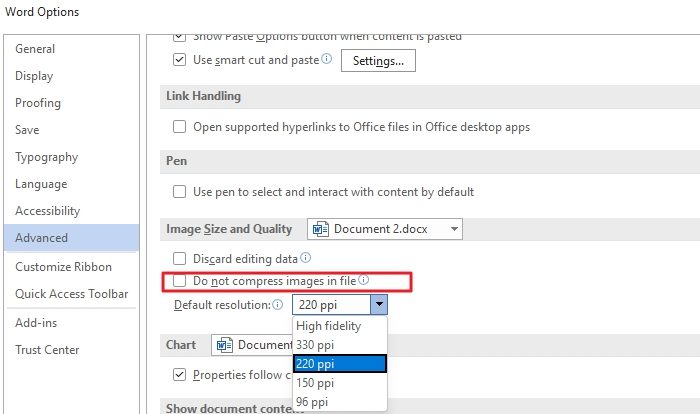
- Click on Advanced and then find the Image Size and Quality settings.
- Here you can configure the following
- Discard Editing Data
- Do not compress images in a file
- Default resolution
While you can check the second box, the office application will not compress any image. Here are more details on the rest:
- Discard Editing Data: Delete data used to restore edited pictures to their original state.
- Default Resolution: Using a resolution other than high fidelity will result in loss of quality. It reduces pixels which result in blurry images.
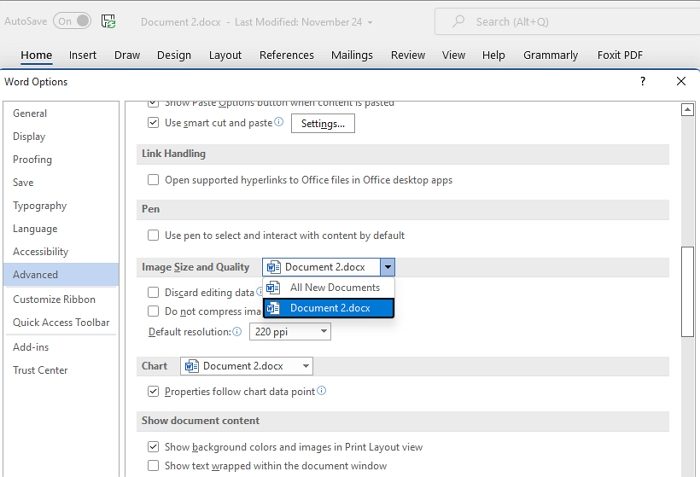
There is another option that you can select. You can apply for that particular document or apply it for all the documents for each of these options. Next to Image Size and Quality, the current document is listed. You can change it to All New Document if you click on it. Post this no document will compress the image.

You will have to configure this individually for all Office applications.
How do you save an image in a high-resolution Office document?
First, ensure the image you add to the document is of the best quality. Second Go to File > Options > Advanced Image Size and Quality settings. Uncheck the compression option, and then set the default resolution to high fidelity. This setting will ensure the best quality or the original image quality in the document.
Related: How to disable Image Compression in Office 365 apps
How do you fix a blurry picture in Microsoft Office?
You can achieve this using the Pictures tool. Select the Picture in the document and select Compress pictures under the Picture format. You can either choose to keep the original quality or select high fidelity.
How do you sharpen a picture in Microsoft Office?
You can achieve this using the Picture tool. Select the image, and then switch the picture format section. Then click on Correction, and then you can change Sharpen/Soften option. Preview the image, and save it. You can use the Reset Picture option to undo all the changes.
Leave a Reply