Here is a free tool for Windows 11/10 that lets you make the drag and drop feature easier and more useful. This tool is named as DropPoint. While the built-in drag and drop feature of Windows OS works fine to perform copy and move operations, there are cases where the drag and drop feature doesn’t work or help you. Using this DropPoint tool, you won’t face such issues.

Here is an example of how this tool is helpful. The drag and drop feature of Windows OS can’t work for two windows opened in maximized mode. You either need to use their taskbar thumbnails or open both the windows side by side or at least some part of the first or second window must be visible so that you can drag item(s) from one window and drop it to another window. There are some other cases where the DropPoint tool can be helpful. So, before we talk about how this tool works, let’s check the benefits or advantages of this tool.
Advantages of using the DropPoint tool
- The traditional drag and drop process is performed in continuation. There is no pause or break. Also, once you have selected items, then you need to press and hold the Ctrl key to select more items. Using this tool, you can add items multiple times without pressing the Ctrl key. Also, the drag and drop process can be performed with a pause. First, you can perform the drag action with all the required items, then you can perform the drop action
- You can add items from multiple folders or locations and then drop them at a location of your choice. This feature is very helpful
- If you want to move files in a sub-folder of the same window/location, then it can’t be done with the built-in feature until you open that folder in a separate window. This tool lets you access any sub-folder of the same window and then you can easily drop the items into that folder
- Windows drag and drop feature doesn’t work when you want to copy/move items between virtual desktops or from the main desktop to a virtual desktop and vice-versa. This tool bypasses that limit easily.
Now lets you check how you can use this tool.
Make Drag-and-Drop easier using DropPoint for Windows PC
This is an open-source and cross-platform tool available for Windows, macOS, and Linux. You can grab its installer or portable version (for Windows OS) from github.com. Run this tool and it will start running in the system tray. It doesn’t come with any interface, options, or settings. All it provides is a drop box that has two parts:
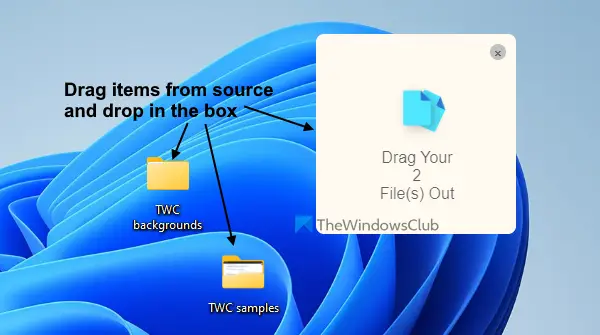
- The first part is used to add items from the source location(s)
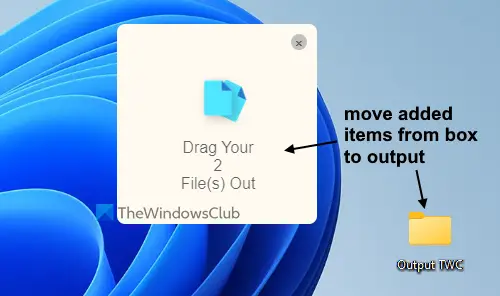
- The second part helps to copy/move added items to the destination location.
To open its drop box, double-clicking on its system tray icon. Now, select items that you want to copy or move and add or drag them to its drop box. That box will show you the number of items added by you and it always remains on top of the other opened windows so that you can add more items when needed and perform the drop function easily.

After this, open a destination folder or location where you want to copy/move the added items. Once that folder is opened, drag the added items from its box, and drop them in the output folder.

This is how this tool works and it is quite similar to the copy/paste and cut/paste function of Windows OS. Since its box remains on top of other applications or windows, it makes the entire drag and drop process easier.
Related: Add Drag and Drop support to Taskbar in Windows 11.
Drag-and-Drop items to a virtual desktop

As mentioned earlier, this tool works with virtual desktops too. So, to perform drag and drop action for virtual desktops, follow these steps:
- First of all, open or create virtual desktops on your Windows 11/10 computer
- Launch this tool on a desktop to open its box
- Add items to that box
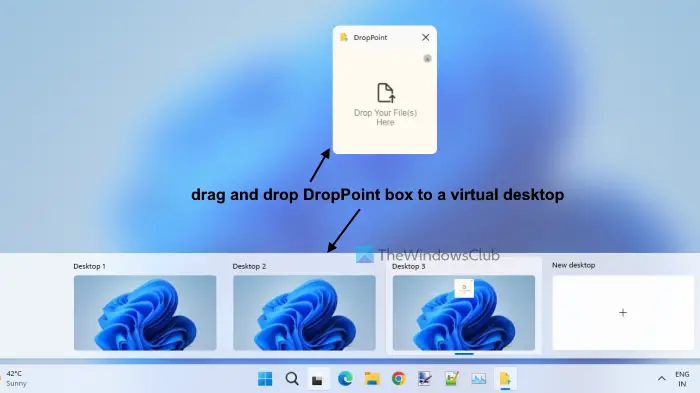
- Click on the Task View or virtual desktop icon available on the taskbar. This will show the thumbnails of all the available desktops (as visible in the image above). The drop box of this tool will also be visible
- Drag that box and drop it in the thumbnail preview of a virtual desktop. Or else, you can also right-click on that box and select Show windows from this app on all desktops option to view the box of this tool on all the desktops
- Click on the thumbnail preview of that virtual desktop to access it. Now you will notice that the drag box of this tool is visible on that desktop
- Now open any folder in that virtual desktop
- Move or drop items from that box to the destination folder.
How do I change the default drag and drop action in Windows?
To change the default drag and drop action in Windows 11/10 computer, follow these tricks while using the drag and drop feature:
- Press n hold the Ctrl key: This will always perform copy action
- Press n hold the Shift key: It will perform the move action
- Press n hold Ctrl+Shift or Alt key: This action will always create shortcuts to the selected items.
How do I fix drag and drop on Windows 11?
If you can’t drag and drop files or folders on Windows computer, then you can try some fixes like:
- Troubleshoot in Clean Boot State
- Disable UAC using Registry Editor
- Change Drag height and width
- Use the Esc key.
Hope this will help.
Read next: How to enable or disable Drag and Drop in Windows 11/10.