How do you stop Windows 11/10 files from going to and saving to OneDrive? If you have this question, this article will show you how to make Windows store or save documents locally on your hard disk drive, instead of saving them to OneDrive. And why would you need to do this? We all know that OneDrive is deeply integrated with Windows. Due to this, whenever you save your files or documents, they get saved under the hood of OneDrive.
Make Windows save Documents locally on the hard drive instead of OneDrive
If your computer is not connected to the Internet, your system will tend to save your documents locally – but if it has Internet access, it will save your content to OneDrive. Next, when this content is saved to OneDrive, and you lose the web connectivity, you won’t be able to open your documents since you’ll need to download them first.
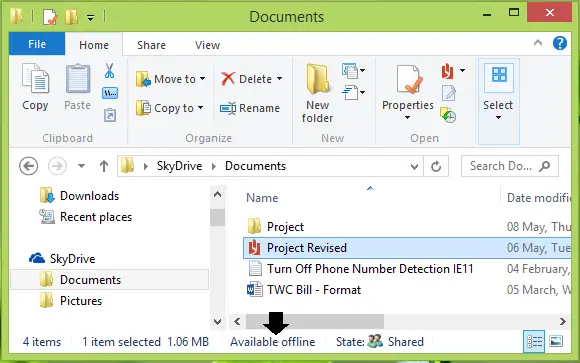
However, you can right-click on any of the files inside the OneDrive section of File Explorer and select the Available offline option, to have the file open, when you don’t have the Internet.
If you don’t like your files listed under OneDrive heads, you can force or make your Windows save files locally to your hard drive. Here are multiple ways, you can configure this.
1] Manage Save location via OneDrive settings
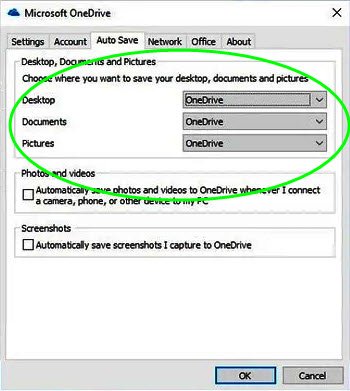
- Open OneDrive Settings.
- Open the Auto Save tab
- Under Desktop, Documents and Pictures, from the drop-down menu, select the default Save location for each.
- Click OK and exit.
2] Make Windows save files to Hard Drive instead of OneDrive using Group Policy
1. In Windows Pro & Enterprise Editions, press Windows Key + R combination, type put gpedit.msc in Run dialog box, and hit Enter to open the Local Group Policy Editor.
2. In the left pane, navigate here:
Computer Configuration -> Administrative Templates -> Windows Components -> OneDrive
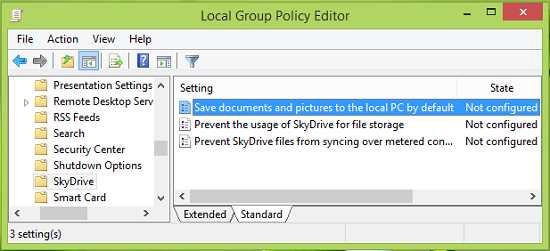
3. In the right pane of the above-shown window, look for the Setting named Save documents and pictures to the local PC by default which is showing Not Configured status. Double-click on the same to get this:
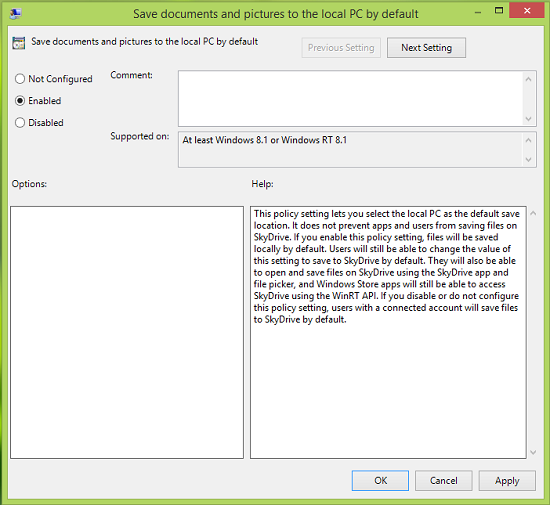
4. In the above-shown window, click Enabled and then click Apply followed by OK. Here’s the policy explanation so far:
This policy setting lets you select the local PC as the default save location. It does not prevent apps and users from saving files on OneDrive. If you enable this policy setting, files will be saved locally by default. Users will still be able to change the value of this setting to save to OneDrive by default. They will also be able to open and save files on OneDrive using the OneDrive app and file picker, and Windows Store apps will still be able to access OneDrive using the WinRT API. If you disable or do not configure this policy setting, users with a connected account will save files to OneDrive by default.
You may now close the Local Group Policy Editor and reboot to make changes effective.
3] Change default save location from OneDrive to Documents folder using Registry
If your edition of Windows does not have the Group Policy Editor, do the following:
1. Press Windows Key + R combination, type put regedit in Run dialog box and hit Enter to open the Registry Editor.
2. Navigate here:
HKEY_LOCAL_MACHINE\SOFTWARE\Policies\Microsoft\Windows\Onedrive

3. In the right pane of the above-mentioned location, right-click in the blank space and select New -> DWORD Value. Name the newly created DWORD as DisableLibrariesDefaultToOneDrive. Double-click on the same DWORD to get this:
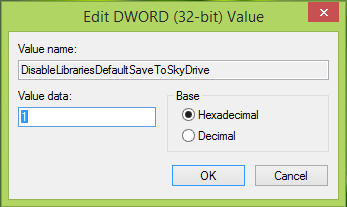
4. In the above-shown box, input the Value data as 1. Click OK. Finally, close the Registry Editor and reboot the machine to observe changes.
Your Windows will now store or save documents locally on your hard drive, instead of saving them to OneDrive.
Now read: What are these Brown Box Icons in left bottom corner of my files?
Too complex. Go charms – change pc settings – select one drive – change storage optuon
I agree with AGR. I use a local account instead of OneDrive. Microsoft scans everything on your drive and reports the findings to the NSA.
Is the Registry string the same for both One Drive and Sky Drive? i.e. “DisableLibrariesDefaultToSkyDrive”. If you’re going to put a Tweak out there you really should take a couple seconds more to say “For those of you wondering, the String Name is the same for both One Drive and Sky Drive. It eliminates doubt. Especially when people post incorrect data all the time. Measure Twice, Cut Once.
Win 8.1 Update. Using the Registry method above, my PC does not have the Onedrive or Skydrive folder under windows Can I just add this folder and how ??
When I went to do this – I said was already off. Considering I am dealing with confidential information, I only want these documents to be save on my hidden hard drive.
Yes, you can!!! I did it, and after HOURS of frustration, error messages, googling, and so on, OneDrive finally acts as it did before. I made both the registry “folders” (keys) and the mentioned DWORD in both of them. I know you don’t have any use for this answer, but others may, that’s why I am replying here. I was completely frustrated, and don;t understand why, after two years of normal behaviour, OneDrive suddenly decided to ignore my “All files local” settings. I tried SO MANY “solutions”, but this was the one that did it!
THANK YOU to the author of this article and I hope my comment will convince others with the same problem to try it.
My default file location is the 320gb internal hd. I want to change it to the 1tb that I just put in. How am I going to do that. Need help guys! I’m new with Windows 8.1. Thanks!
How do I delete a file I do not want stored in the cloud? I had no idea it was automatically storing personal financial information “out there,” something I would never choose to do. Now its there and there doesn’t seem to be a delete mechanism. I have turned off the auto function via charms. Much easier than the description above. But what about the horrid mistake of inadvertently saving personal data where I don’t want it??????????????????????????????????
I followed the directions exactly and rebooted and it’s still saving in the One Drive by default.
What a convoluted route.
For Windows 10 go to Settings > System > Storage >”New documents will save to:” > [choose location]
It stille tries to save on Onedrive
THis does not work, One drive is not listed in registry
where you said under policies
Mine just reverts right back to One drive!!!
Same here Win10
Tried this and it just reverts right back to OneDrive!
It happened to me only after a big update, when Windows has to reset some settings (probably most of them) to defaults. Other than that it never “just happened”.
I did exactly as directed. No only does it not work, it now puts One Drive in my “local” documents. And I don’t go back and undo! As I have said many times since I downloaded Windows 10 a year ago, I am sick and tired of the problems 10 has caused me. And they are many. They don’t stop. Every time there is a 10 update, it screws up something else.
Far, far too complicated for an ordinary human being who just wants to USE a computer not make it a lifelong quest. Nerds and geeks love Win 10 because of the hours of fun they can have getting it right instead of interacting with the rest of human society!!!
Kapil, I’m also an Electrical Engineer and have been working on computers for 50 years. In all those years NO ONE has asked me to make their computer or their IT infrastructure MORE COMPLICATED! You’ve posted this “so-called” solution in the most complicated manner possible. AND more importantly, it doesn’t work! Please reconsider or remove your post until you have a concrete solution!