EasyBCD is a robust tool for modifying the Windows bootloader. It is incredibly useful and gives you unrivaled customization capabilities over one of the most delicate programs on your Windows 11/10 computer.
This tool can give you too much power over your bootloader, so you need some guidance for using it. This post will offer this guidance and show you how to configure your bootloader and how to modify your boot settings in Windows.
How to modify Boot settings & configure Bootloader
You can do a lot with EasyBCD to change the look and behavior of your computer’s bootloader. In this guide, we’ll only explore the following operations:
- View the bootloader entries.
- Add a new bootloader entry.
- Change the default bootloader entry.
- Modify the boot menu options.
- Reorder boot menu entries.
Without further ado, let’s get right into the steps for performing the above operations using EasyBCD.
1] View the bootloader entries

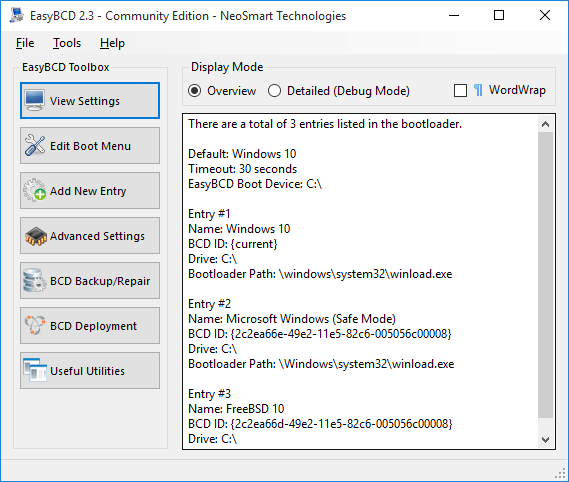
Bootloader entries are the operating systems you are asked to choose when your computer boots. To check your existing bootloader entries, open EasyBCD and select the View Settings button on the left.
By default, the Display Mode is set to Overview. This displays only the basic details about the entries. For more detailed information on your entries, choose the Detailed (Debug Mode).
2] Add a new bootloader entry
To add a new bootloader entry, click on the Add New Entry button on the sidebar. Next, you can either select the NeoGrub option for the customer NeoGrub bootloader or choose an operating system family – Windows, Mac, or Linux.
Click on Windows in the Operating Systems section to add an entry. Specify the Windows version from the Type dropdown menu, give it a custom name, drive letter, and hit the Add Entry button.
3] Change the default boot entry

If you configure EasyBCD with multiple entries, you will see a menu whenever you start up your computer. This menu is where you select what you wish to boot into.
To set your machine to boot into the default operating system, you can select the Skip the boot menu or Count down from… options. The skip boot menu option enabled your computer to bypass the boot menu and select the default entry.
This option is useful when you are sure of the OS you want to boot into. However, if you want the system to give you some time to select an entry before deciding the default OS, select the Count down from… option and set your preferred waiting time in seconds. Once this time elapses, your system boots you into the default entry automatically.
If you select the Wait for user selection option, the bootloader will give you all the time in the world to make a selection before starting up your system. There’s no default entry for this option.
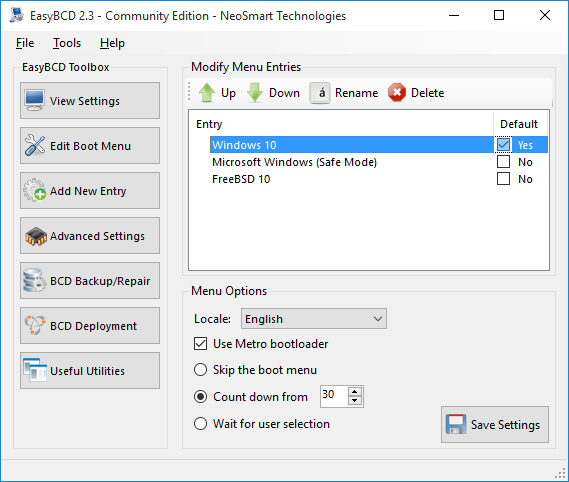
You will find these options for configuring EasyBCD’s default entry from the Edit Boot Menu page.
Setting the default entry is a breeze with EasyBCD. On this screen, click on your preferred entry and mark the Default checkbox. On doing this, you’ll notice the text go from No to Yes, while the other entries become No because you can only have one default entry.
4] Modify the boot menu options

Changing the menu options also happens on the Edit Boot Menu screen of EasyBCD. This page contains loads of settings to modify the menu options in whatever way you like.
Here, you can change the default language from the dropdown menu beside Locale.
Users with computers running on Windows versions earlier than Windows 8 would love the Use Metro bootloader option.
It transforms the bootloader from the boring black-and-white screen to the graphical bootloader used in recent Windows editions.
5] Reorder boot menu entries
When you’re powering up your computer and are at the bootloader, it’s natural that you’d want your preferred OS to be at the top. You may wish to reorder the boot menu entries for this or any other reason.
Again, you start from the Edit Boot Menu page of EasyBCD. In the Entry field, click on an operating system and then hit the Up or Down buttons to rearrange the entry.
The above operations make changes to your bootloader. So, you must ensure that you follow the guide closely. If you don’t, you risk running into severe problems on your machine.
To download the free, personal, non-commercial version of EasyBCD, you will have to register here on neosmart.com.
TIP: Also take a look at Advanced Visual BCD Editor & Boot Repair Tool for Windows.