Digital technology has a vital role to play in expanding business networks. It offers many innovative solutions that simplify the task of organizing your business. Handling scheduling for new customers or additional appointments is one such task and Microsoft Bookings manages this pretty easily, without hassles.
The mobile version of Microsoft Bookings enables a user to view his calendar and manage bookings or customer lists. If you’re new to Bookings and haven’t yet set it up, check our post first.
Manage Bookings from iOS mobile device
Download the Microsoft Bookings app from your app store, and sign in with your Office 365 account. Currently, the app is available for iOS only and the service is available to users with the Office 365 Business Premium license.

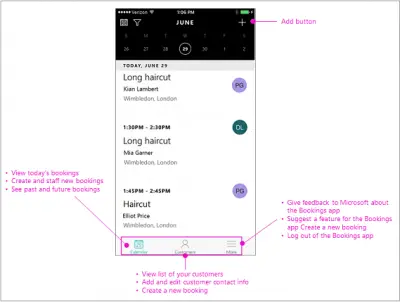
Once done, select a bookings calendar. By default, the app opens with today’s calendar so you have before you the complete schedule of the day including, customers, services, and staff are scheduled for the day.
Now, for adding a customer, go to the navigation bar, tap Customers.
Tap ‘Plus’ sign to add a new customer and then hit, ‘Create a new customer’ tab.
Thereafter, type the customer name, email address, phone number, and address. Finally, Tap Save.
To create a booking, tap Calendar followed by a click on ‘add’ button.
Select the service you want to provide in this booking. Please note that you cannot create new services in the mobile app. Microsoft Bookings uses the same list you first defined in the web version of the app.
When you land on the New Booking page, select one from the list. If this is a new customer, tap ‘Create a new customer’ and fill in the customer details. Once done, tap Staff to assign staff to this booking, select a staff member and hit the ‘Done’ button.
Now, check if the booking start and end times are correct.
When done, chose ‘Save’ option. The action when confirmed, will send an email notification to the customer and staff member. The booking will be listed on the calendar for the scheduled day.
At any moment, if you would like to change the booking date and time, do the following.
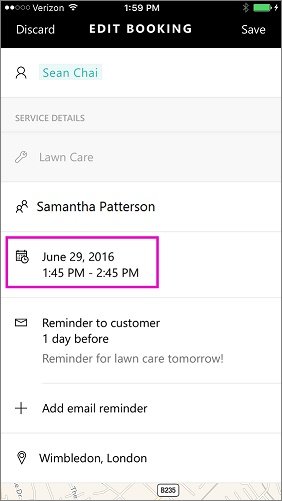
Tap Calendar and chose the add button. Next, tap the booking you want to cancel > Edit. On the Edit Booking page, tap the date and time.

Select new start and end times. Once you complete the process you will also need to change the staff member since the original one will not be available at the new time.
Once complete, select ‘Done’ and hit Save button. An email notification will be sent to the customer and staff member. The booking will be listed on the calendar for the scheduled day.
Read: How to enter Business Information in Microsoft Bookings Business Page
Does Microsoft Bookings have an app?
Yes, Microsoft Bookings is available for Android and iOS. You can download the Android app from play.google.com and the iOS app from apps.apple.com. If you want to install it on Android mobile, ensure that you have Android 4.4 or later versions. On the other hand, iOS 12.1 or later version is required to install on iPhone.
How do I access MS Bookings?
There are two ways to access Microsoft Bookings. You can use mobile apps or the website. Either way, you have the same options so that the user experience remains the same across all platforms. That said, you won’t have any problem if you move from mobile app to website and vice versa.
That’s all! Hope this guide helped.
Leave a Reply