This post will show you how to view, set up, remove, limit, monitor, check, edit and manage the Data Usage Limit on Windows 11/10. This can be useful if your laptop is using too much data.
Monitoring your data usage consumption is extremely important, especially if you have a limited connection or an FUP, after which the ISP will throttle the data speed. Windows 11/10 hasn’t exactly been frugal when it comes to data consumption. In fact, in some instances, it has completely eaten up my monthly data quota.
Windows 11/10 features an easy way to monitor and control data usage. If you do not have an unlimited data package or plan to monitor the amount of data a computer consumes, this feature comes in handy. This feature is handy for monitoring kids’ PCs in terms of data usage since Microsoft Family doesn’t say anything about it.
If you open the Task Manager, you will be able to see some details under the Network & Metered network columns. Clicking on the Delete usage history will clear the numbers.
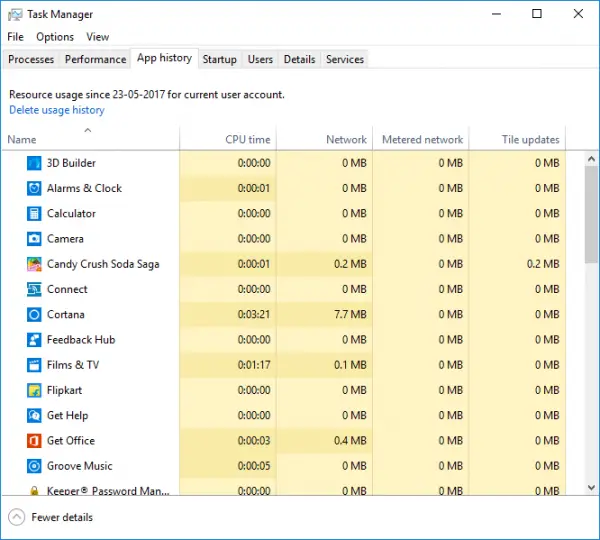
Now, I am not talking about using some third-party app; instead, it is Windows’s very own data monitoring system that displays how much data is sent and received by every app in a given month. You can do all of this by using your network usage monitor, which is present in the Settings app and the Task Manager.
Manage Data Usage Limit on Windows 11/10
Data usage tracking is not new in Windows. In some ways, it has taken a step back, but its new features are useful in terms of usage. When you open Network and Internet settings, data usage details are upfront for the connected network. It represents 30 days of usage and clearly conveys that if you are on a limited network, you can manage it by following the data usage button.
Data usage was earlier available as one of the sections under Network and Internet, which is merged with the status section. The only advantage I can see is that it makes it clear upfront. It is beneficial for many countries where data still doesn’t come cheap.
How to view data usage on Windows 11
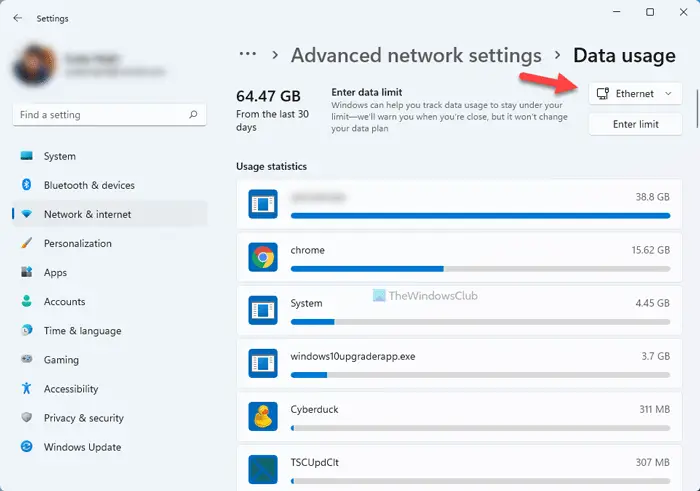
To view data usage on Windows 11, follow these steps:
- Press Win+I to open Windows Settings.
- Click on the Network & internet option on the left side.
- Click on the Advanced network settings.
- Click the Data usage option under More settings.
Read: How to control Bandwidth in Router
How to set up data usage limit on Windows 11
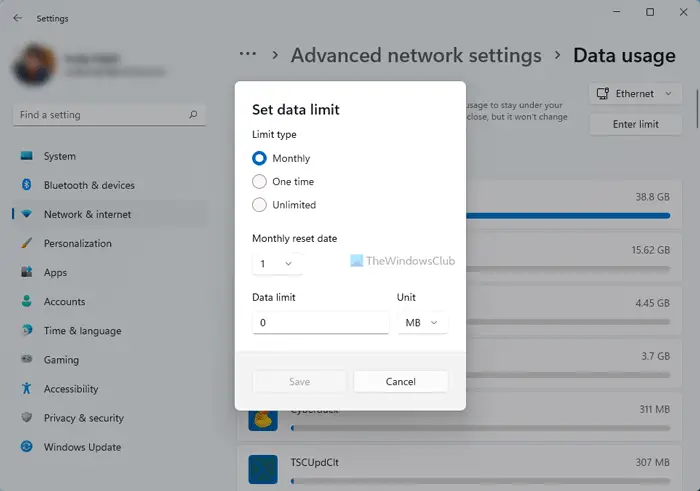
To set up data usage limit on Windows 11, follow these steps:
- Open Windows Settings.
- Go to Network & internet tab.
- Click on the Advanced network settings option.
- Select the Data usage option.
- Choose a network.
- Click the Enter limit button.
- Choose Limit type (Monthly, One time, Unlimited), Monthly reset date, data limit, etc.
- Click the Save button.
How to monitor Data Usage in Windows 11
Right-click the Windows button on the Taskbar and select Settings from the list of options. Alternatively, you can press Win+I in combination to go to the settings directly.
Select Network & Internet from the side panel on the left.
Then, move to the right pane and scroll down to the Advanced network settings tile.
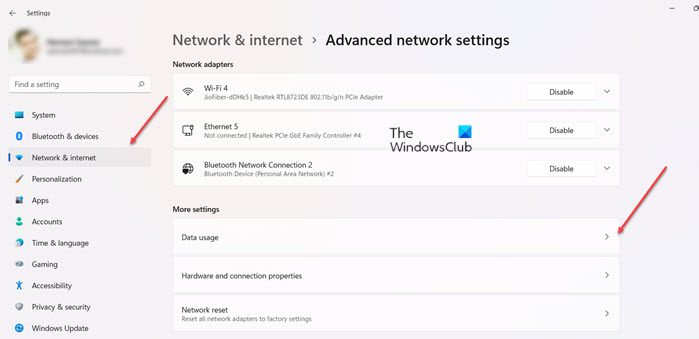
When directed to a new screen, go to the More settings heading. Under it, expand Data usage entry.
Here, you can see the cumulative usage for the entire month.
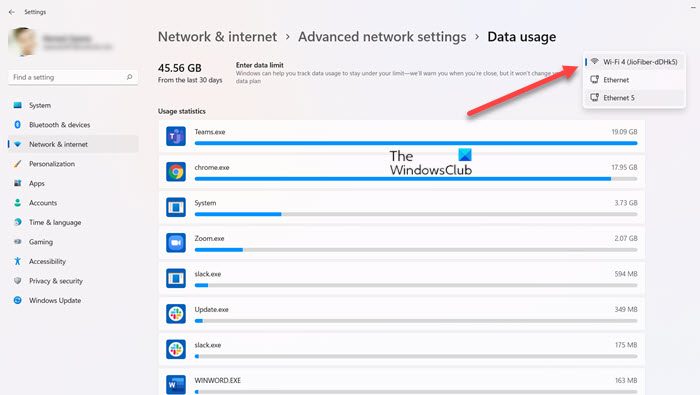
To check usage from WiFi, Ethernet, or any other kind of network, click the drop-down button next to your network name.
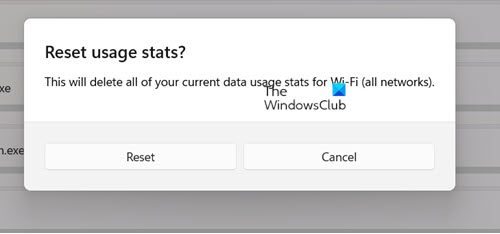
In Windows 10, there wasn’t an option to reset the graph. This limitation has been removed in Windows 11. At the bottom of the screen, you’ll find an option to reset the statistics. However, it will delete all your current data usage stats for Wi-Fi, including all networks.
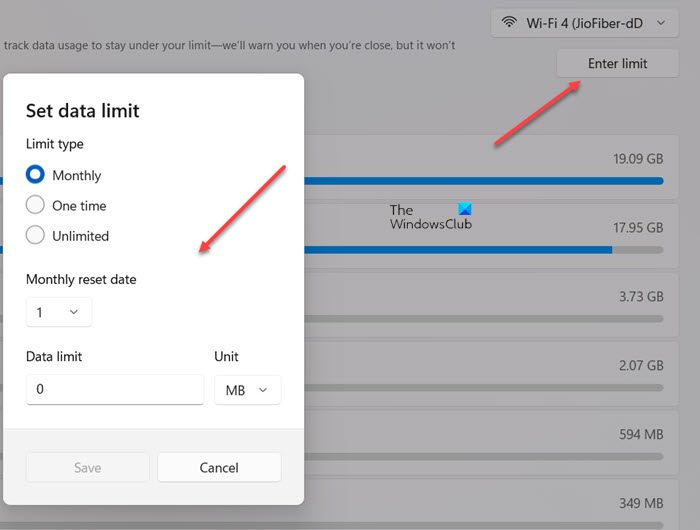
Also, you can configure the data limit in MB or GB units. Simply hit the Enter limit button and set the options as desired.
How to view data usage on Windows 10
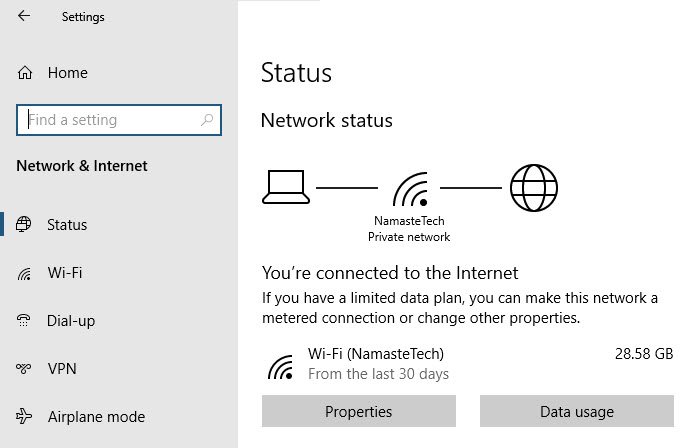
Windows 10 monitors network traffic on all the adapters connected to Windows 10 PC. If you have both ethernet and wifi adapters, you can view data usage on a per adapter basis. The data usage that is shown upfront is one with which you are connected at that moment.
- Open Settings ( Win + I)
- Navigate to Network & Internet > Status
- The amount of data used on the connected network is displayed above the Data Usage button. Click on the button.
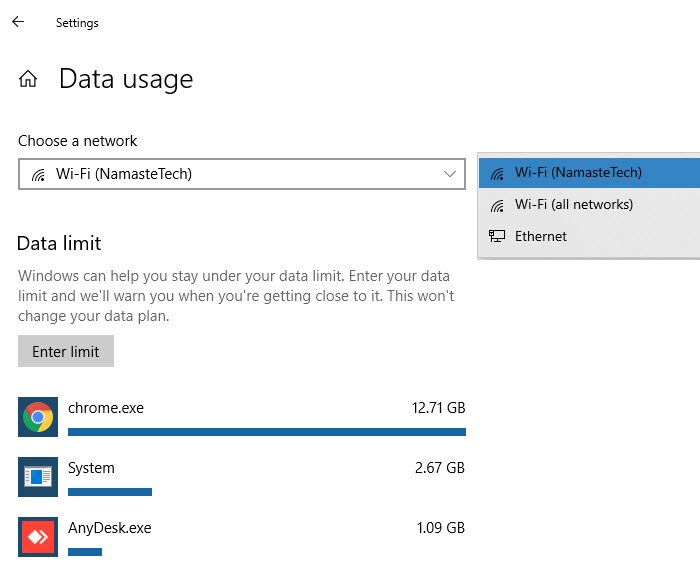
- It will open the Data Usage section where you can select the network from the drop-down menu.
- Once selected, it will show details of per-app data usage, and the option to configure the data limit for that network.
How to set up data usage limit on Windows 10
- Open Settings, and navigate to Network and Internet > Status
- Click on the Data Usage button, and then select the network from the drop-down menu.
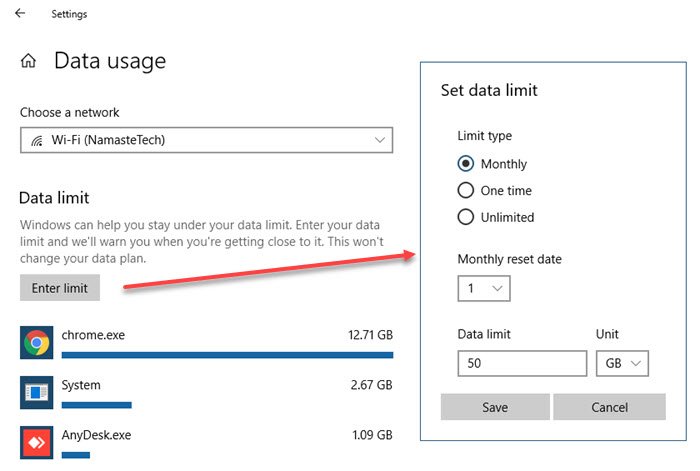
- Then press the Enter Limit button.
- It will open a pop-up window where you can set the limiting factors:
- Limit Type: Monthly, One Time, Unlimited
- Monthly reset date: Make sure to match it with the billing cycle
- Data Limit in terms of GB or MB
- Click the save button, and ti will refresh to display the following information.
- Time left until reset with the exact date.
- Data used
- Data Remaining.
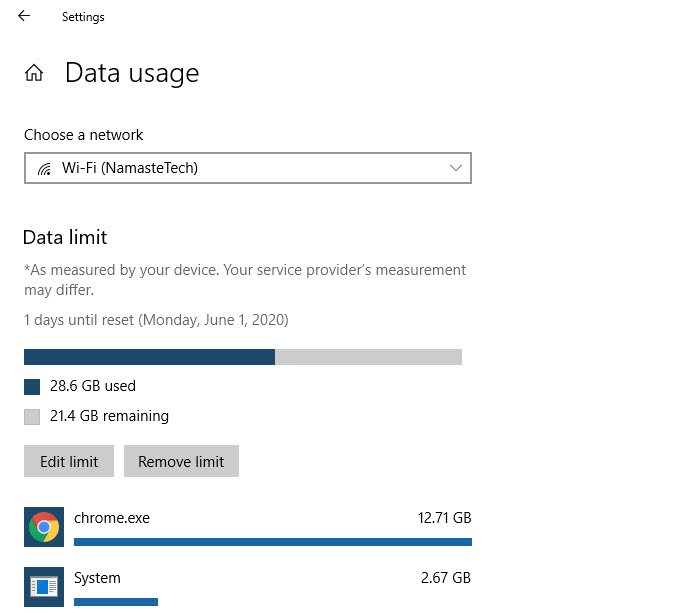
It is interesting to note that data was always monitored, and only when you enable the option, it is shown differently. Do note that the data is only calculated for this device. Most of the homes have a setup router, and if you want to tally it with ISP stats, it is better to look at data logged in the router. This setting is only to understand the data usage of the computer and on a per-application basis.
How to monitor Data Usage in Windows 10
Open the Settings app from Start Menu. Select Network & Internet. Select Data Usage, and here you can see the cumulative usage for the entire month.
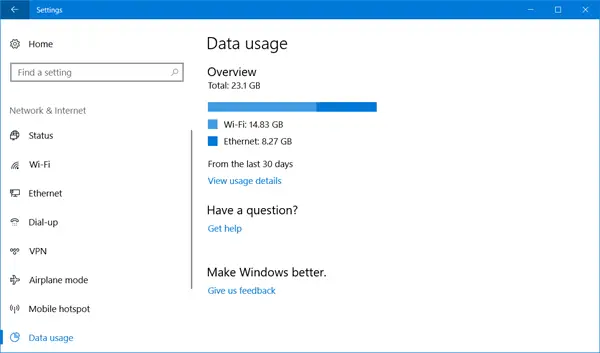
Click on the “Usage details, ” and a new window with application wise data usage will open. You can see usage from WiFi, Ethernet or any other kind of network.
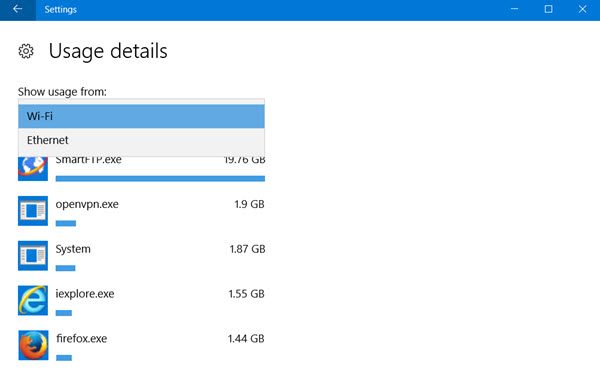
The only limitation is that the Usage details shows the cumulative data and doesn’t segregate the data from networked usage or data consumed for an update. Also, you won’t be able to reset the graph and the same will automatically get reset only after the end of the month.The plus point, however, is that one can monitor data from both traditional applications and also UWP apps.
Conserve 3G & LTE Data Usage on Windows PC
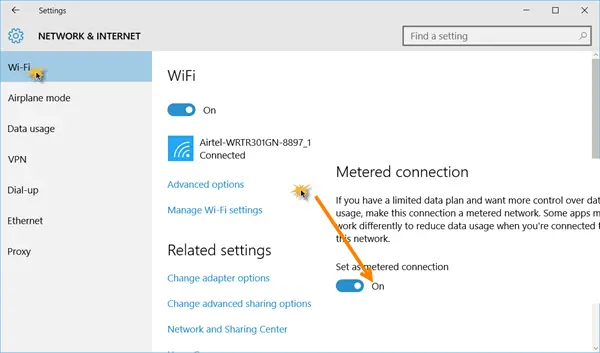
If you’re running on an LTE or 3G network, we recommend turning on Metered Connection. This can be done by launching the Settings app, then going to Network & Internet > Wi-Fi > Advanced Options > Set as metered connection. Just toggle the switch it from Off to On position, and you should be good to go.
Metered connection limits the number of apps that connect to the Internet. This works really well, so expect to save a few MBs throughout the day.
If you’re interested in knowing the amount of data you’re using, track back to the Wi-Fi section in the Settings app and click on “Data usage.” This section should give an overview of the amount of data used in a 30-day period.
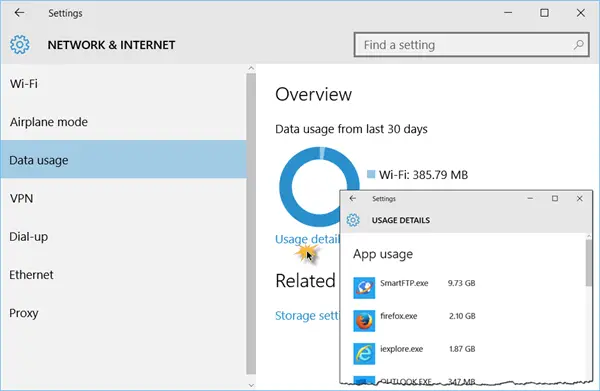
Click on Usage details from the Data Usage section. Once everything has done loading, all Internet-related software and apps will be listed and show the amount of data used.
TIP: These Free Bandwidth Monitoring Tools may also interest some of you.
Set up a metered connections for restricted data usage
This feature has been a lifesaver for me as I don’t prefer automatic updates since they eat up my LTE data when I am not using Wi-Fi. Well if you are using a smartphone and tethering the internet you can either set the connection as metered in the smartphone or you can simply manage all the connections on the Windows machine.
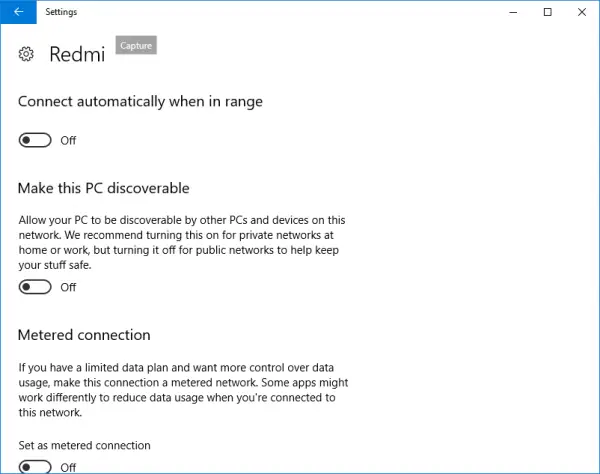
In order to set a connection as metered go to Settings > Network & Internet > Wi-Fi and then click on the “Advanced options” on the bottom of the Wi-Fi networks. Once you are in the advanced menu, you will have an option to “Set as metered connection.” The metered connection can always be toggled off.
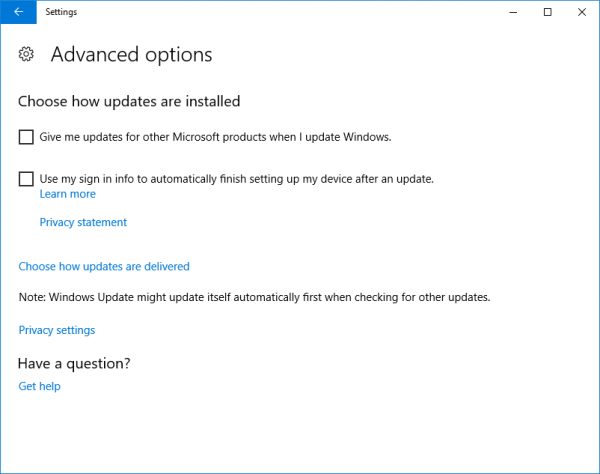
Also if you are worried about the way Windows Updates hogging your data and increasing data usage go to Windows Update in the Settings and then you can always head over to “Configure Automatic Updates” and select “Notify for Download and Notify for Install.” With this Windows will notify you every time there is an update available and you can install using WiFi.
Restrict Data Usage in Windows 11/10
If you want to restrict Data Usage in Windows 11/10 further, here are some other things you could control:
- Configure Windows Update as mentioned above
- Make sure OneDrive syncing is disabled. Better still disable OneDrive and use it only when you need to
- Disable PC Sync your settings. You will find it under Settings > Accounts.
- Turn off Background apps so that they do not consume data in the background
- Turn off Live Tiles by right-clicking on the Live Tiles and selecting Turn live tile off.
- Disable Windows Telemetry. You could use some Windows Privacy Fixer Tools to achieve the same easily.
Windows 11/10 Data Usage FAQ
How to remove the data usage limit in Windows?
Open Settings and go to Network & Internet > Status, and click on the Data Usage button. If you want to remove the data limit for the current network, simply click on the Remove limit button. If it’s for a different adapter you wish to remove, then select it from the drop-down menu, and select it. Then, remove the limit.
Post this; no warning will be displayed about data usage even though it will be collected in the background if you ever wish to see it.
How to reset data usage on Windows 11/10?
Open Network and Internet settings and click on the Data Usage button. Select the network adaptor of which you want to reset the limit. Scroll to the end of the page, and click on Reset usage stats. The button has been oddly placed at the bottom. Once you do that, the calculation of data usage will start again. There is no way to disable this feature as of now.
How to view remaining data?
Under Network & Internet > Status, click on Data Usage, and then select the adaptor for which you want to view the remaining data. If you have set up the Data Limit earlier, you should see a progress bar, which indicates how much of the data limit has been consumed. Under that, you have exact details of the consumed data and the remaining data. There is no way to set or view the data limit of individual applications.
How to edit data usage for a network?
Go to Settings > Network and Internet > Status. Click on the Data usage button, and then click on the Edit limit button. Now you can change the data usage settings in terms of limit type, monthly reset, and data limit. Do note it will change accordingly, and will not reset the already collected data.
What consumes data on PC?
Web browsers and the other apps you use make up most of the data. Fortunately, in Windows 11 you can limit this by configuring desired options under Data Usage statistics. You can also make the apps not automatically download updates for your installed games.
Does Windows keep track of data usage?
Yes! you can monitor data usage for specific apps through the Windows Task Manager. Just open the Task Manager and go to the App history tab. There, you’ll see a list of your applications along with several columns.
I hope you like the new feature of data usage in Windows 11/10. Earlier, there was a dedicated section of data usage in the Network and Usage section. It offered a dashboard and a centric approach to data usage management. But now Microsoft has decided to change things.
Leave a Reply