Files and folders start taking space on your hard drive with time. If you do not organize your files and folders correctly on your Windows 11/10 computer, things will start messing up and you will face difficulties while finding a particular file or folder. This article lists some useful tips and tricks that will help you manage files and folders in Windows 11/10.

Managing Files and Folders in Windows 11/10
We have listed some tips and tricks for managing files and folders in Windows 11/10. If you know them, you will better organize file and folder hierarchy.
- Change the location of user folders
- Pin your files and folders to Quick Access
- Create a folder shortcut
- Show or hide file extensions
- Customize the Send to option
- Password protect your folders
- Apply filters to File Explorer search
- Group your files and folders
- Find and remove duplicate files
- Copy or move files and folders via the File Explorer address bar
Let’s see all these tips and tricks in detail.
1] Change the location of user folders
The easiest way to move folders from one place to another in Windows 11/10 is the cut and paste method. Simply, select the folder that you want to move to another location, press the Ctrl + X keys, go to the location where you want to place the folder, and press the Ctrl + V keys. But you cannot move the user folders simply by using the cut and paste method.
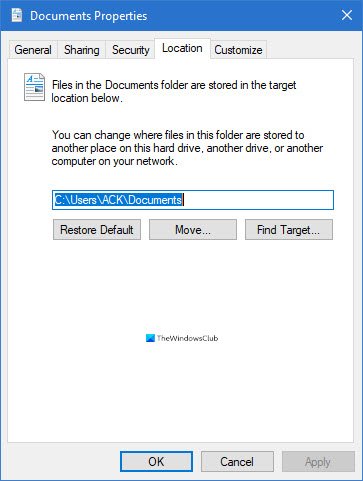
The user folders are the folders that hold the files and folders of a particular user account. These folders include Downloads, Pictures, Documents, Music, and Videos. No user except the administrator can access the files and folders placed inside the user folders in another user account.
By default, the location of the user folders is the C drive. If there are a lot of files and folders in the user folders, it will create a problem for you and slow down your system’s performance. To save space in the C drive, you can change the default save location of the user folders.
Read: How to Select, Copy and Paste, Delete, Rename Multiple Files and Folders
2] Pin your files and folders to Quick Access
There might be some folders that you open frequently on your Windows 11/10 system. You can pin such folders to Quick Access in order to open them quickly. You will find the Quick Access section on the left side of the File Explorer. This section displays the pinned folders as well as the folders that you open frequently.
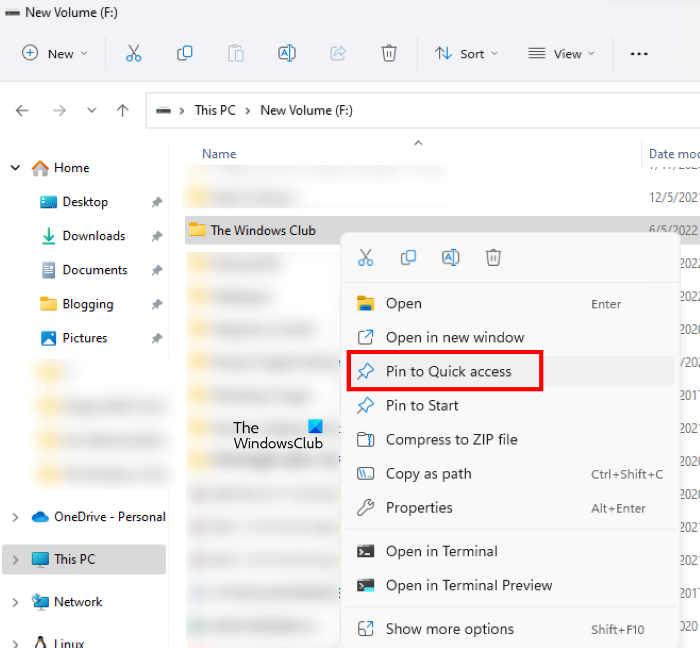
You can customize the Quick Access section by pinning the folders that you open most frequently on your Windows 11/10 device. The following instructions will help you with that:
- Open File Explorer.
- Right-click on the folder that you want to pin to Quick Access and select Pin to Quick Access.
Alternatively, you can also pin a folder to Quick Access by the drag and drop method. To unpin the folder from Quick Access, right-click on it and select the Unpin from Quick Access option.
Read: How to disable Full Row Select in File Explorer
3] Create a folder shortcut
Windows 11/10 also lets you create a shortcut to files and folders. You can use this feature to create shortcuts to the files and folders that you open most frequently. The following steps will guide you on how to create a shortcut to files and folders.
How to create a shortcut for files on Windows 11
Follow the steps below:
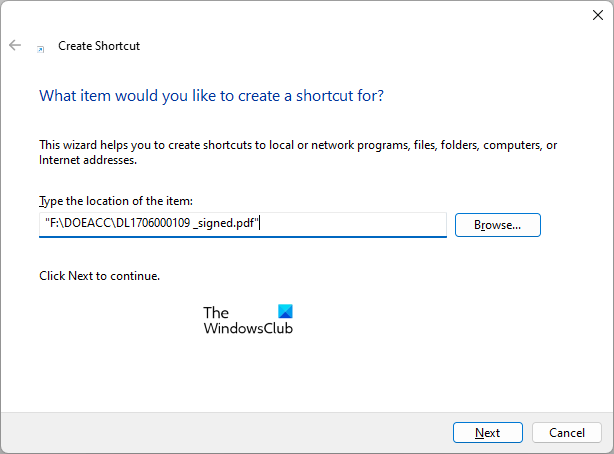
- Right-click in the empty space on your desktop.
- Go to “New > Shortcut.”
- The Create Shortcut window will appear. Now, click on the Browse button and select the file, the shortcut to which you want to create.
- Click Next.
- Give a name to your shortcut and click Finish.
Read: File Explorer Add-ons to improve productivity and file management in Windows 11
How to create a shortcut to folders on Windows 11
Creating a shortcut to a folder in Windows 11/10 is easy. Simply right-click on the folder, the shortcut to which you want to create, and select “Send to > Desktop (create shortcut).” If you are a Windows 11 user, first, select Show more options after right-clicking on a folder, then you will see the Send to option.
Read: How to sort Files by Extension into separate Folder
4] Show or hide file extensions
We keep different files on our Windows 11/10 computer. These files have different extensions. By default, Windows 11/10 does not display the extension of the files. Hence, if you want to view the extension of a particular file, you have to open its properties (right-click on the file and select Properties). After opening the properties, you can see the file extension under the General tab. This can become hectic if you have stored the files with different extensions in the same folder. In such a case, if you want to view the extension of multiple files, you have to open the properties of each of them.

You can make this process simple by switching to the Details view in File Explorer. After switching to the Details view, you will see the file type under the Type column. This will also let you know the file extension. There is one more way by which you can show the file extensions after the name of each file.
Read: How to Find and Replace Text in Multiple Files in Bulk
5] Customize the Send to option
When you connect a pen drive, a hard disk, or another USB storage device to your computer, you can copy the files and folders to the storage device by using the Send to option. This is the easiest method to send your files or folders to the storage device. Windows 11/10 lets you customize the Send to option in the right-click context menu. By doing so, you can add those folders to the Send to option to which you usually copy your files. The steps to do that are as follows:
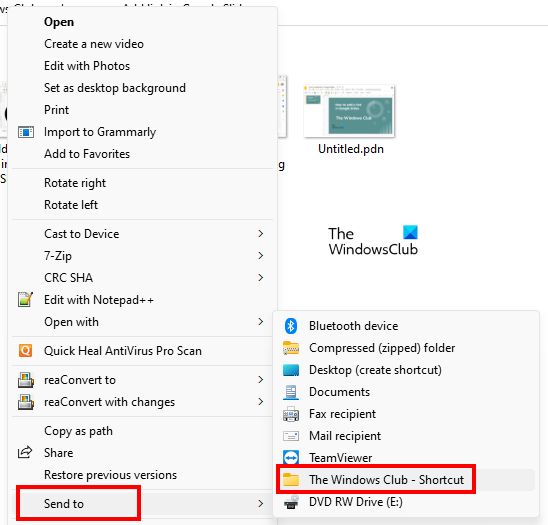
- Create a shortcut to the folder which you want to add to the Send to option in the right-click context menu.
- Press the Win + R keys to open the Run command box.
- Type
shell:sendtoin the Run command box and click OK. This command will open the SendTo folder in File Explorer. - Now, copy the shortcut to the folder that you have just created and paste it into the SendTo folder. After that, you can delete the folder shortcut from your Desktop.
The above steps will add the selected folder to the Send to option in the right-click context menu. Now, you can easily send all the files to the folder by using the Send to option with a single click.
Read:
- How to Merge Folders in Windows
- How to manage Folder Merge Conflict
6] Password protect your folders
If your folder contains sensitive files, you can protect these files by creating a password for that folder. If you want, you can install third-party software for this purpose. But there is also a method that lets you password protect a folder without installing third-party software.
Read: Useful Commands to Manage Files and Folders through CMD.
7] Apply filters to File Explorer search
In File Explorer, you can find specific files inside a particular folder by applying filters to File Explorer search. For example, if a folder contains images of different sizes and different extensions, and you want to find the images with a particular extension or images larger than, less than, or equal to a particular size, you can do so by applying filters to the File Explorer search. We will show you how to do that.
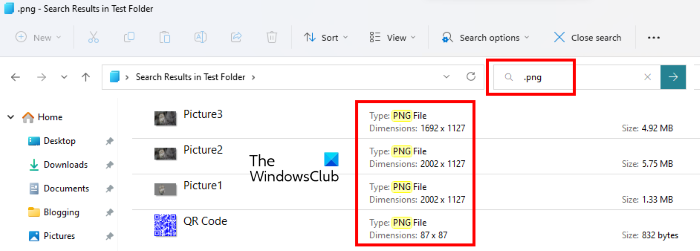
Let’s say, you have kept files with different extensions in a particular folder and you want to move the files with a particular extension, say PNG to another location. You can easily do that by applying the search filter in File Explorer. Open the folder, type .png in the search bar, and hit Enter. After that, File Explorer will show you only the files with the PNG extension. Now, you can copy or move all the files to another location easily.
Let’s take one more example. Suppose you want to find the files with a size equal to, less than, or greater than a particular size, say 100 KB, then you can modify the search by typing the size: keyword. Type the following keywords in the File Explorer search.
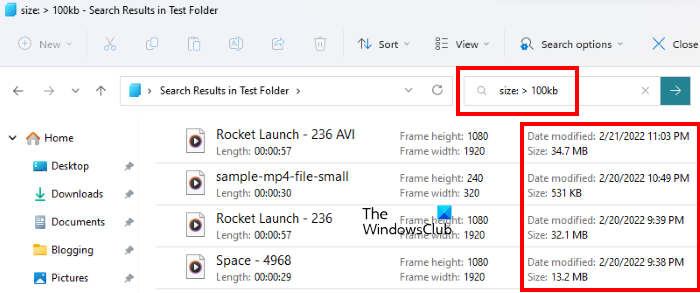
- To find the files with a particular size, say 100 KB, type size: 100 kb, and hit Enter.
- To find the files with a size greater than a particular size, say 100 KB, type size: > 100 kb, and hit Enter.
- To find the files with a size less than a particular size, say 100 KB, type size: < 100 kb, and hit Enter.
Read: Reopen recently closed folders, files, programs and windows
8] Group your files and folders
Windows 11/10 File Explorer also has a feature to group files in a particular folder. Using this feature, you can better manage and organize your files. You can sort files and folders in a particular folder by name, date modified, type, size, date created, authors, tags, etc.
Read: Manage Files and Images like a Pro with PowerToys
How to group files and folders in Windows 11
The following steps will help you use the Group by feature in Windows 11:
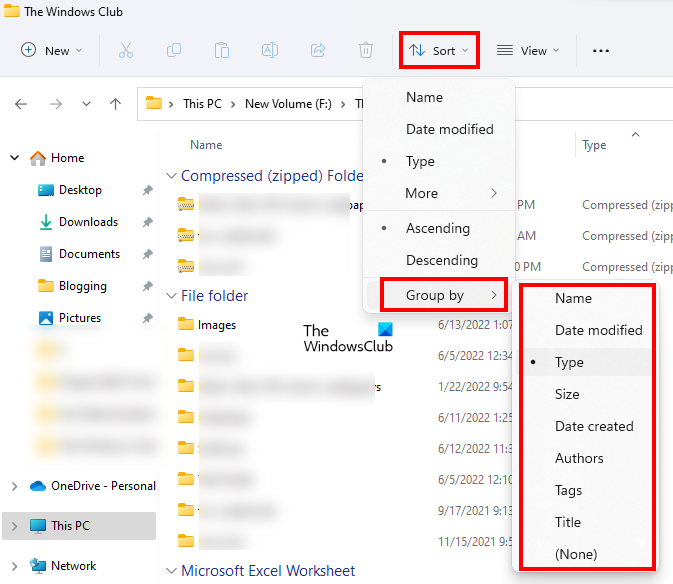
- Open File Explorer.
- Go to “Sort > Group by” and select the desired option.
How to group files and folders in Windows 10
the following steps will help you group files and folders in Windows 10:
- Open File Explorer.
- Click on the View tab.
- Now, click on the Group by drop-down and select the desired option.
Read: How to open Files or Folders automatically when Windows starts.
9] Find and remove duplicate files
If multiple copies of the same file exist on your computer, it will not only take up the disk space but also create a problem for you as the changes won’t sync among all of them. To deal with this problem, you can install some free software or tools to find and remove duplicate files.
Read: How to create a folder name starting with Dot
10] Copy or move files and folders via the File Explorer address bar
You can move or copy the files and folders in File Explorer without opening the targeted folder. This trick works only if you want to move or copy the files or folder from a sub-folder to the parent folder or any of the upper folders. Follow the steps below:
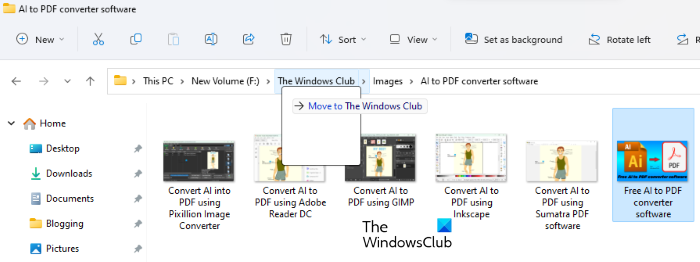
- Open the folder from which you move or copy the files to the parent folder.
- Select the files or folders inside it.
- Drag all of them to the address bar of the File Explorer that indicates the parent folder name or the name of any of the upper folders.
- Release the left click of your mouse. This action will move the selected files or folders to the targeted folder without opening the targeted folder. If you want to copy the files and folders to the parent folder, press and hold the Ctrl key while using the drag and drop method.
Read: How to sort Files by Extension into separate Folders in Windows
Is there a File Explorer on Windows 11?
The File Explorer in Windows 11 is redesigned to give it a new interface. It also has some additional features that the File Explorer of Windows 10 does not have. If you are new to Windows 11, you should know some File Explorer Tips and Tricks for Windows 11 and Windows 10 that will help you use it like a pro.
How do I manage files and folders in Windows 11?
Read: How to sort Folders by Size or Month in Windows
There are some useful tips and tricks that you should know to manage files and folders on Windows 11/10 easily. If the user folders contain a lot of data on your computer, it will take space on your C drive. This will also impact your system’s performance. If you know how to change the default location of these user folders, you can save space on your C drive.
You can group files and folders inside a particular folder and arrange them by date, name, type, size, etc. Apart from that, you can also display the file extensions. Doing so, you will better manage your files on Windows 11/10. This trick is helpful if you want to move or copy the files of a particular extension to another location on your PC.
Leave a Reply