In this article, we will be showing you the two ways in which you can manually create a Crash Dump file in Windows 11/10. Also known as a Memory dump file or a Windows dump file, a crash dump file holds details concerning a specific application or process crash in Windows.
What is a Crash Dump file?
Commonly used to analyze and troubleshoot an issue, these Memory dump files hold data on the files and processes that were running during a particular crash and also the Kernel-mode stack that stopped. While, for the most part, your computer creates these files on its own, mostly when there is a complication, there may arise a need for you to create them manually sometimes too. The most common scenario would be when an app is not responding on your computer, and you have to send details of its malfunctioning to technical support to resolve the issue.
Broadly speaking, there are three different types of crash dump files, even though all of them serve the same purpose. Dump files are categorized based on their file size and the information they hold. A complete memory dump has the biggest stack of information. It’s the biggest dump file that a system can support, with its size as big as your computer’s RAM. Kernel Memory dump files are smaller, making them easier to transfer around. The third and final type is a small memory dump file, which contains only the most basic information and is normally only 256KB in size.
How to manually create a Crash Dump file in Windows 11/10?
As mentioned earlier, there are two ways in which you can create a crash dump file. One via the Task Manager, and the other using your Command Prompt.
1] Create Crash Dump files using Task Manager
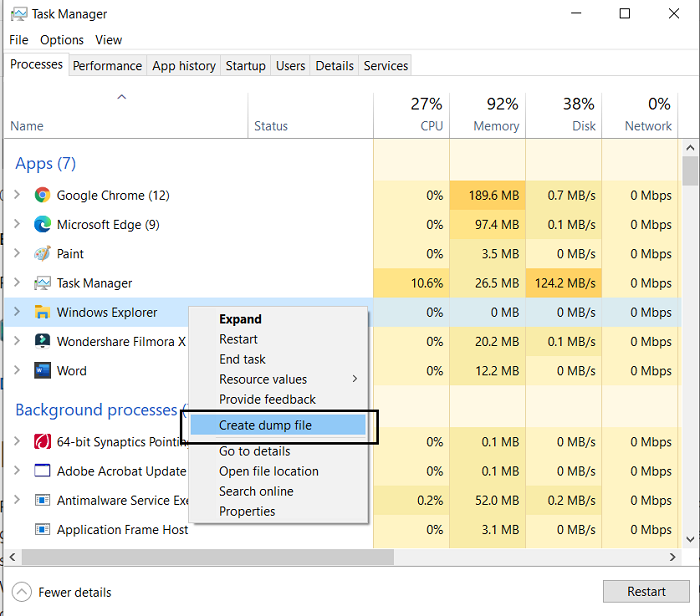
First things first, open the Task Manager. The simplest way to do it is by clicking on the Taskbar and selecting Task Manager from the context menu. Click on the Processes tab and right-click the app that you want to create the file for. From the list of options that appear, select Create dump file.

Wait for some time till the process is finished. Once you’re notified that the file has been created, click on Open File location. If you don’t want it to stay where it’s been located by default, you can copy the .dmp file and paste it in the location of your choice.
TIP: You can configure Windows to create Crash Dump Files on Blue Screen.
2] Create Crash Dump files using Command Prompt
For this, you’re going to have to download ProcDump. It’s a command-line utility that helps users in keeping an application’s CPU spikes in check. It also does the job of generating crash dumps during said spikes. This tool can be used alongside the command prompt to create crash dump files. Here’s how.
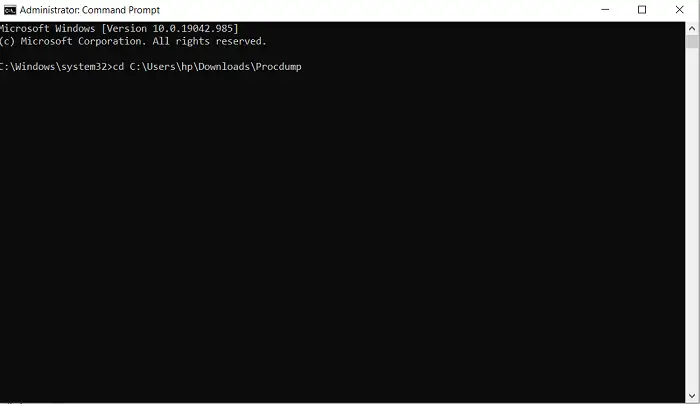
Firstly, download ProcDump from the Windows SysInternals website. The file is in a .zip format, so you will have to extract it. Upon downloading and installing, search for Command Prompt and open to run it as administrator.
Type the following command line to open the Procdump folder and press enter.
cd C:\Path\Procdump
You can get the path to the ProcDump app by right-clicking on the app icon and opening its properties.

After that, in order to create a dump file, paste the following command line.
procdump APP-NAME
For example, if you want to create a dump file for File Explorer, then the command line would be:
procdump explorer
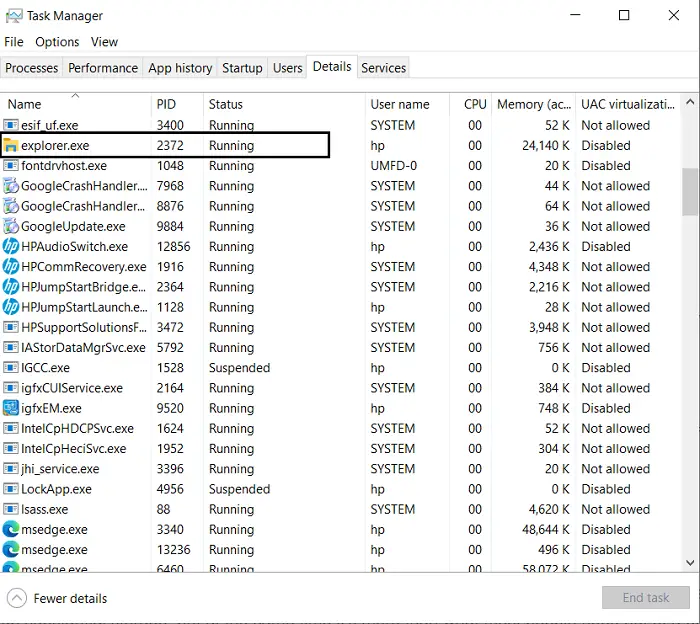
This is going to create a mini-dump file for your file explorer. A similar command line can be used for the creation of a dump file by replacing the app name with the Process ID. So, an alternate command line would be
procdump PROCESS-ID
You can easily find the process ID of any particular application by opening Task Manager and visiting the Details tab. Here, you’ll find all the processes running on your PC and their respective PID next to them.

If you want to create a full-size dump file for an application or process, you can make use of the following command.
procdump -ma APP NAME/PROCESS ID
Here too, both the executable name of the program or its process ID will work. As mentioned earlier, a complete dump file stores all the memory information about the app and takes up substantial storage, but at the same time, it’s more than what most people need out of a dump file.
TIPS:
- You can create Live Kernel Memory Dump File using Task Manager
- You can change the number of Memory Dump Files that are created.
Once done, you will find your manually created dump files housed in the same folder as all the other ProcDump files. Here is the link to download the .zip file for ProcDump from Microsoft.com.
We hope that this post was able to bring some clarity about what crash dump files are, why you may need them, and how they can be manually created if need be.
Related reads: