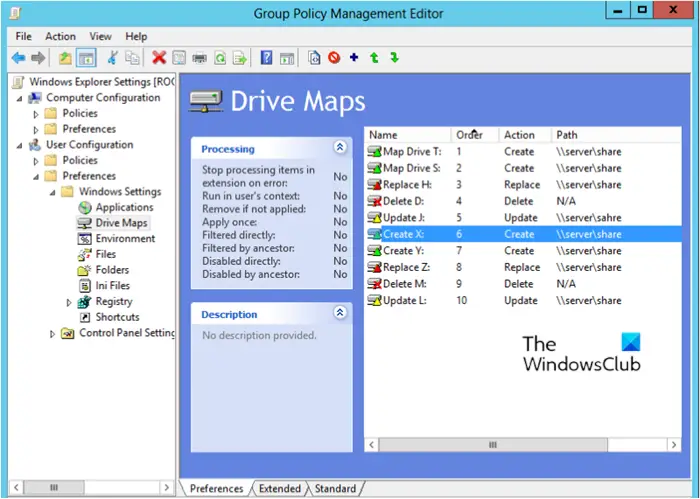
Mapping network drives using Group Policy preferences is flexible, provides easy control over who receives the drive mappings, and has easy-to-use user interfaces, all of which are in stark contrast with the complexities associated with batch scripts, which were traditionally used to map network drives in Windows. In this post, we will show you how to map a Drive using Group Policy Preferences on Windows 11/10.

Group Policy preferences are a set of extensions that increase the functionality of Group Policy Objects (GPOs). Administrators can use them to deploy and manage applications on client computers with configurations targeted to specific users. The Drive Maps policy in Group Policy preferences allows an administrator to manage drive letter mappings to network shares.
Map a Network Drive using Group Policy Preferences
To map a Network Drive using Group Policy Preferences, follow these steps:
Open the Group Policy Management Console. Right-click the domain or the required subfolder to create a new GPO, or select an existing one. On the GPO, right-click and select Edit to open the Group Policy Management Editor.
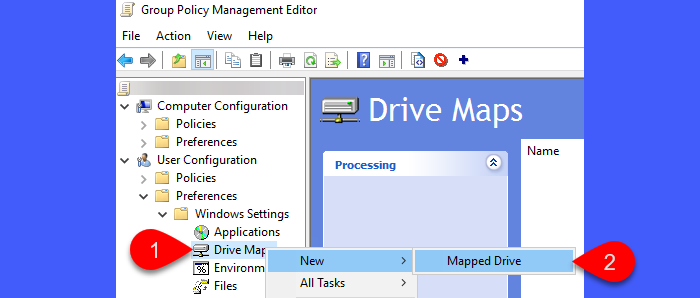
Go to User Configuration > Preferences > Windows Settings > Drive Maps. Right-click Drive Maps and select New > Mapped Drive. This will open a new window where you can configure the mapped drive.

Configure the Mapped Drive
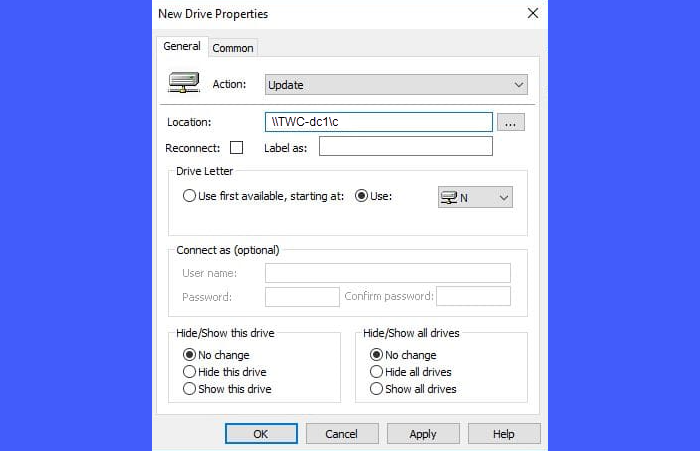
Under the General tab, configure the following parameters accordingly:
- Action: Select Create or Update.
- Location: Specify the full file path, e.g. \\TWC-dc1\c.
- Reconnect: Enable this to auto-connect the drive.
- Label as: Pick a suitable name for the shared drive, e.g. SharedDrive.
- Drive Letter: Select a suitable letter for the drive.
- Connect as: Enter a username and password if you want users to connect with certain credentials other than their own Windows login credentials.
- Hide/Show this drive: Select whether you want to hide the folder or make it visible on the network.
- Hide/Show all drives: Select whether, by default, all the shared drives/folders are hidden or visible.

Under the Common tab, configure the following parameters:
- Run in logged-on users’s security context: Select this option to create the mapped drive using the permissions and security context of the user currently logged in to the computer.
- Item-level Targeting: Specify conditions for when this drive mapping should apply (optional).
Click Apply > OK when done with setting the parameters and close the Group Policy Management Editor.
For the settings to take effect, reboot the PC receiving the drive mapping or open Command Prompt, type the command below, and hit Enter.
gpupdate /force
Once the Group Policy settings have taken effect on the desired users/computers, the mapped drives should automatically appear under Network Location(s) in File Explorer.

Now when the users log on, the drives will be effortlessly mapped.
That’s it!
Read: How to clear Mapped Network Drive Cache.
How do I map a drive in Windows 11?
You can map a drive in Windows 11 using File Explorer. Click the File Explorer icon in the taskbar area or press the Win + E keys together. Click the This PC option in the left pane of the File Explorer. Then click the three-dots icon in the top ribbon area and select Map network drive from the available menu. In the Map Network Drive dialogue, specify the drive letter for the connection and the folder that you want to connect to. Select the Reconnect at sign-in option if you wish the mapped drive to be available every time you sign in to your computer. Click Finish to map the drive.
How do I access Group Policy preferences?
To access Group Policy preferences in Windows 11 (Pro, Enterprise, or Education edition), press Win+R and type gpedit.msc in the Run dialogue. Press Enter to open the Local Group Policy Editor. Within the editor, navigate to User Configuration > Preferences. Within the Preferences section, you will find categories such as Windows Settings and Control Panel Settings. These categories allow you to configure various settings related to user environments, system configurations, and other aspects of Windows behavior.
Read Next: How to remove Map Network Drive and Disconnect Network Drive options from This PC.
Leave a Reply