OneDrive has become an indispensable tool in Windows 11/10. It comes deeply integrated with all the versions of the OS. It just requires you to sign in with your Microsoft Account to be able to browse your OneDrive and keep all of your files and settings in sync. In this post, we will see how you can map your cloud storage as a Drive in File Explorer on Windows 11/10.
Map Cloud Storage as a Local Drive in Windows
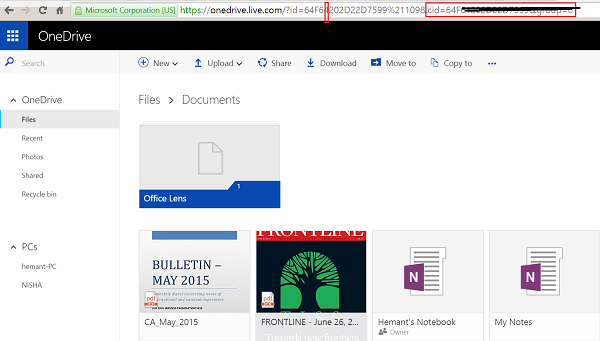
First, access OneDrive on the web and sign in. Once you see your dashboard, select the ‘Files’ link from the left section of the screen. You will notice, that the URL field displaying a “?id” number.

Copy and paste the CID number to a safe place.
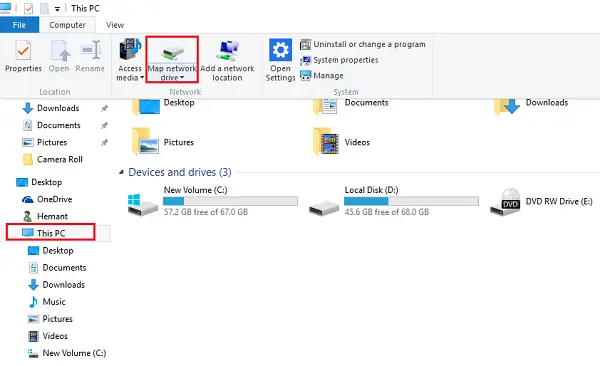
Now, open Windows 10 File Explorer, navigate to the This PC view, and click Map Network Drive option shown in the ribbon.

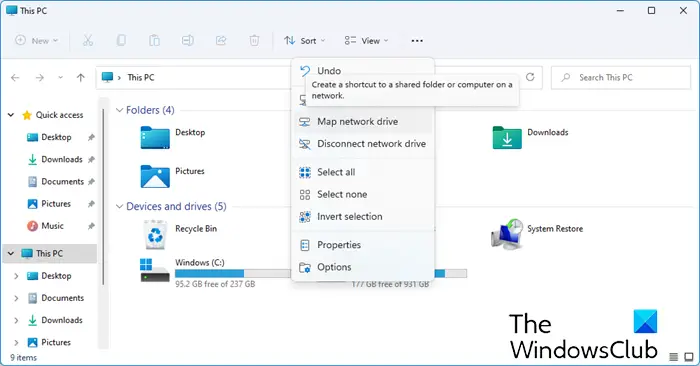
In Windows 11, it will look like this-

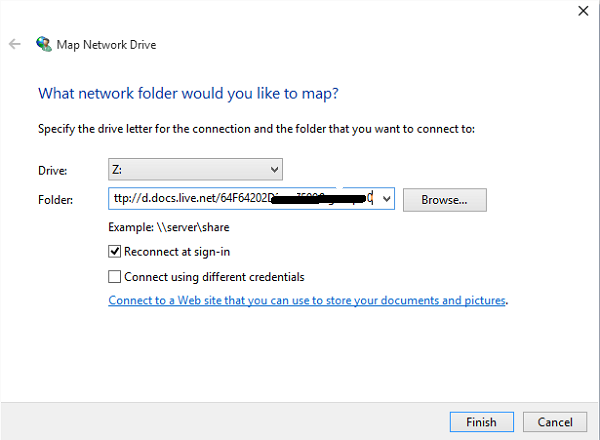
You should now see the Map Network Drive wizard appearing on your computer screen.
Chose a drive letter of your choice and then add it to this to the Folder field: https://d.docs.live.net/<Your-CID>.

Do note, the option ‘Reconnect at sign-in’ remains checked. Click Finish.
Here, you will be requested to enter your OneDrive credentials— Account name and password. Now, when you sign in, a new drive should be visible in File Explorer, under ‘This PC’ view, with a name that matches your entered cid number. Rename it, if required.
Mapping OneDrive as a drive in Windows does work. It may however slow down the PC performance. Plus your PC has to be online. If your PC is offline, it can’t access OneDrive files and folders.
Incidentally, Windows 11/10 offers OneDrive Selective Sync. This feature allowed users to display the files that are synced to their PC via OneDrive. What the feature particularly does is allow users to either sync all files and folders on your OneDrive, or Choose specific folders to sync, making them available locally.
using chrome from windows, the cid number doesn’t show, it simply onedrive.live.com/ and shows nothing even when i select the files section
Same with FF 40 however if you let auto complete show you a recent link to the Onedrive site, the CID should be displayed. Just take a screenshot to save the info and then you can type it in.
Problem I’m running into is that even though I can log into the website with the credentials, I can’t map the drive – keeps prompting for creds…
maybe this only worked on a beta build?
thanks man, finally able to link it in my Windows 10
You were able to get the drive mapped?
I’m being prompted for credentials though I’m providing the ones I knwo to work.
Is you user account an online account?
I’m trying this on a W10 install with a local only account… wondering if that’s tripping me up…
I was able to login using my one drive acount, but i guess I find using One drive folder better as its faster :p just pinned it to This PC using the tweaker from winaero
Yep, but this way it will be through an unencrypted connection. Mind the http:// prefix.
sir i an urgent help