Mapping a Network Drive is a great way of creating a shortcut on a network computer for early access. However, according to some users, the Mapped Network Drive is not showing. In this article, we are going to talk about this issue and see what should be done to resolve it.

Why can’t I see my Mapped Network drives?
Usually, a standard user is unable to see the Mappen Network Drive, because of limitations in the account. If need to access the drive, contact your admin and ask for permissions. However, there is a large chunk of popular that’s unable to access the drive even with an administrator account and the required permissions. After probing a bit, we found out that it’s because of a registry that you are unable to see Mapped Network Drives. Fortunately, this misconfiguration can be resolved easily by changing the value of one of the registry keys. We have mentioned a complete guide to do the same hereinafter, so, do check that out to resolve the issue.
However, it is not the only reason, there are some other causes that we have mentioned here. So, go through all the solutions and hopefully, you will be able to find Mapped Network Drives.
Fix Mapped Network Drive not showing in Windows 11/10
Is Mapped Network Drive not showing on your network computer? Follow these solutions to resolve the issue:
- Change Registry setting
- Make sure that SMB is enabled
- Update Windows and all its drivers
Let us talk about them in detail.
1] Change Registry setting

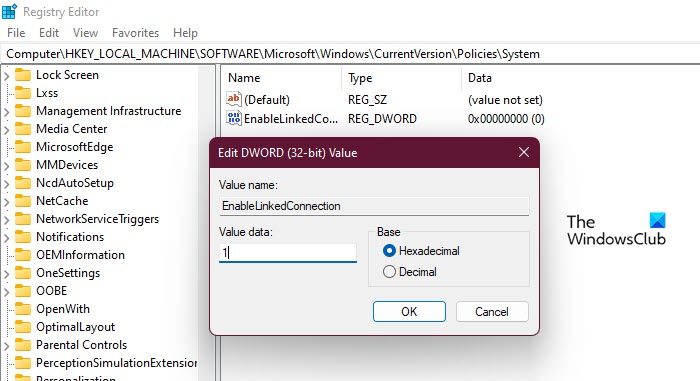
The first solution involves changing the registry of your system. If they are misconfigured, chances are, you will see the error code in question. The configuration can be changed manually by the user or automatically by a third-party app. To change the registry, we are going to use the Registry Editor. So, open Registry Editor by searching it out of the Start Menu, you will be asked by UAC to confirm your actions, so, do that by clicking Yes. Now, move to the following location.
Computer\HKEY_LOCAL_MACHINE\SOFTWARE\Microsoft\Windows\CurrentVersion\Policies\System
Look for EnableLinkedConnection, if it’s not there, right-click on System and click on New > DWORD (32-bit) Value. Name it EnableLinkedConnection. Now, double-click on EnableLinkedConnection and set the Value data to 1.
Finally, restart your computer and see if the issue persists. Hopefully, this will resolve the problem for you.
Read: How to remove Network Drive on Windows
2] Make sure that SMB is enabled

SMB or Service Message Block is a protocol that helps in networking. It is likely that SMB 1.0 may have been disabled for security reasons. What you need to do is to enable SMB 2.0.
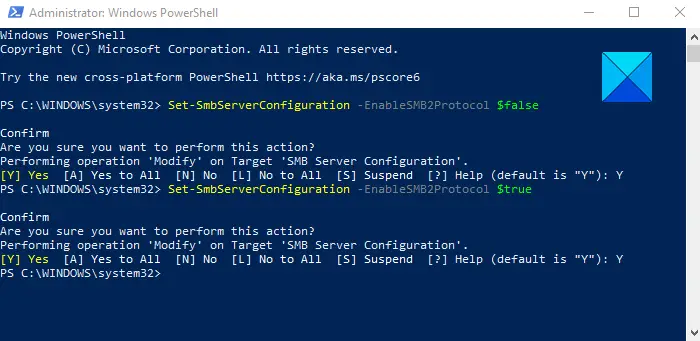
First run the following command in an elevated PowerShell prompt:
Get-SmbServerConfiguration | Select EnableSMB2Protocol
If the above command runs successfully, it means your computer is able to install SMB2. So proceeding with it, now you can enable this feature by running a simple command.
Set-SmbServerConfiguration -EnableSMB2Protocol $true
This will enable the SMB2 protocol on your computer.
Now, restart your computer and check if the issue persists.
Read: How to check SMB version on Windows 11/10
3] Update Windows and all the drivers
Maybe there is a bug that’s stopping you from accessing the Network Drive. In that case, you need to check for Windows updates and see if that works. In case, updating Windows is to no avail, try updating your drivers. There are various methods to do the same, we have mentioned a few of them below.
- Download Driver and Optional Updates from Settings.
- Go to the manufacturer’s website and download the driver.
- Use free driver update software.
- Update all your driver from the Device Manager.
Hopefully, this will do the job for you.
Also check:
- The mapped network drive could not be created
- Mapped Network Drive not opening, connecting, syncing or working
Fix Map Network Drive Button Missing in Windows 11

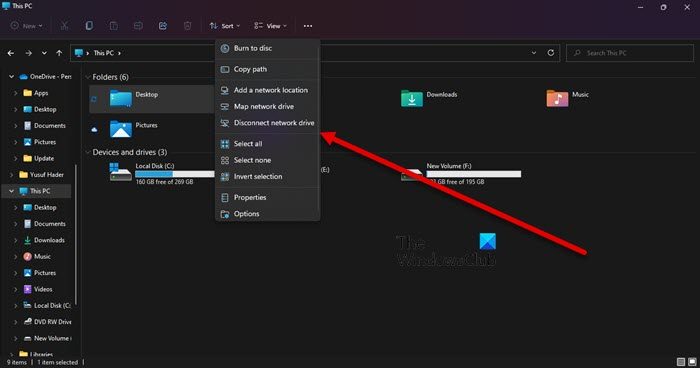
A lot of users have reported that they are unable to see Map Network Button. According to them, the option was there when they click on the three horizontal dots button in File Explorer, but now, it’s missing. Well, if you are one of them, go to This PC, and then click on three horizontal dots, you will be able to Map Network Drive there. Just click on the button to do your job.
Read: How to clear Mapped Network Drive Cache in Windows
Can’t see network drive on Windows 10?
If you can’t see network drive on Windows 11 or 10, chances are, your Network Discovery feature is turned off on your system. They can get disabled manually or because of some third-party app. Whatever the case is, you can easily enable them using the following steps.
- Open Control Panel by searching it out of the Start Menu.
- Select Large icons from View by.
- Click on Network and Sharing Center > Change advanced sharing settings.
- Expand the Private option and tick Turn on network discovery and Turn on file and printer sharing.
- Click on Save Changes.
This should allow you to see the network drive on your Windows computer.
Read Next:
Leave a Reply