If your microphone is not working in Steam, the solutions listed in this article may help you fix the problem. According to the affected users, the issue is occurring only on Steam. Their microphone works fine in other applications like Discord. Due to this issue, users are not able to chat with their friends on Steam. On the other hand, some users have reported that their microphone does not work only in some particular games on Steam, like Counter-Strike.
Microphone is not working in Steam
If your Steam microphone is not working, the following suggestions may help you resolve the problem.
- Check your Privacy settings on Windows
- Check your microphone volume
- Disable all other microphones in Windows
- Disable and re-enable your microphone
- Check if you have selected the right microphone in Steam
- Disable GeForce Experience Share In-game Overlay
- Uninstall and reinstall your microphone driver
- Disable Audio Enhancements for your microphone
- Troubleshoot in a Clean Boot state
Let’s see all these fixes one by one in detail.
1] Check your Privacy settings on Windows
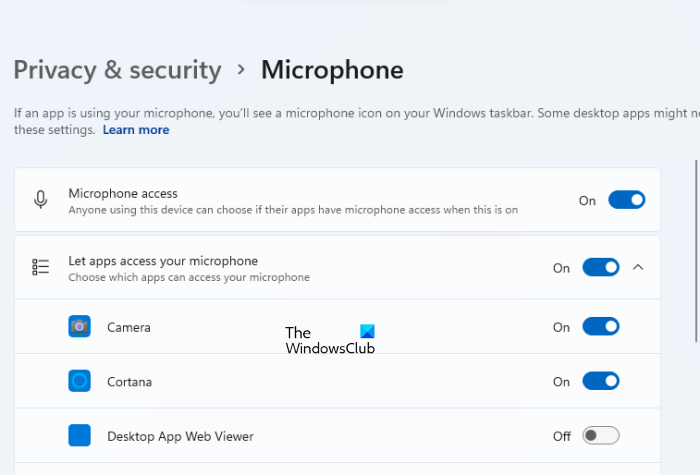
If you have blocked apps to access your microphone, those particular apps will not be able to use your microphone, even after detecting it. You can check this in the Privacy settings on your system. The following steps will guide you on this:
- Open Windows 11/10 Settings.
- Go to “Privacy & security > Microphone.”
- Turn on the following options:
- Microphone access.
- Let apps access your microphone.
- Let desktop apps access your microphone.
If you see Steam on this page, make sure that the button next to it is also turned on.
2] Check your microphone volume
A microphone is an input device. Users can also change the input volume of a mic. If the input volume of your microphone is low, other gamers on Steam will not hear your voice. Also, check if you have selected the right microphone on your Windows PC.
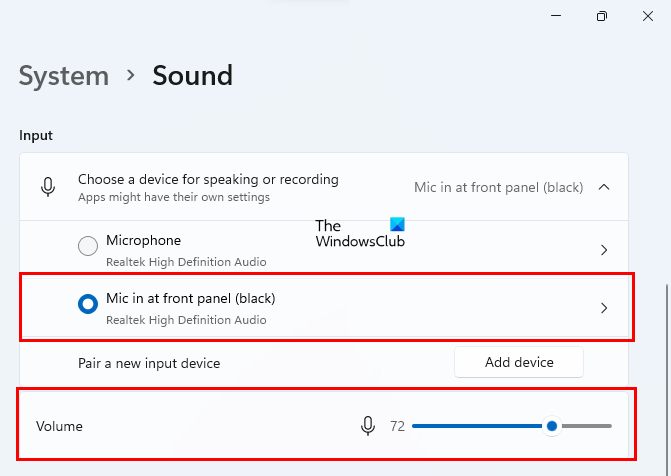
The following steps will help you with that;
- Open your Windows 11/10 Settings.
- Go to “System > Sound.”
- Select your microphone under the Input section and increase its input volume by moving the slider to the right.
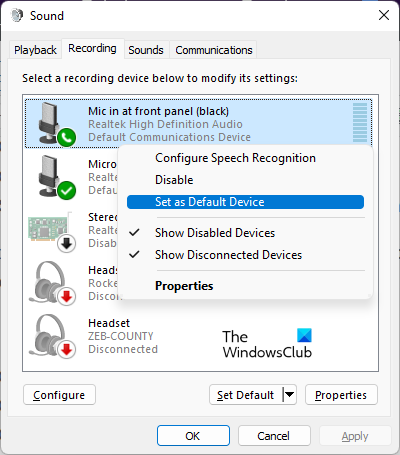
Apart from Windows 11/10 Settings, you can also set your microphone as a default input device via the Control Panel. The following steps will guide you on this:
- Open the Control Panel.
- Click on the Search Bar and type Sound.
- Click Sound.
- Select the Recording tab.
- Right-click on your microphone and select the Set as Default device option.
Read: Mic is not working on Windows
3] Disable all other microphones in Windows
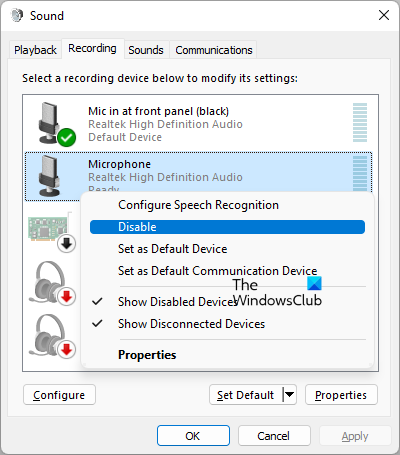
If you have connected an external microphone to your laptop, disable its built-in microphone or other microphones that are showing in the Sound settings. The steps to do that are listed below:
- Open the Control Panel.
- Type sound in the Control Panel search.
- Select Sound from the search results.
- Under the Recording tab, you will see all your microphones.
- Right-click on the microphones that you are not using and select Disable.
- Now, right-click on the microphone that you are using and select the Set as Default device option.
This solution has worked for the users whose microphone was not working in some particular games on Steam, like Counter-Strike. It should also work for you.
4] Disable and re-enable your microphone
If after trying the above fixes, the issue persists, disable and re-enable your microphone. It may help. To do so, open your sound settings by following the steps described in the previous fix and switch to the Recording tab. Now, right-click on your default microphone and select Disable. If you disable your external microphone, Windows will immediately make your laptop’s internal microphone the default input device.
After disabling your microphone, wait for a few minutes, then right-click on it and select Enable. After enabling your microphone again, make sure that it is set as default. If not, set it as default.
Read: USB microphone not working on Windows
5] Check if you have selected the right microphone in Steam
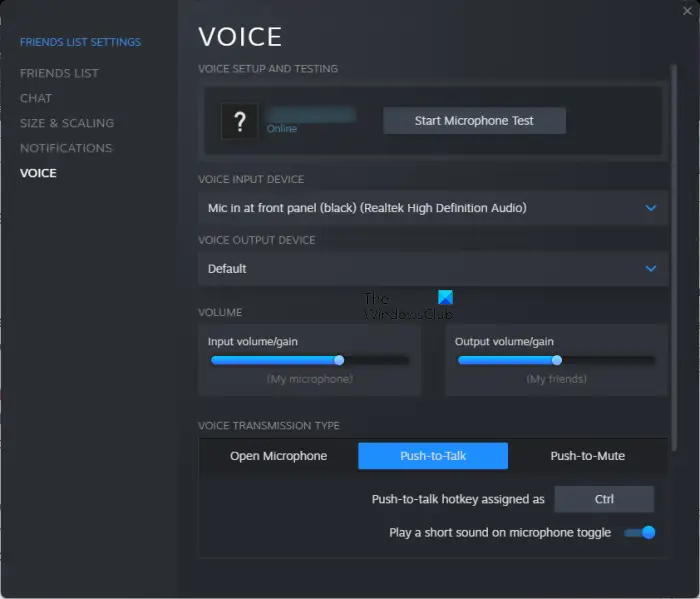
If your microphone is working in all other gaming applications but not working only in Steam, make sure that you have configured it correctly in Steam settings. Follow the instructions mentioned below:
- Open Steam.
- Go to “Friends > View Friends List.”
- A window showing your friend’s list will appear. Now, click on the gear-shaped icon on the top right side of your friend’s list window.
- Select VOICE from the left side.
- Click on the VOICE INPUT DEVICE drop-down and select your microphone.
- Increase your microphone input volume by moving the input volume/gain slider to the right.
After performing the above steps, you can test your microphone in Steam. To do so, select the Push-to-Talk tab under the VOICE TRANSMISSION TYPE section. Assign a hotkey by clicking on the button under the Push-to-Talk section. Let’s say, you have assigned the Ctrl key. Now, click on the Start Microphone Test button and speak into your microphone. Press and hold the Ctrl key while speaking and you will hear your own voice.
6] Disable GeForce Experience Share In-game Overlay
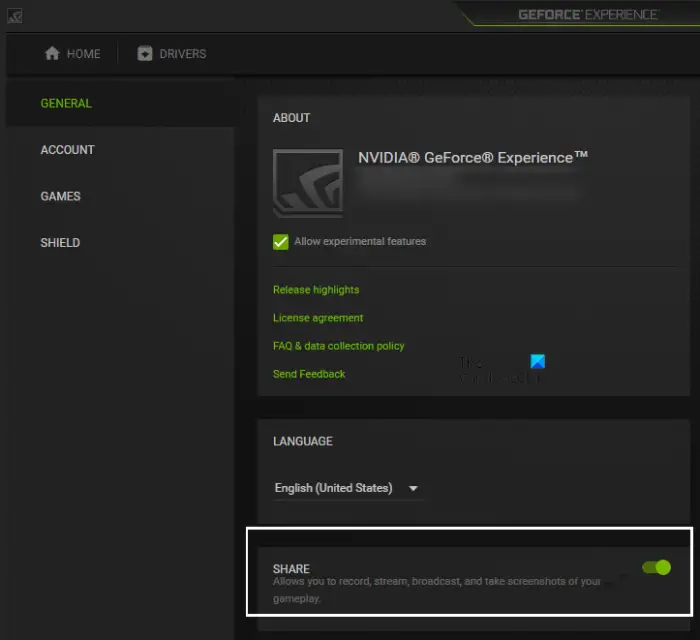
Some users have found the NVIDIA GeForce Experience Share In-game Overlay interfering with the Steam app and causing the issue. The solution to fix this problem is to disable the NVIDIA GeForce Experience Share In-game Overlay. This can be done in three simple steps. Go through the following instructions:
- Open NVIDIA GeForce Experience.
- Open its settings by clicking on the gear-shaped icon on the top right side.
- Select the GENERAL category from the left side and turn off the button next to SHARE.
7] Uninstall and reinstall your microphone driver
If your microphone is not working in Steam as well as in other applications, you need to update or reinstall your microphone driver. A corrupted device driver causes the device to fail. Go to the Windows Optional Updates page in Windows 11/10 Settings and check if an update for your microphone driver is available, If yes, install it.
If an update is not available, uninstall and reinstall your microphone driver. The following steps will help you do that:
- Open the Device Manager.
- Expand the Audio inputs and outputs node.
- Right-click on your microphone driver and select Uninstall device.
- After uninstalling your microphone driver, restart your computer.
Windows will automatically detect the hardware changes and install the missing driver. This should resolve the issue.
8] Disable Audio Enhancements for your microphone
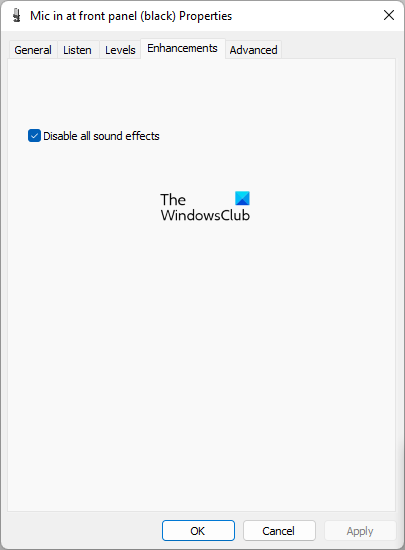
The Audio Enhancements feature makes the sound of your hardware device absolutely perfect. Sometimes, users may experience issues with their sound input or output devices due to this feature. In such a case, disabling the Audio Enhancements can help. Disable the Audio Enhancements for your microphone on Windows 11/10 and see if it helps.
9] Troubleshoot in a Clean Boot state
If despite trying the above solutions, your microphone is not working in Steam, there might be a third-party startup application conflicting with Steam. Some users have confirmed that an audio process running in the background was conflicting with the Steam due to which their mic was not working in Steam. You can check this by troubleshooting your system in a Clean Boot state.
In a Clean Boot state, all the third-party programs remain disabled. After starting your system in a Clean Boot state, connect your microphone and launch Steam. Now, check if it is working or not. If your microphone works in the Clean Boot state, there is a conflicting application installed on your system. To identify that program, restart your computer in normal mode and then disable the startup programs one by one. You can do this via the Task Manager, Windows 11/10 Settings, etc. Launch Steam and check your microphone every time you disable each startup app.
This process will take time but help you identify the problematic startup app. Once you find it, consider uninstalling it.
Now, the issue should get fixed.
Read: Fix Pending Transaction Error in Steam.
How do I enable my mic on Steam?
To enable your mic on Steam, open your Friends List settings and select VOICE from the left side. Now, you will see different options to select and configure your mic on Steam. Click on the drop-down menu under the VOICE INPUT DEVICE section and select your microphone. You can also set the input volume of your mic by moving the slider to the right. We have explained this in one of the fixes discussed above in this article.
Why does my mic work on Discord but not on Steam?
There are many reasons why your mic is working on Discord but not on Steam. For example, you have blocked Steam from accessing your mic in Windows Settings, you have configured your mic incorrectly in Steam, you have selected the wrong mic in Steam, a third-party startup program is conflicting with Steam, etc. We have listed some solutions to deal with this problem in this article.
I hope this helps.
Read next: Conflicting Software Detected: Incompatible version found in Steam.
Leave a Reply