One of the most frustrating things one can experience is the muting of a Microphone. It is especially annoying when you are in an important meeting, and suddenly, you realize that your Microphone is on mute. So, if the Microphone keeps muting itself, or getting disconnected randomly, even when connected on a Windows 11/10 PC, then this is the article you need to resolve this issue.

Why does my microphone keep muting itself in Windows 11?
There are many reasons why your microphone mutes itself automatically without your permission, such as the wrongful configuration of the sound settings. It can also be because of faulty drivers, viruses malware, etc. You need to check the Microphone settings, scan your PC with antivirus, stop SVCHOST process, etc., to get rid of this problem.
Fix Microphone keeps muting itself on Windows 11/10 PC
Before moving forward, you should try to check for updates, and install the latest version of the Windows available. If your Microphone keeps muting itself on Windows PC, these are the things you need to do to resolve the issue.
- Check Microphone’s Settings
- Check for Virus and Malware
- Stop SVCHOST Process
- Update, Rollback, or Reinstall drivers
- Troubleshoot in Clean Boot
Let us talk about them in detail.
Mic getting disconnected randomly, even when connected
1] Check Microphone’s Settings

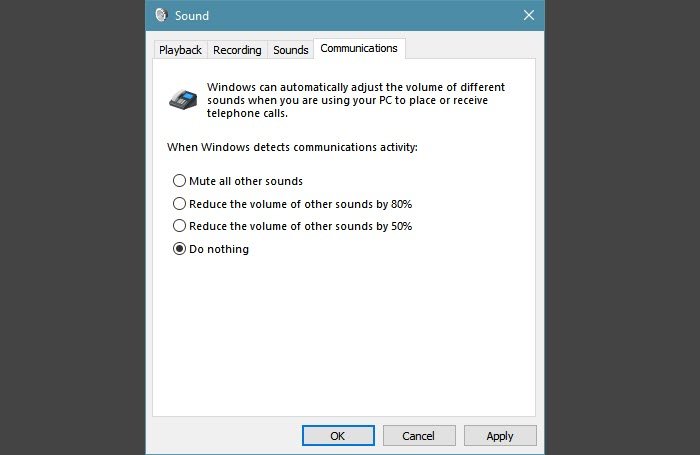
The first thing that you need to know the moment you start seeing this error, is to check the Microphone settings and make sure that it is not configured to mute the microphone. To do that, follow the given steps.
- Open Control Panel by searching it out of the Start Menu.
- Click Sound.
- Go to the Communications tab, select Do nothing, and click Apply > Ok.
Now, check if the issue persists.
2] Check for Virus and Malware
As mentioned earlier, viruses and malware are two of the most common reasons you may see this error, so you must remove them and resolve the issue. You can run any anti-virus or anti-malware that you may have or use Windows Defender Offline tool. To do that the latter, follow the given steps.
- Search out “Windows Security” from the Start Menu.
- Go to Virus & threat protection.
- Click Scan options.
- Select Microsoft Defender Offline scan and click Scan now.
Wait for the process to complete, as it will eliminate all the virus and malware that your computer may have.
Read: Cannot unmute Microphone on Windows
3] Stop SVCHOST Process

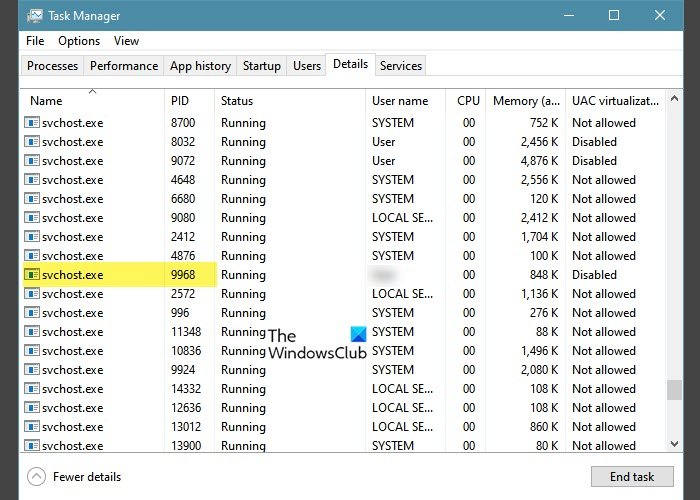
You have to kill SVCHOST Process that’s running under your username to resolve the issue. To do that, first open Task Manager by searching it out of the Start Menu. Go to the Details tab, look for svchost.exe, and check which one has your username. If you are able to find the process running under your username, copy its PID.
Now, open Command Prompt by searching it out of the Start Menu. Run the following command-
taskkill /F /PID <PID-number>
Make sure to replace <PID-number> with the one that you have copied. In my case, the PID number is 9968.
4] Update, Rollback, or Reinstall driver
Next up, the issue can be resolved by checking your microphone drivers. You can open Device Manager from the Start Menu and update, rollback, or reinstall drivers and see if the issue persists.
Read: Mic unmutes itself on Windows
5] Troubleshoot in Clean Boot
The issue can be because of a third-party application or service, so you should troubleshoot in Clean Boot to know what’s causing this. After knowing the name of the application, you can remove it from your computer, and hopefully, the issue will be fixed.
Why is my Microphone not working in Windows?
There are many reasons why your Microphone may not be not working on your computer, such as outdated drivers, faulty devices or jacks. The problem can also occur due to improper functioning of some peripherals or can result from unknown privacy changes.
Related reads: