Microsoft Teams, arguably, is one of the most prominent players in the video calling industry. However, being prominent does not stop from creating problems for users, as many users are complaining that the app is restarting on their computer. So, if Microsoft Teams keeps restarting on your computer, then we have written about all the potential measures you can take to resolve this issue.

Why does Microsoft Teams keep restarting?
There are many variables that can cause this issue. But more often than not, it happens because of a corrupted app cache. There is an easy way by which you can remove the corrupted app cache, that we have mentioned later in this article. A more serious reason can be the corrupted app. A corrupted installer package can cause the app to restart or crash.
Microsoft Teams keeps restarting
If Microsoft Teams keeps restarting on your Windows computer, then, first of all, update your Windows 11/10. You need to make sure that your computer is updated before trying to solve the issue. When Teams restarts, important meeting calls get disconnected and this can be a serious issue. The fixes are listed below.
- Terminate the Microsoft Teams Application
- Restart your computer
- Delete Microsoft Cache files
- Repair or Reset Microsoft Teams
- Uninstall and Reinstall Microsoft Teams
Starting with the first fix.
1] Terminate the Microsoft Teams Application

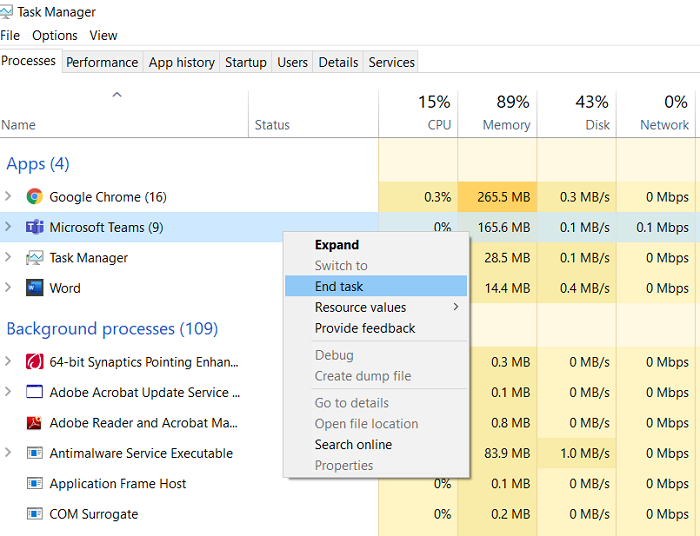
Terminating the Microsoft Teams application can help. To stop the Microsoft Teams process, use the Task Manager and then start it again to see if the issue still persists.
- Press Ctrl+Shit+Ecs to open Task Manager.
- In the Processes tab, Look for Microsoft Teams.
- Right-click on it, and then select End Task.
Run Microsoft Teams again and see whether your Teams is abruptly restarting or not.
2] Restart your computer
Restarting allows your computer to start fresh – and restarting is known to solve many simple issues, so try it and see if that helps.
3] Delete Teams cache files
This issue can be solved by clearing out the Teams cache as it is one of the most common reasons that can cause this error. Deleting cache files once in a while is a must. So, follow the steps to clean faulty or corrupted cache files.
- Press the Windows + R to open the Run dialog box.
- Type in ‘%appdata%’ and press Ok.
- Open the Microsoft folder.
- Now delete any folder related to Teams
Deleting cache is one of the fixes that generally no one pays attention to. Hopefully, you won’t complain about Teams suddenly shutting down.
4] Repair or Reset Microsoft Teams

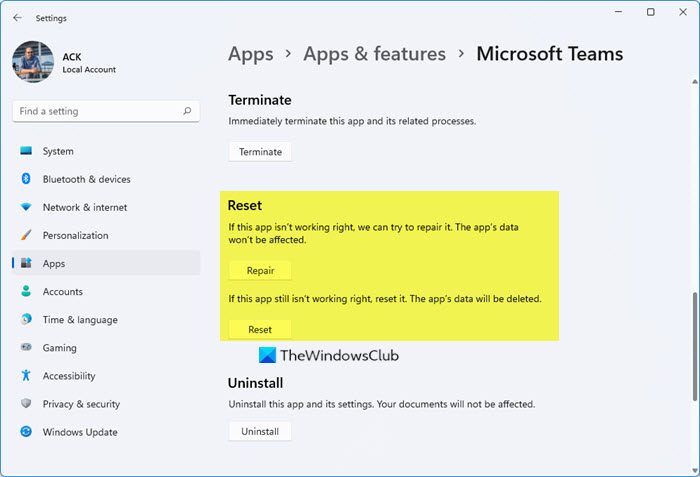
To Repair or Reset Microsoft Team in Windows 11/10, follow the given steps.
- Open Settings
- Click the Apps > Apps & Features.
- Look for Microsoft Teams.
- Click on the three vertical dots and click Advanced Options.
- From the next panel, select Repair or Reset.
5] Uninstall and Reinstall Microsoft Teams

If deleting cache does not work for you, go for deleting Microsoft Teams. Uninstalling Microsoft Teams will delete all the corrupted or faulty files.
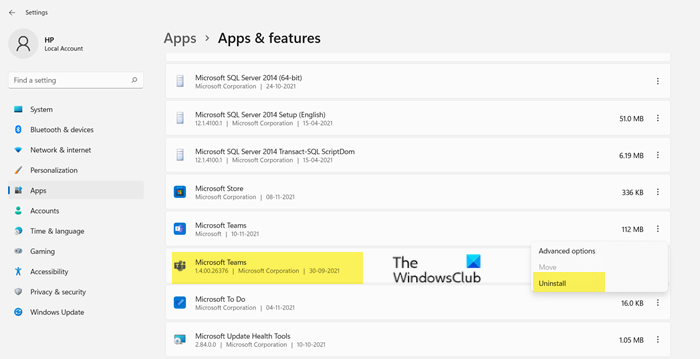
To uninstall Microsoft Team in Windows 11/10, follow the given steps.
- Open Settings
- Click the Apps > Apps & Features.
- Look for Microsoft Teams.
- For Windows 11: Click on the three vertical dots and click Uninstall.
- For Windows 10: Select Microsoft Teams and click Uninstall.
Reinstall it again, the Microsoft Teams will be installed with the latest version.
Why does my Teams keep crashing?
There are many things that can crash MS Teams. Such as corrupted system files, or corrupted cache. Even though they are primary reasons that force the app to crash, but some other unnoticed causes include server issues and some problems with the credentials. So, you have to check all of them to stop Microsoft Teams from crashing.
Read Next: Fix Microsoft Teams high memory and CPU usage issue