Minecraft doesn’t need any introduction. It is one of the most popular games among PC gamers. Minecraft actually originated the survivor game genre years back. Here you have to fight monsters for your survival, explore, build structures, etc. While this game runs pretty smoothly, you sometimes may face errors while installing or reinstalling it on your PC. Not to worry, you can fix this easily.

Minecraft not installing on Windows 11/10 PC
If Minecraft is not installing or if the Minecraft installer is not working on Windows 11/10 PC then here are some working suggestions to help you.
- Restart your PC
- Update your OS
- Install the alternative version of Minecraft
- Run Minecraft installer as administrator
- Delete Mod files
- Run Minecraft in compatibility mode
- Run Program Install & Uninstall Troubleshooter
- Ensure that Windows Installer Service.
Minecraft installer not working
1] Restart your PC
Restarting your PC normally fixes all the temporary bugs and errors. Restart your PC and if your installer is not working due to any temporary glitch, it will fix it. Once your PC reboots, try installing Minecraft again and see if that works. If not, try the next fix.
2] Update your OS
Make sure your PC is running the latest version of Windows. Check for the updates on your PC.
- Press Win+I to open the Settings.
- Go to Windows Update and see if there is any update available.
- Download and install it.
- Try running the installer again and see if that helps.
Move on to the next fix if this doesn’t help.
3] Install the alternative version of Minecraft
If the classic version is not working for you and you are unable to install it on your PC, try downloading the alternative version of Minecraft, ‘Minecraft.exe‘. You can download it here. There are various alternatives mentioned, check for the suitable version for your machine and download it. See if you can install it. Move on to the next fix if this doesn’t help.
4] Run Minecraft as an Administrator
- Launch the Start Menu and in the Search bar, type Minecraft Installer.
- Click on Run as Administrator.
- See if that works for you.
5] Remove Mod Files
If you had Minecraft installed on your PC before, this method may help you get rid of this error. The mod files remain on your PC even if you uninstall and delete the game and they won’t let you install it again. You need to remove these mod files from your PC first and then try to install the newer version of Minecraft.
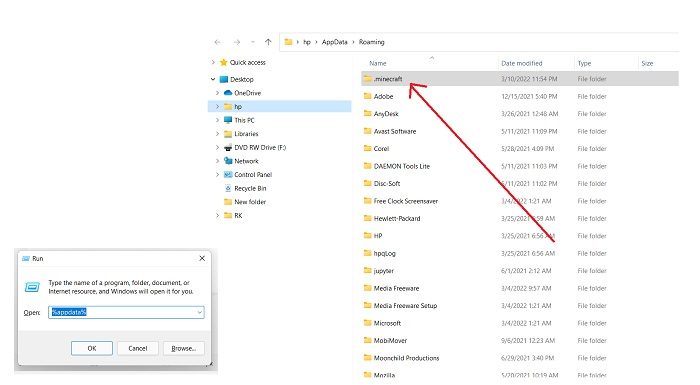
To remove mod files, hold down the Windows key and then press R on your keyboard and type ‘%appdata%’ and then press Enter. You will see a folder named Mods along with the other folders here. Take your cursor there, right-click and Delete it.
Once done, try installing Minecraft again and this should work.
6] Run Minecraft in Compatibility Mode
If none of the above-mentioned fixes are working for you, try running Minecraft in compatibility mode and see if that helps. Locate the file Minecraft.exe on your PC and right-click. Go to Properties and go to the Compatibility tab. Check the box saying, ‘Run this program in compatibility mode for” and from the dropdown menu select your OS. Go to the Settings section again and check the box saying, ‘Disable fullscreen optimizations. Click on ‘Apply’ then ‘OK’ and try running the Minecraft Installer again.
7] Run Program Install & Uninstall Troubleshooter
The first thing we would suggest is to run the Program Install and Uninstall Troubleshooter to repair issues that block program installation or removal because of corrupted registry keys. This program will fix corrupted registry keys on 64-bit operating systems, which control the update data, problems that prevent existing programs from being completely uninstalled or updated, and problems that block you from uninstalling a program through Add or Remove Programs (or Programs and Features) in Control Panel
8] Start the Windows Installer Service
In the Run prompt, type MSIExec, and then press Enter.
If you get the Windows Installer window which tells you everything about MSIExec, then it’s all good.
If you get an error, you might have to start it manually.
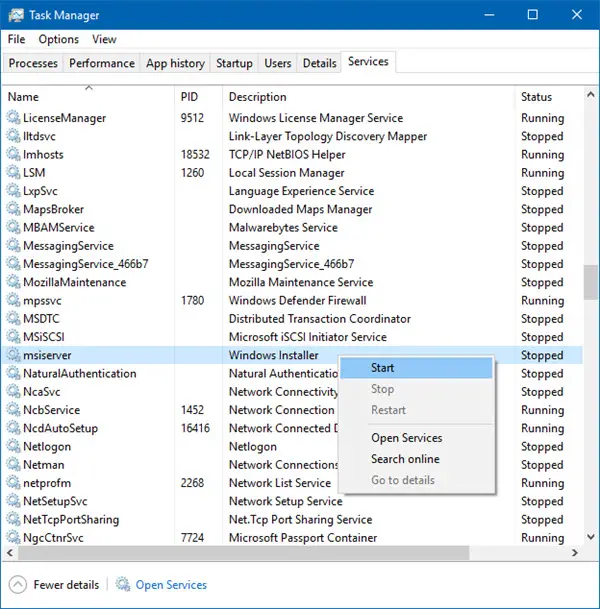
Right-click on the taskbar, and select Task Manager. Switch to Services, and look for msiserver. Start it.

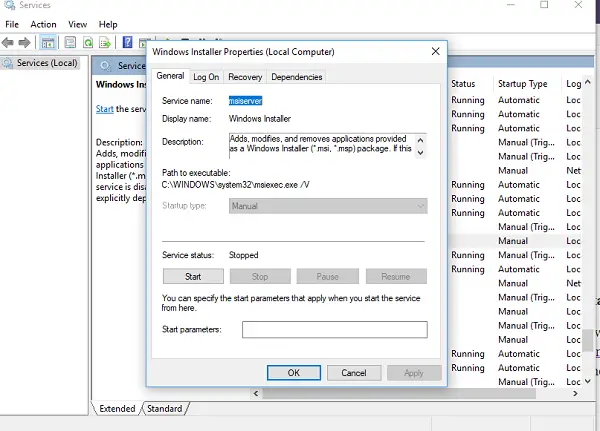
You can also run services.msc to open Windows Services and go to Windows Installer, and restart it.

Read: Minecraft Launcher won’t open on Windows PC
How do I fix the Minecraft Installer error?
We have mentioned 6 fixes for the Minecraft Installer error. Try them and see if that helps. Do let us know if none of the above-mentioned fixes work for you.
Why do I get errors when downloading Minecraft?
The downloading errors mostly come up because of the outdated Minecraft Game launcher. The launcher is regularly updated to fix the bugs. Make you have updated the launcher to avoid these errors.
Related: Minecraft keeps crashing or freezing.
Leave a Reply