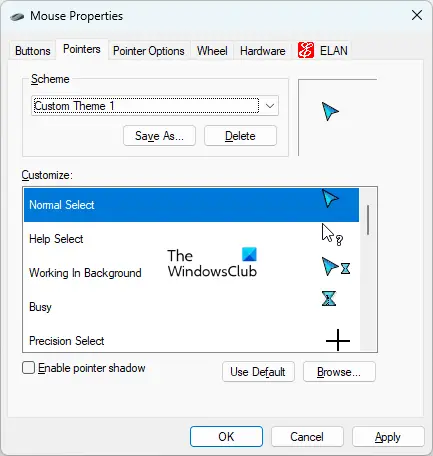
Windows comes with some pre-installed mouse cursor schemes. You can change the scheme of your mouse cursor in mouse settings. If you do not want to use any of the Windows schemes for your mouse cursor, you can also install a custom mouse cursor scheme. Some users are facing an issue with the custom mouse cursor scheme. According to them, the custom mouse cursor scheme reset to the default Windows cursor scheme every time they restart their computers. Due to this, they have to set the custom mouse cursor scheme every time they turn on their computers. If your mouse cursor change won’t stay permanent in Windows 11/10, the solutions explained in this article are sure to help you fix the problem.

Mouse cursor change won’t stay permanent in Windows 11/10
If your custom mouse cursor scheme resets to the default Windows cursor scheme every time you restart your computer, the following solutions will help you fix the problem.
- Save the custom cursor scheme with another name
- Update your mouse driver
- Turn off Fast Startup
- Place the .cur files inside the Cursors folder manually
Let’s see all these solutions in detail.
1] Save the custom cursor scheme with another name
By default the cursors on a Windows computer are located at the following location:
C:\Windows\Cursors
It is important that the custom cursor scheme that you want to use on your Windows PC should be installed on this default location. If it is not installed on the default location, your mouse cursor will reset automatically to the Windows default scheme every time you turn on your computer. To fix this issue, follow the following instructions.

- Press the Ctrl + R keys to launch the Run command box.
- Type control panel and click OK. This will launch the Control Panel.
- Select Large icons in the View by mode.
- Click Mouse. This will open the mouse properties window.
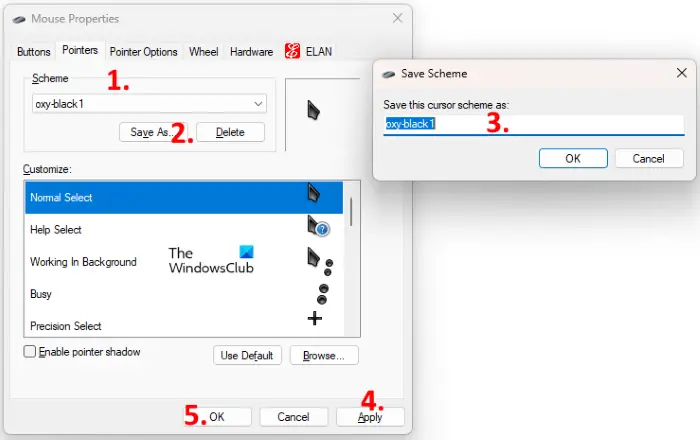
- Select the Pointers tab.
- Click on the Scheme drop-down menu and select your custom cursor scheme.
- Click on the Save As button and save this scheme with another name.
- Click Apply and then click OK.
This should fix the issue. If not, try the next solution.
Read: Black Box around the Mouse Pointer on Windows
2] Update your mouse driver
If the above method did not help, the problem might be occurring due to the corrupted mouse driver. To fix this issue, you have to update your mouse driver. If the latest version of your mouse driver is released by the manufacturer, it will be displayed in the Windows Optional Updates. Open the Optional Updates page in your Windows 11/10 Settings and see if there is any update available for your mouse driver. If yes, install the latest version of your mouse driver.
You can also visit the manufacturer’s website and download the driver for your mouse model. Now, run the installer file to install the mouse driver manually. After updating your mouse driver, change the Windows default cursor scheme to the custom cursor scheme and restart your computer. Check if the issue persists.
3] Disable Fast Startup
Sometimes the Fast Startup feature in Windows 11/10 devices creates problems. Therefore, if you have enabled the Fast Startup, disable it and check if the custom cursor scheme resets to default after restarting your system.
4] Place the .cur files inside the Cursors folder manually
If none of the above solutions fixed your problem, you have to manually place the .cur files in the Cursors folder and then create a new custom scheme for your cursors. The steps to do this are provided below:

- Go to the location where you have downloaded the custom cursor folder. Open that folder.
- In that folder, you will see one INF file and other .cur files. The INF file is the setup file for your custom cursor scheme. On installing the INF file, the entire cursor scheme is installed on your system. Because the INF file is not getting installed on the default cursor location, you need not install this INF file.
- Copy all the .cur files. Do not copy the INF file.
- Open the File Explorer and then open the C drive.
- Now, open the Windows folder and then open the Cursors folder. Create a new folder in the Cursors folder.
- Open the newly created folder and paste all the copied .cur files there.
- Open the Control Panel.
- Select Large icons in the View by mode.
- Click Mouse.
- The Mouse Properties window will appear. Select the Pointers tab. You will see the Windows default cursor scheme there.
- Click on the Save as button under the Scheme section. Give a name to your new scheme and click OK. This will create a new scheme for your cursor.
- Now, click on the drop-down under the Scheme section and select the newly created cursor scheme.
- Select the cursors in the customize box one by one and click on the browse button. Now, replace the Windows default cursor with your custom cursor by selecting the .cur file placed inside the Cursors folder.
- When you are done, click Apply and then click OK.
The above process will take time but solve your problem. After performing the above steps, the issue should not occur again.
Read: How to change mouse scroll speed in Windows 11/10.
How do I stop my custom cursor from resetting?
To stop your custom cursor from getting reset automatically, it should be placed inside the Cursors folder on your Windows device. You will find the Cursors folder at the following location:
C:\Windows\Cursors
If the INF file of your custom cursor scheme is not getting installed inside the Cursors folder, you have to create a new scheme and add all the cursors (.cur files) manually. We have explained this process in detail in this article.
Read: Mouse pointer moves when pressing arrow keys
How do you make your cursor change permanently?
If your custom cursor INF file is installed in the Cursors folder on the C drive, your custom cursor will not change after the restart. If it is not getting installed at the default location, you have to create a custom cursor scheme to make your cursor change permanently.
I hope this helps.
Read next: Mouse is highlighting everything when I click.
Leave a Reply