When you drop the mouse cursor over a file or folder, it brings up a pop-up that displays the information related to it. The action can take time anywhere between the default 400 milliseconds to 1000 milliseconds. This is called Mouse Hover Time and allows the mouse pointer to stay hovered over an item before an action is triggered. In Windows 11/10, there’s a setting that lets you change the Mouse Hover time. Read how it’s done!
How to change Mouse Hover Time in Windows 11/10
Changing the mouse hover time has an influence on both, the Taskbar thumbnail preview and file selection in File Explorer. For example, when you increase the mouse hover time and hover the mouse cursor over an open program in Windows 11/10 Taskbar, it will show a preview but after a few milliseconds of delay.
- Open the Registry Editor.
- Go to Control Panel\Mouse.
- In the right pane of the Mouse key, double click the MouseHoverTime.
- Enter time in milliseconds you want for the mouse hover time.
- Click OK.
- Close the Registry Editor
- Restart your PC.
Please note that the method involves making changes to the Registry Editor. Serious changes can occur if you make changes to the Registry Editor incorrectly. Create a System Restore Point before proceeding further and making changes.
Press Win+R in combination to open the Run dialog box.
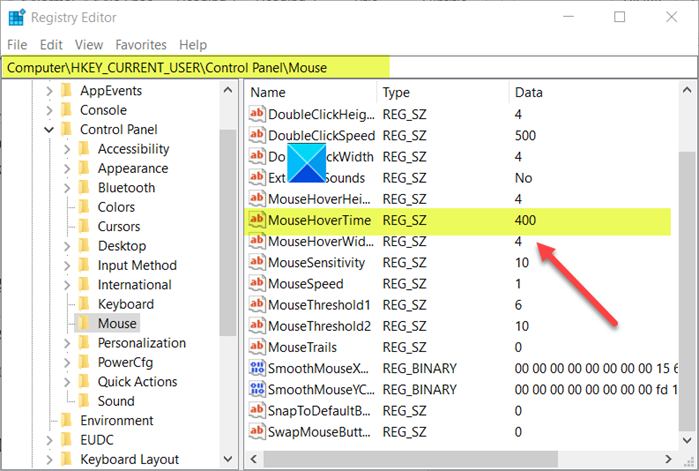
When the Registry Editor opens, navigate to the following path address –
HKEY_CURRENT_USER\Control Panel\Mouse.
Switch to the right pane of the Mouse key and double-click the MouseHoverTime string value (REG_SZ).

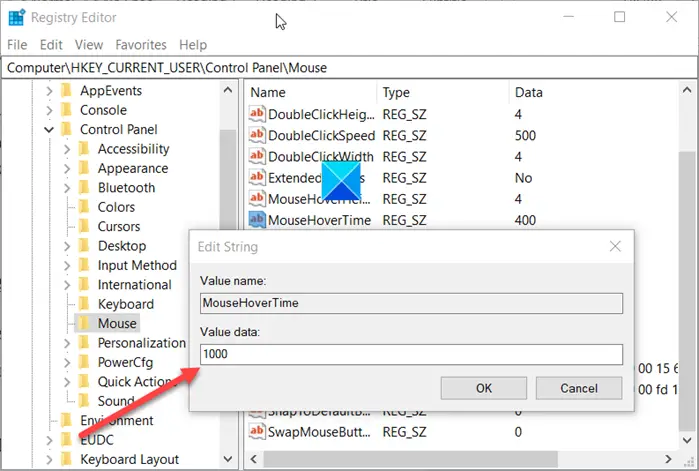
When the Edit String box appears, type in how many milliseconds you want for the mouse hover time. The default time is set to 400 milliseconds.

You can extend this time limit up to 1000 milliseconds which is the same as 1 second.
When done, close the Registry Editor and exit.
Restart your PC to allow the changes to take effect.