Some gamers are not able to play Valorant because their mouse stutters in the game. Whereas, some gamers have reported that their mouse stops working when they launch the Valorant game. The mouse starts working again on closing Valorant. If your mouse is stuttering or not working in Valorant, the solutions provided in this article may help you resolve the issue.
Mouse is stuttering or not working in Valorant
If your mouse is stuttering or not working in Valorant, try the following fixes to get the issue resolved. Before you proceed, we suggest you clean your mouse and mouse pad. The mouse stuttering issues also occur due to the dirty mouse pad. There is also a temporary fix for the issue. Keep moving your mouse while launching Valorant. This trick worked for many users.
- Run Valorant as an administrator
- Check your CPU usage
- Replace your wireless mouse with the wired mouse
- Update or reinstall your mouse driver
- Uninstall and reinstall your graphics card driver
- Reset Valorant settings to default
- Turn off VSync
- Cap your FPS
- Change your mouse polling rate
- Troubleshoot in a Clean Boot state
- Reinstall G HUB software
- Edit the GameUserSettings.ini file
Let’s see all these fixes in detail.
1] Run Valorant as administrator
The first thing that you should do is to run Valorant as administrator and see if this fixes the problem. You can run any program on a Windows computer as an administrator by right-clicking on it. If this does not work, try the other solutions described below.
2] Check your CPU usage
Open the Task Manager and check your CPU usage. A high CPU usage can cause several problems on a Windows PC, like mouse stuttering issues. If the Task Manager shows high CPU usage, check which program is causing the high CPU. Close background applications and other opened programs to lower your CPU usage.
If you are recording your gameplay, it may also cause Valorant to consume the high CPU. Turn off game recording or close the game recording software and see if this fixes the issue.
3] Replace your wireless mouse with the wired mouse
Wireless mice have a higher latency rate as compared to wired mice. If you have a wired mouse, replace your wireless mouse with the wired one and see if it helps.
4] Uninstall and reinstall your mouse driver
Mouse issues also occur if the mouse driver is corrupted. If the device driver gets corrupted, that particular device does not work properly. Uninstall and reinstall your mouse driver and see if it helps. The following steps will help you with that:
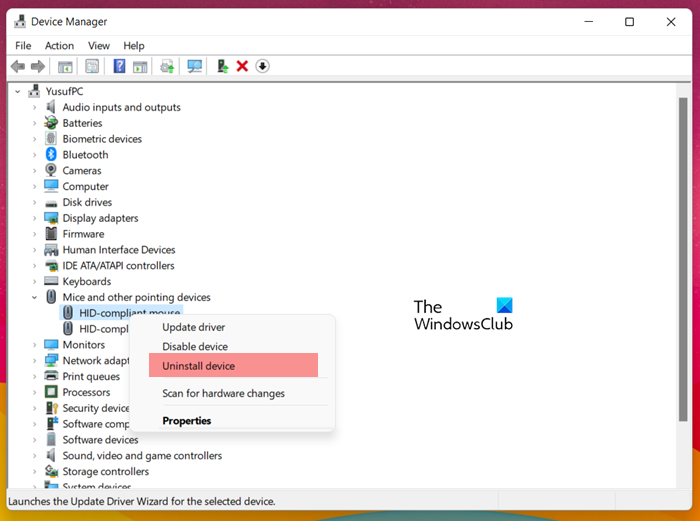
- Open the Device Manager.
- Double-click on Mice and other pointing devices node.
- Right-click on your mouse driver and select Uninstall device.
- Your mouse will not work after uninstalling the mouse driver. Close the Device Manager and restart your computer using the keyboard shortcuts.
Windows will automatically detect the hardware changes on the restart and install the missing driver. If this does not work, download the latest version of your gaming mouse driver from the manufacturer’s website and install it manually.
5] Uninstall and reinstall your graphics card driver
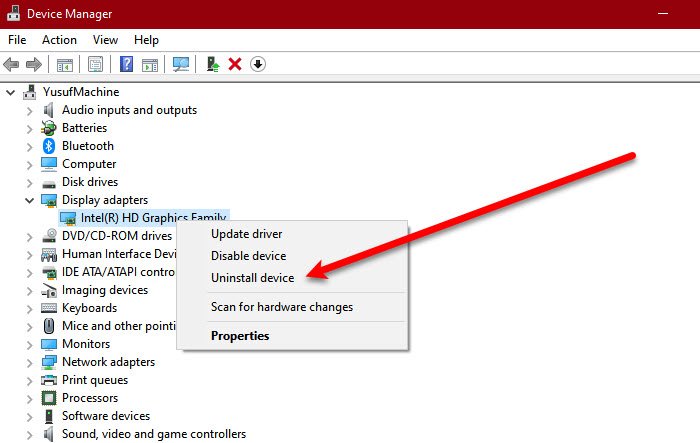
The mouse stuttering issues also occur due to the corrupted display driver. If the problem still persists, reinstalling the graphics card driver can help. The steps for the same are listed below:
- Download the latest version of your graphics card driver from the manufacturer’s website.
- Open the Device Manager.
- Expand the Display adapters node.
- Right-click on your graphics card driver and select Uninstall device. After uninstalling your graphics card driver, your computer will switch to the default display driver.
- Double-click on the installer file (the file you downloaded in step 1) and install it manually.
- Restart your computer.
6] Reset Valorant settings to default
Some users confirmed that resetting the Valorant settings to default resolved their issue. The following steps will guide you on this:
- Close Valorant.
- Open the Task Manager and kill all the processes related to the Valorant game.
- Press the Win + R keys to open the Run command box.
- Type %localappdata% and click OK.
- Now, locate the VALORANT folder and delete it.
Do note that, the above steps will reset the settings like sound settings, graphics settings, etc., to default, and the rest of other settings like Crosshair will remain the same.
7] Turn off VSync
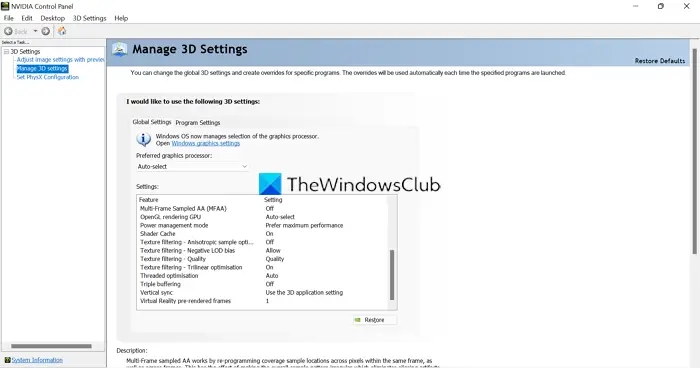
VSync is a technology that fixes the screen tearing issues in video games. Sometimes, users experience issues in video games due to VSync technology. Your mouse might be stuttering or not working due to VSync (if you have enabled it). In such a case, disabling VSync can fix the problem. The steps to turn off VSync in NVIDIA and AMD are different.
8] Cap your FPS
FPS capping refers to limiting the frame rate in video games. Capping the FPS in Valrant fixed the issues for some users. You should also try this. Maybe it will work for you too. Go through the following steps to limit FPS in Valorant in NVIDIA and AMD.
How to limit FPS in Valorant in NVIDIA
Go through the following instructions to limit FPS in Valorant in NVIDIA:
- Open NVIDIA Control Panel and expand the 3D Settings node on the left side.
- Now, select the Manage 3D Settings option.
- After that select the Program Settings tab and click Add.
- Add Valorant game. After doing this, the Valorant game will appear in the drop-down. If not, select it by clicking on the drop-down.
- Scroll down and locate the Max Frame Rate option.
- Once you find it, set the custom frame rate by moving the slider.
How to limit FPS in Valorant in AMD
AMD users have to follow the steps written below to cap FPS in Valorant:
- Open the Radeon software.
- Select the Gaming tab and click on the three vertical dots on the top right side.
- Select Add a game and add Valorant game.
- After adding Valorant, enable the Radeon Chill option and move the slider to cap the minimum and the maximum FPS.
For some users, capping the FPS to 72 worked. You have to do a hit and trial and see at which FPS mouse stuttering stops.
9] Change your mouse polling rate
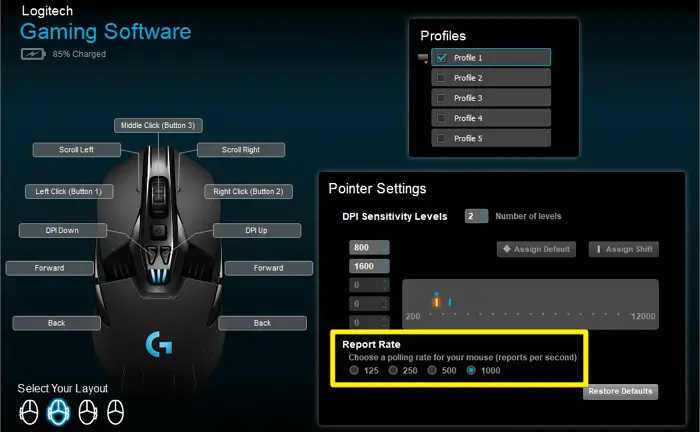
Mouse polling rate is the measurement of the number of times a mouse indicates its position on the screen to the CPU. It is measured in Hertz. A high polling rate helps reduce the mouse latency, but for some of the affected gamers, the high polling rate was causing their mouse cursor to stutter on the screen. To fix this issue, when they decreased their mouse polling rate, the problem got fixed.
Changing the mouse polling rate to 500 Hz has worked for many users. You can also try this. First, change your mouse polling rate to 500 Hz and see if this works. If not, set your mouse polling rate to another value. You have to follow the hit and trial method here.
To change the polling rate, some gaming mice have dedicated buttons. Check if your mouse has such buttons. You can also use your gaming mouse software (if available) to change your mouse polling rate.
10] Troubleshoot in a Clean Boot state
Clean Boot is a state in which Windows starts only with the essential services and drivers. All other startup apps and services remain disabled in this state. If your mouse is stuttering or not working in Valorant due to a conflicting third-party startup app, the problem will not appear in the Clean Boot state. To check this, start your computer in a Clean Boot state. After starting your system in Clean Boot, launch Valorant and see if your mouse works or if it stutters this time. If not, your next step is to identify the problematic startup app.
Now, enable some of the startup apps and reboot your computer in normal mode. Launch Valorant and see if the problem persists. If the problem is fixed, one of the startup apps that you have just disabled is causing the problem. To identify it, enable the disabled apps one by one and check the issue in Valorant every time you enable a startup app. In this way, you will be able to find the problematic startup app. Once you find it, uninstall it.
11] Reinstall G HUB software

According to the feedback of affected users, uninstalling and reinstalling the G HUB software fixed the issue. If you have installed G HUB on your system, uninstalling and reinstalling it may help. In addition to reinstalling the G HUB software, you should also uninstall and reinstall your mouse driver. You can uninstall a program on Windows 11/10 computer via the Control Panel or Settings.
12] Edit the GameUserSettings.ini file
If despite trying all the above-listed fixes, your mouse still stutters or does not work in Valorant, edit the GameUserSettings.ini file. The steps are as follows:
Open the Run command box and type %userprofile% and click OK. When the File Explorer opens up, enable the hidden files and folders and open the AppData folder.
Now, go to the following path:
local\Valorant\saved\config
Look for the GameUserSettings.ini and copy it to another location on your hard disk, so that you could replace the edited file with the original file to revert the changes in case any problem occurs.
Once you find the GameUserSettings.ini file, open it with Notepad. Double-clicking on the INI file opens it automatically in your default text editor software. In most cases, Windows built-in Notepad is the default text editor software.
Look for the following and change the values accordingly.
sg.ResolutionQuality=100.000000
sg.ViewDistanceQuality=0
sg.AntiAliasingQuality=0
sg.ShadowQuality=0
sg.PostProcessQuality=0
sg.TextureQuality=0
sg.EffectsQuality=0
sg.FoliageQuality=0
Save the INI file by pressing the Ctrl + S keys.
This should fix the problem.
Read: Fix Riot Vanguard Crashed Error on Valorant.
How do you fix mouse stutter in-game?
Mouse stuttering is one of the common problems in video games. A corrupted display driver is one of the causes of mouse stuttering problems in video games. Your mouse may also stutter if your game is consuming more system resources. Check your CPU usage in the Task Manager. If you see high CPU usage, kill the apps that are responsible for it. Sometimes, CPU usage goes high when you record games.
In addition to this, mouse stuttering problems in video games also occur if your mouse driver is corrupted. In this case, updating or reinstalling the mouse driver can help.
Is VSync good for Valorant?
VSync is a technology that fixes screen tearing issues in video games. The screen tearing occurs when the monitor’s refresh rate and the frame rate of the game are not synchronized. VSync adjusts the frame rate of a game in order to synchronize it with the monitor’s refresh rate. If you experience screen tearing in Valorant, you can turn on VSync to fix it.
According to the feedback from gamers, VSync has been found to cause issues in some games. In this case, turning off VSync resolves the problem.
I hope this helps.
Read next: DX11 feature level 10.0 is required to run the engine.