You may have noticed, that a mouse works perfectly fine but the moment you wake your computer from sleep, open another application or do something else, it starts acting weird. For some users, it became slower whereas for some the cursor becomes rapid and extra sensitive. Not anymore, we will be talking about some solutions that you can try to resolve the issue. In this post, we are going to see what to do when Mouse sensitivity changes automatically on your Windows computer.

Why does my Windows Mouse Sensitivity keep changing?
There could be various why your Mouse sensitivity keeps on changing. Some users have reported that the sensitivity changes when they open a specific app; in that case, you need to make sure that Enhance Pointer Precision is disabled and that the pointer settings of that app are not causing the issues.
Also, if you have corrupted or outdated drivers, your computer may encounter various issues, which could be one of them. We can also not forget the fact there is a lot of third-party software that can interfere with the Mouse and change its sensitivity. Whatever the reason is, try the solutions mentioned in this post for a remedy.
Read: How to reset Mouse settings to default in Windows 11/10
Fix Mouse Sensitivity changes automatically on Windows 11/10
If Mouse Sensitivity changes automatically on your computer or changes its DPI randomly, the first you should do is remove the dongle or the mouse and connect it to a different port. If the issue is resolved after plugging the mouse into a different port, you need to consult a technician and get the port repaired.
However, if the port is not the cause and your mouse is still facing the same issue even after getting connected to a different port, try the following solutions to resolve the issue.
- Click on the DPI button on your Mouse
- Check Mouse Manufacturer’s App
- Turn off Enhance Pointer Precision
- Run Hardware and Device Troubleshooter
- Update Windows and all its drivers
- Reinstall the mouse driver
- Troubleshoot in Clean Boot
Let us talk about them in detail.
1] Click on the DPI button on your Mouse
You must have seen a little button (not the scroller) on your mouse between the left and right clicks. This button is used to control the DPI of your mouse, if you click on that button, you will notice that your pointer became more or less sensitive as it switches to a different DPI profile. So, make sure you are not pressing accidentally as it will change your pointer’s sensitivity by switching to a different profile. If you were not clicking that button or if there is no such button on your mouse, move to the next solution.
2] Check Mouse Manufacturer’s App
Some Mouse Manufacturers give their own applications along with the mouse, since you are facing an issue, open that app and see if there is a feature that is enabled that will automatically choose DPI or sensitivity for you. Also, set the sensitivity in that app as well. In case, there is no such app or feature, move to the troubleshooting guide.
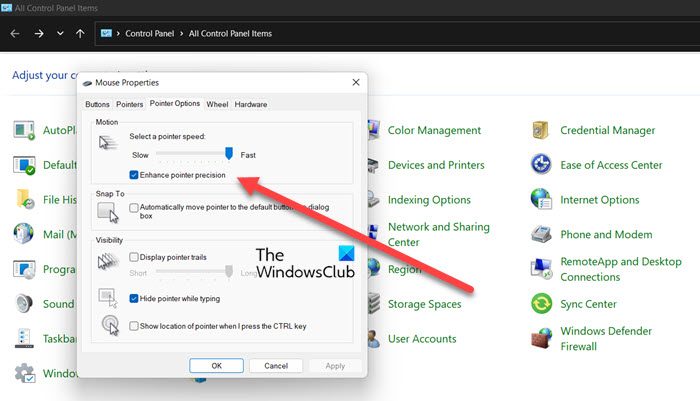
3] Turn off Enhance Pointer Precision

Enhance Pointer Precision works perfectly on a lot of software, especially Microsoft apps, but it can fail to work on a non-Windows app. That is why we would recommend you disable Enhance Pointer Precision from your computer’s Control Panel and see if that helps. Follow the prescribed steps to do the same.
- Hit Win + R, type “Control” and hit Enter.
- Set View by to Large icons.
- Click on Mouse, it will launch Mouse Properties.
- Go to the Pointer Options tab.
- Untick Enhance pointer precision box.
- Click Apply > Ok.
Hopefully, this will do the job for you.
4] Run Hardware and Device Troubleshooter

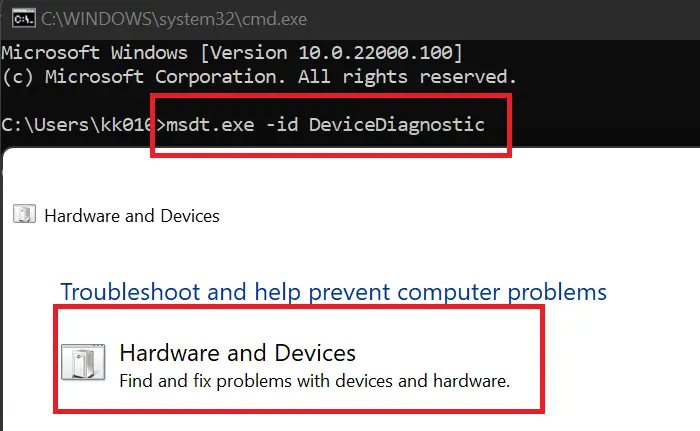
Hardware and Device Troubleshooter can automatically detect what’s wrong with your hardware, your mouse in this case, and then deploy a suitable solution. Unlike most troubleshooters, this is not buried in the Windows Settings but in order to run it, you need to run a cmd command. To do the same, first of all, open Command Prompt as an administrator, you can search it out from the Start Menu or by Win + R, type “Cmd”, and hit Ctrl + Shift + Enter.
Once Command Prompt window is open, paste the following command and hit Enter.
msdt.exe -id DeviceDiagnostic
It will open the Hardware and Device troubleshooter, just follow the on-screen instructions to run the troubleshooter. Hopefully, this will do the job for you.
5] Update Windows and all its drivers
If there is a bug that is causing this issue, then the only thing that you can do to resolve it is to update your Operating System along with all its drivers. So, first of all, check for updates, and install the update if it is available. Then, try any of the following methods to update all your device drivers.
- You can pick any one of the free driver update software to update your drivers.
- Install Driver and Optional Update from Windows Settings.
- Update Device Driver from Device Manager utility.
- Download the driver from the manufacturer’s website
After updating the driver, check if the issue persists.
6] Reinstall the mouse driver

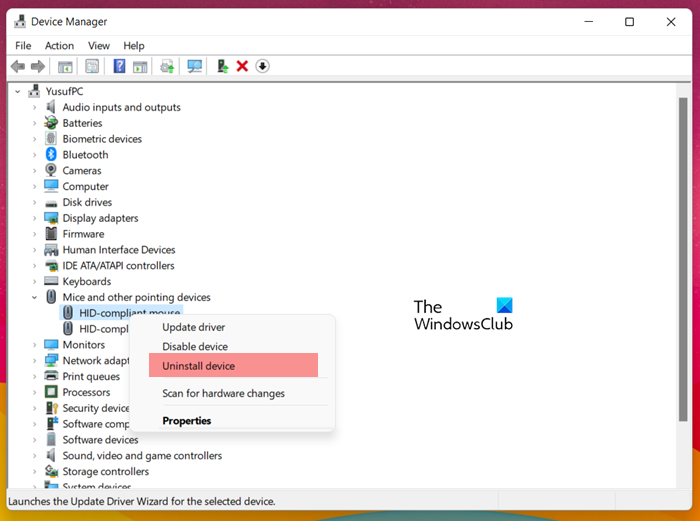
If updating the driver doesn’t work, then maybe there is an issue with the driver of your mouse. It is pretty common for a driver to get corrupted or face some sort of glitch. That is why Windows has a Device Manager that lets you uninstall a driver effortlessly. So, first of all, let us remove the Mouse driver. Follow the given steps to do the same.
- Open Device Manager by Win + X > Device Manager.
- Expand Mice and other pointing devices.
- Right-click on your mouse’s driver (it will have the manufacturer’s name) and select Uninstall device from the context menu.
- Click on Uninstall again when prompted.
Once the driver is removed, to reinstall it, right-click on Mice and other pointing devices and select Scan for hardware changes. This way, Windows will detect connected hardware and install appropriate software. You can also unplug and replug the dongle if you think that’s easier. Whatever method you choose, the driver will get installed, and hopefully, this time you won’t face the issue in question.
7] Troubleshoot in Clean Boot
If nothing worked, your last resort should be to perform Clean Boot and find out the culprit. There is a lot of third-party software ready to interfere with the Windows processes and cause trouble to the user, booting the OS in a Clean Boot state will disable all non-Windows processes, which you can disable manually to stumble upon the troublemaker. Then, you can uninstall that app and your issue will be resolved.
Hopefully, you are able to get a constant Mouse sensitivity after executing the solutions mentioned in this post.
Read: How to change Touchpad Sensitivity in Windows 11/10
How do I turn on Mouse Acceleration in Windows 11?
Mouse Acceleration is nothing but Enhance Pointer Precision, you can check the third solution, just instead of unticking the box, you have to tick it. Another method for the same is given below.
- Open Settings.
- Go to Bluetooth & devices.
- Click on Mouse > Additional mouse settings.
- Go to Pointer Options and tick Enhance pointer precision.
That’s it!
Also Read: How to Enhance Mouse Pointer Precision in Windows.