Windows lets you change the Mouse Properties as per your requirements. By opening the Mouse Properties, you can swap primary and secondary mouse buttons, change the pointer speed, change the mouse scroll wheel speed, etc. After applying changes, Windows saves these settings until you reset or change these settings again. But for some users, the mouse settings keep resetting automatically after restart. This is a very annoying issue as users have to do all the changes to mouse properties every time they boot their computer. If your mouse settings, speed or properties reset on a restart, you can try the solutions provided in this post.
Mouse Settings or Properties reset on restart
If your Mouse Settings, Speed or Properties reset on a restart on your Windows 11/10 computer, then these suggestions may help you resolve the issue:
- Uninstall additional mouse software
- Run Hardware and Devices Troubleshooter
- Update or reinstall your mouse driver
- Troubleshoot in a Clean Boot state
- Tweak Windows Registry
- Create a new user account
- Miscellaneous fixes
Let’s see all these solutions in detail.
1] Uninstall additional mouse software
Some users install more than one mouse software on their Windows devices. In this case, different mouse software can create a conflict and cause issues in a user’s system. If you have installed more than one mouse software, uninstall the additional software and keep only one of them. Uninstalling additional mouse software will eliminate the conflict among mouse software and the problem will get fixed.
2] Run Hardware and Devices Troubleshooter
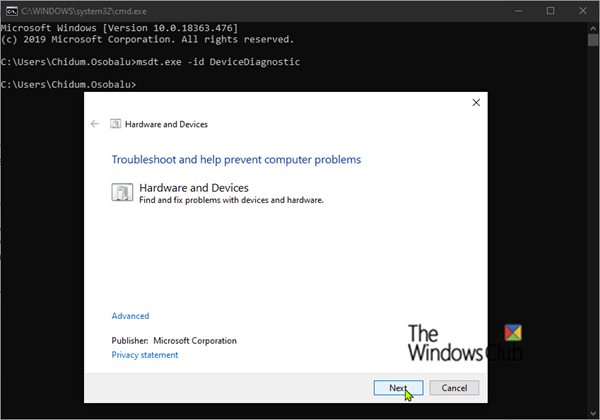
The Hardware and Devices Troubleshooter is an automated tool that helps users fix hardware-related issues on a Windows computer, provided the hardware is not faulty or malfunctioned. Run Hardware and Devices Troubleshooter and see if it helps. You can launch it by executing the following command in the Command Prompt.
msdt.exe -id DeviceDiagnostic
3] Update or reinstall your mouse driver
The problem might be associated with your mouse or touchpad driver. If a driver gets corrupted, the respective hardware device doesn’t work properly. The corrupted driver issue on a Windows PC can be fixed by updating or reinstalling it.
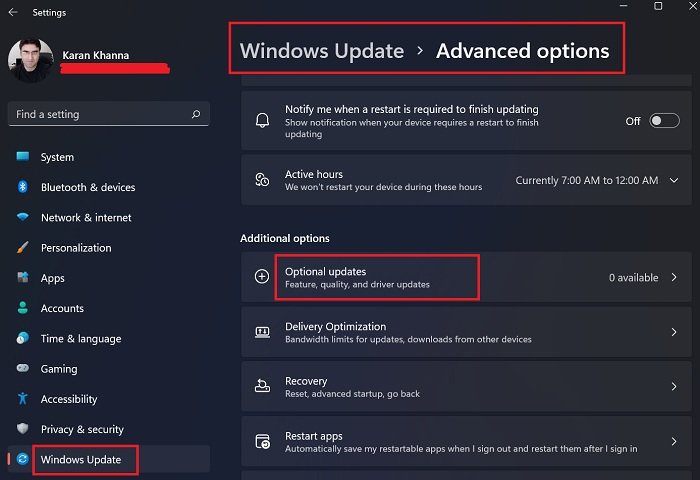
Windows 11 and Windows 10 users can update any device driver via the Optional Updates feature. Open Windows 11/10 Settings and go to “Windows Update > Advanced options > Optional updates” and see if an update for your mouse or touchpad driver is available there. If yes, install the update.
If an update is not available, we suggest you uninstall and reinstall your mouse or touchpad driver. The steps for the same are:
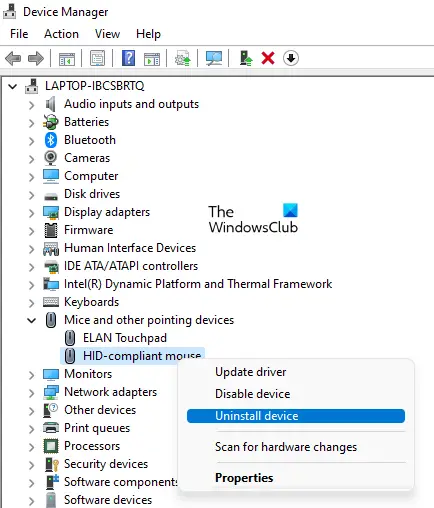
- Press the Win + X keys and click Device Manager.
- When the Device Manager opens up, expand the Mice and other pointing devices node.
- Right-click on your mouse or touchpad driver and select Uninstall device.
- Close the Device Manager and restart your computer. You will not be able to use your mouse or touchpad after uninstalling the driver. Therefore, you have to use the keyboard shortcuts to restart your computer.
After restarting your computer, Windows will automatically detect the missing driver and install it.
4] Troubleshoot in a Clean Boot state
One cause of the problem is a conflicting startup program. You can identify it by troubleshooting your computer in a Clean Boot state. The Clean Boot is a state in which Windows loads itself with only required services. All the other third-party services and applications remain disabled in the Clean Boot state.
Change your mouse settings and restart your computer in a Clean Boot. Now, open the Mouse Properties and see if the changes are reset or not. If the mouse settings remain as is after restarting the computer in Clean Boot, the issue is occurring due to a conflicting third-party startup app. Now, restart your computer in normal mode and disable one of the startup programs from the Task Manager. After that, restart your computer and see if the mouse settings remain as is or reset to default.
If the mouse settings reset to default, disable another startup program and restart your computer again. See if the mouse settings reset this time too. Repeat this process until you find the problematic startup app. Once you find the culprit, consider uninstalling it. Or you can visit its vendor’s official website to check if an update for the software is available.
5] Tweak Windows Registry
This fix is for the users who have Synaptics touchpad. Tweaking Windows Registry has worked for many users with Synaptics touchpad. Hence, this method will surely resolve your problem. If you have a Synaptics touchpad, you can also try this. Before you proceed, we recommend you create a System Restore Point and backup your Registry.
Follow the instructions carefully as any mistake can lead to serious errors in your system.
Open the Run command box (Win + R keys) and type regedit. Click OK and click Yes in the UAC prompt. When the Registry Editor appears on your screen, copy the following path, paste it into the address bar of the Registry Editor, and hit Enter.
HKEY_LOCAL_MACHINE\SOFTWARE\Synaptics\SynTP\Install
Make sure that you have selected the Install folder on the left pane. Now, look for the DeleteUserSettingsOnUpgrade key on the right side. Once you find it, right-click on it and select Modify. Change its Value Data to 0. Click OK to save the changes. Restart your computer.
This should help.
6] Create a new user account
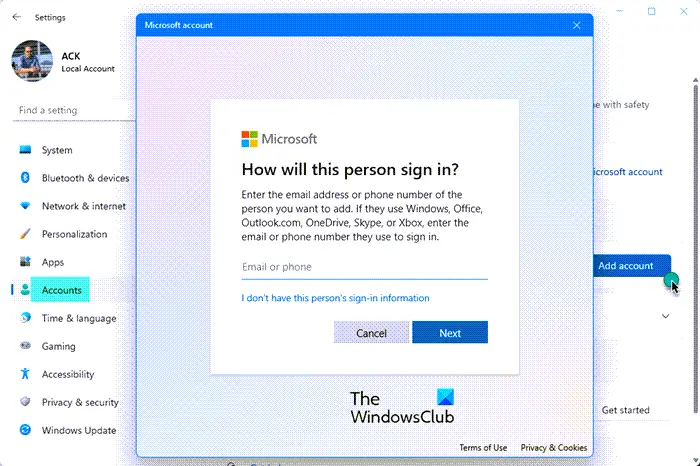
Sometimes the problems occur due to the corrupted user profile. If this is the case with you, the problem should not appear in a new user profile. We suggest you create a new user profile and see if the mouse settings change after restart in that user profile. If the problem does not appear in the new user profile, you can delete your old profile and start using the new one.
7] Miscellaneous fixes
Some users have reported that the mouse swap button settings keep resetting after every restart. In Windows, you can swap left and right mouse buttons. After changing this setting, the left mouse click will open the context menu and the right click will become the primary button. This setting is useful for users who work with their left hand. If the mouse swapping setting keeps resetting to default, you can change it in the Registry Editor.
Open the Registry Editor and go to the following path:
HKEY_CURRENT_USER\Control Panel\Mouse
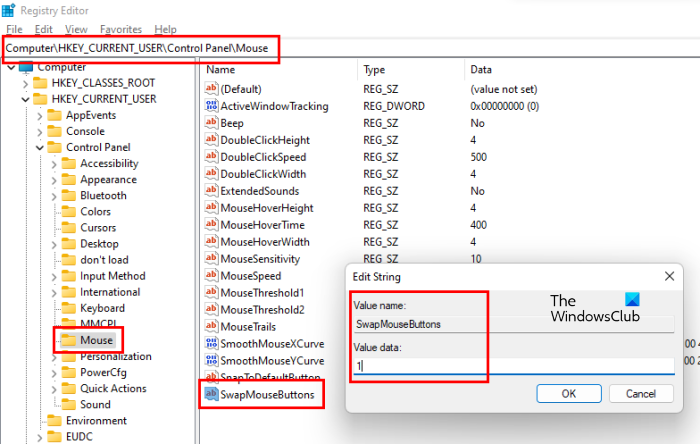
Make sure that the Mouse folder is selected on the left side. Look for the SwapMouseButtons key on the right side. Now, right-click on the SwapMouseButtons key and select Modify. Because the mouse swap buttons keep resetting automatically after the restart, you should see 0 in its Value Data. Change its Value Data from 0 to 1 and click OK. Restart your computer. The issue should get fixed.
In Windows, you can also change your cursor to a custom cursor. Some users have reported that their cursor reset to default on every restart. See this post if your mouse cursor won’t stay permanent after a restart.
How do I change my mouse settings permanently?
To change your mouse settings in Windows 11/10, follow the steps listed below:
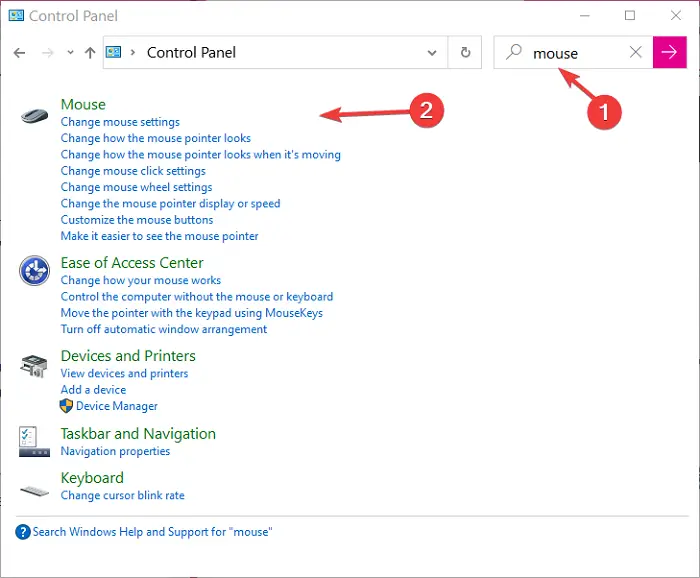
- Open the Control Panel.
- Click on the Control Panel Search Bar and type mouse.
- Select Mouse. This will open the Mouse Properties.
- In the Mouse Properties window, you can change different properties of your mouse in different tabs.
After changing your mouse settings, click Apply and then click OK to save the changes. If your mouse settings keep changing to default after every time you restart your computer, try the solutions provided in this article.
How do I reset my mouse properties?
In Windows 11/10, there is no option to reset all the mouse properties to default. However, you can reset your mouse pointer to default by opening the Mouse Properties window. Go to “Control Panel > Mouse > Mouse Properties” and select the Pointers tab. Now, click on the Use Default button.
I hope the solutions provided in this post helped you fix the issue.
Read next: Mouse pointer keeps changing to an arrow with a vertical scroll bar.
Leave a Reply