If your mouse pointer is stuck in the corner of the screen in Windows 11/10, the solutions provided in this article will help you. Usually, there are multiple causes of such types of problems, like a corrupted driver, corrupted system files, a conflicting background application, etc. Here, we have provided all possible solutions that will help you resolve this problem.
Mouse stuck in corner of screen in Windows 11/10
Use the following fixes if your mouse pointer is stuck in the corner of the screen in Windows 11/10.
- Restart your computer
- Disable and re-enable your mouse driver
- Roll back or update your mouse driver
- Disable your touchpad
- Align your monitors properly
- Repair your system files
- Check for interference issue
- Troubleshoot in a Clean Boot state
- Restore your system.
Below, we have provided all these fixes in detail.
1] Restart your computer
This is the easiest fix. Restarting a computer helps fix many common issues, like the one you are currently facing. Because you are unable to use your mouse, you have to use the keyboard shortcuts to restart your computer.
- Press the Win + X keys.
- Now, press U.
- Now, press R.
2] Disable and re-enable your mouse driver
If restarting your computer did not fix the issue, disable and re-enable your mouse driver. It can help. You have to use your keyboard to disable and re-enable your mouse driver because your mouse is not usable at this time.
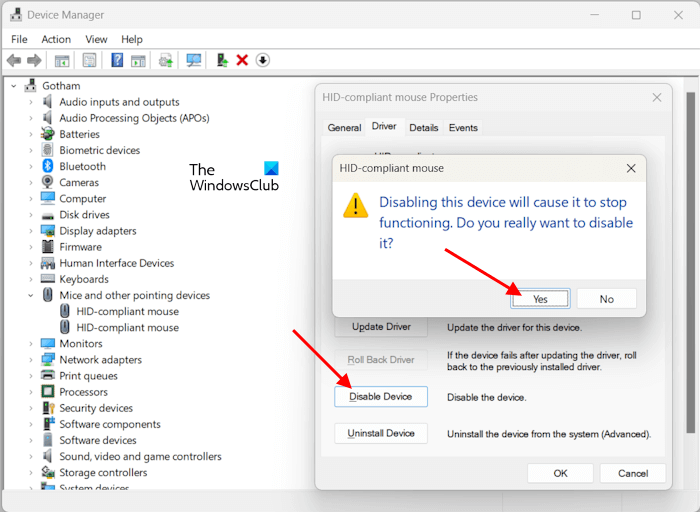
Follow the steps provided below:
- Press the Win + X keys.
- Use your arrow keys to select the Device Manager. Press Enter to open the Device Manager.
- When the Device Manager opens up, press the Tab key at one time.
- Now, use your arrow keys to highlight the Mice and other pointing devices branch. When highlighted, press the right arrow key to expand the branch.
- Use your arrow keys to highlight your mouse driver. When highlighted, press Enter. This will open the mouse driver properties window.
- Press the Ctrl + Tab keys to move to the Driver tab.
- Keep pressing the Tab key to highlight the Disable Device button.
- Press Enter. Press the Tab key to highlight the Yes button. Now, press Enter.
After disabling your mouse driver, restart your computer and then re-enable your mouse driver.
Read: Computer freezes but Mouse still moves in Windows 11
3] Roll back or update your mouse driver
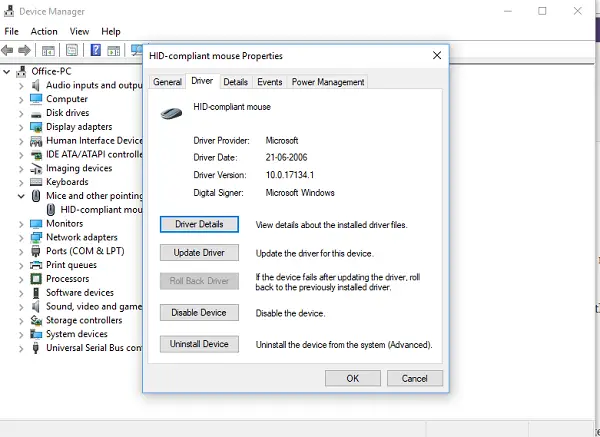
If the problem still persists, the next step that you should do is roll back or update your mouse driver. You have to use the Device Manager to roll back your mouse driver. Again, you have to use your keyboard to Roll back your mouse driver. We have described the detailed method in the previous fix. If the Roll back option is not greyed out, select it to roll back your mouse driver.
If the roll back option is greyed out, you cannot roll back your mouse driver to the previous version. Now, update your mouse driver. Use another computer to download the latest version of your mouse driver from the official website of the manufacturer. Now, move the installer file to your computer and then install it. Alternatively, you can try uninstalling and reinstalling the mouse driver. Uninstall the mouse driver via the Device Manager and then restart your computer.
4] Disable your touchpad (solution for laptop users)
According to the feedback of some users, their touchpad was causing this issue. In this case, updating the touchpad diver can help. To check if this is the case with you, disconnect your external mouse (if applicable) and then see if the problem persists. If the problem persists after disconnecting the external mouse, your touchpad may be causing the issue.
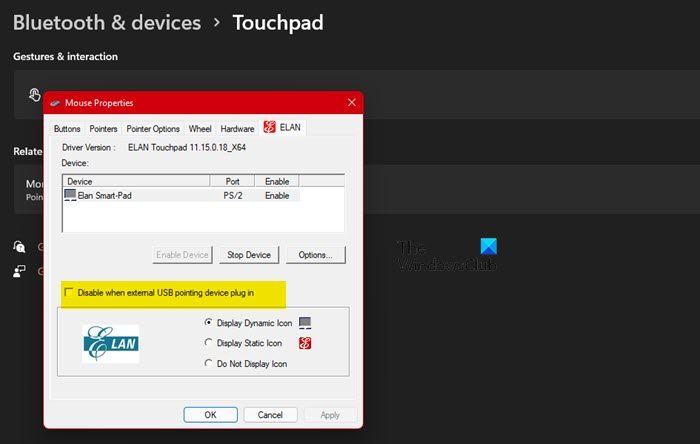
To confirm this, disable your touchpad. After disabling the touchpad, the problem should get fixed. Now, connect your external mouse. If the problem reappears, the issue lies somewhere else. Maybe a background application is causing the conflict.

If the touchpad is causing the issue, update or reinstall your touchpad driver. If you do not use your touchpad, you can disable it permanently and keep using your external mouse. Laptops of some brands have dedicated software to disable the touchpad. For example, ASUS laptop users can open the MyASUS app and lock the touchpad under the Customization section to disable the touchpad.
5] Align your monitors properly (if applicable)
This solution is for users who use multiple monitors. Align your monitors in Windows 11/10 Settings. This fix has helped some users. Open Windows 11/10 Settings and go to “System > Display.” Now, drag your display(s) to rearrange them properly.
6] Repair your system files
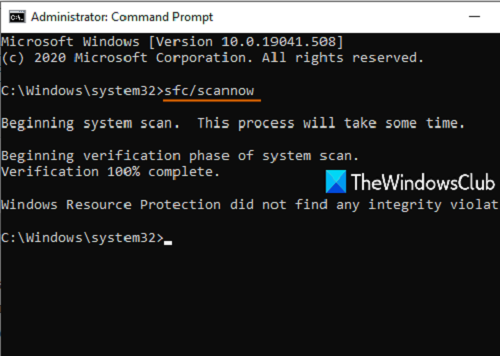
One possible cause of this issue is the corrupted system files. You should run SFC and DISM scans on your system to repair the corrupted system files. To run SFC and DISM scans, you have to use the Command Prompt as an administrator.
After launching the elevated Command Prompt, type the following command and hit Enter.
sfc /scannow
Do not interrupt the scanning process. Let it be completed properly.
7] Check for interference issue
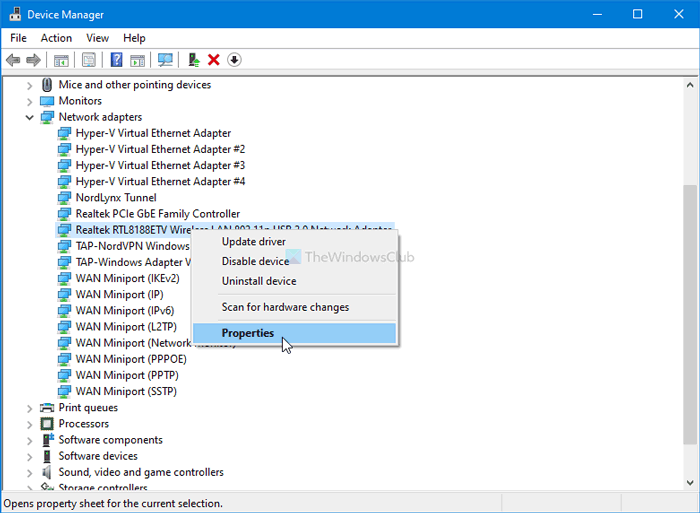
This fix is for wireless mouse users. Interference issues occur with wireless connections, like Bluetooth mice. You may experience interference with your Bluetooth mouse if you have placed the Bluetooth mouse near the USB 3.0 port and a device is connected to that port, or if your computer is connected to the WiFi signal with the same frequency as Bluetooth.
To fix this issue, move your Bluetooth mouse away from the USB 3.0 port or change your WiFi signal frequency.
8] Troubleshoot in a Clean Boot state
The problem might also be occurring due to a conflicting background application. To check this, you have to enter the Clean Boot state and troubleshoot there. To start your computer in a Clean Boot state, you have to use MSConfig and disable all third-party startup apps and services. Be careful while disabling the third-party Services. You will make your problem worse if you accidentally disable all the Services.
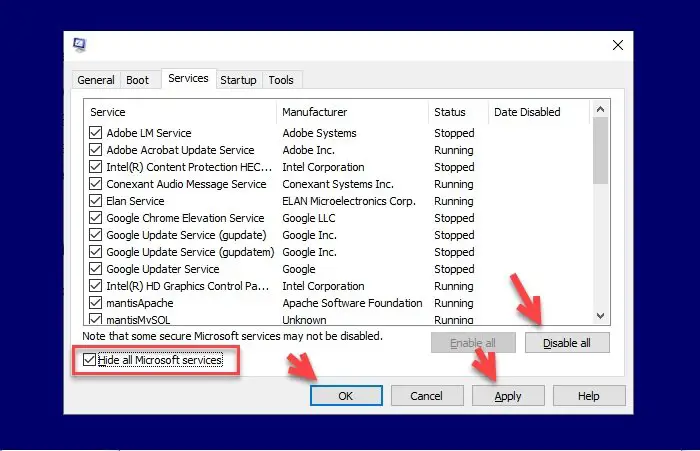
Once you enter the Clean Boot state, check if the problem persists. If not, a third-party background app or service is the culprit. Now, you have to identify the problematic app or service. To do so, follow the steps written below:
- Enable some of the startup apps and restart your computer.
- Check if the problem persists. If not, enable some other startup apps and restart your computer again.
- If the problem persists, disable one of the startup apps from those you have just enabled and restart your computer. Keep disabling the startup apps one by one and restart your computer every time you disable a startup app. Repeat the process until the problem disappears.
When the problem disappears, the app that you have just disabled is the culprit. Repeat the same process to find out the problematic Service but this time you have to use the MSConfig app instead of the Task Manager. According to some reports, the Ubisoft background process was found culprit.
9] Restore your system
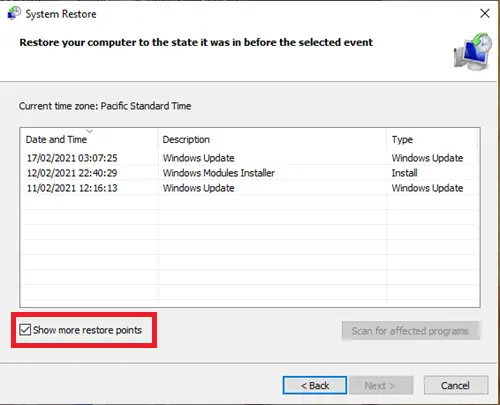
If nothing helped you, restore your system. This step will take your system to the previous working state. While performing this step, select the restore point that was created before the date on which the issue started occurring. This step will also uninstall the programs you installed after the selected date.
That’s it. I hope this helps.
Read: Cursor keeps moving to the left when typing.
Why is the mouse in the middle of the screen?
There may be many reasons why your mouse cursor is stuck in the middle of the screen, like a corrupted mouse driver, corrupted system files, etc. Moreover, the problem may also be with the mouse itself.
How do I change my cursor back to normal in Windows 11?
If you have changed your mouse cursor and now you want to change it back to normal on Windows 11, open Mouse Settings via the Control Panel. Now move to the Pointers tab and select the cursor that you want to change back to normal. Now, click Browse and select the default cursor from the list.
Read next: Mouse is highlighting everything when I click.