Network Driver Interface Specification (NDIS) is a programming interface for the network interface cards that aids in the proper functioning of a system driver in a computer network. NDIS helps the computer system to communicate with other connected devices and hardware components on a computer network. Relatedly, ndis.sys is a critical system file that is developed by Microsoft for the Windows operating system. The system files or sys files are the essential part of the Windows system and a repository of system driver settings used by the Windows system to communicate with the connected hardware and devices
BUGCODE_NDIS_DRIVER
The BUGCODE_NDIS_DRIVER bug check has a value of 0x0000007C. This bug check indicates that the operating system detected an error in a networking driver.

The ndis.sys files are mostly stored in a driver folder C:\Windows\System32\drivers and it is necessary for the normal functioning of the operating system. While the presence of ndis.sys system file is not known to affect the normal functioning of an operating system, some of the Windows users have encountered ndis.sys blue screen errors on their Windows system. The Blue screen error usually occurs when users open a program and function. The error also occurs when the driver gets loaded during the system startup or may occur during Windows shutdown.
The cause for the ndis.sys blue screen error is not exactly known, but the issue may occur because of corrupt files, misconfigured device drivers malicious programs, bad drivers, corrupted Windows registry, missing system files, or due to the damaged system files. The Ndis.sys error may also arise if your hard disk is damaged and also if the system RAM is corrupted.
During such error episodes most of us try to disable ndis.sys file. However doing so will not fix the problem as the ndis.sys file is required for normal functioning of the operating system, and even after disabling ndis .sys, the file will start all over again. Additionally one may also want to temporarily disable security software as firewalls and antiviruses are sometimes known to cause the software conflicts. In this article, we explain some solutions to fix ndis.sys Blue screen error on Windows 10. The accompanying error message could be – DRIVER_IRQL_NOT_LESS_OR_EQUAL.
Fix ndis.sys failed BSOD error
1] Update/Reinstall your PC Device Driver
Ndis.sys Blue screen error can occur if you are using an outdated network driver or corrupted drivers – notably NDIS miniport driver (Ndis.sys.. It is recommended to update your device driver to fix the blue screen error. On a related note make sure you update an appropriate device driver in order to fix the problematic drivers. Follow the below steps to reinstall the network device driver to solve the network driver issue.
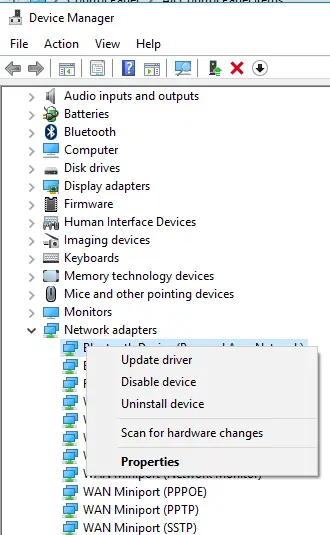
Reboot the system in Safe Mode. Open Control Panel and navigate to Device Manager. Click on Network adapters and select the network device from the drop-down menu.
Right-click on the network device and click on Uninstall from the drop-down menu to uninstall the device driver.

Click OK to confirm and click on Scan for hardware changes to reinstall the driver.
If this does not help, you may consider rolling back your device driver.
2] Rollback Network drivers
Identifying the recently installed network drivers and then trying to restore the previous network drivers can help to fix the ndis.sys blue screen error problem.
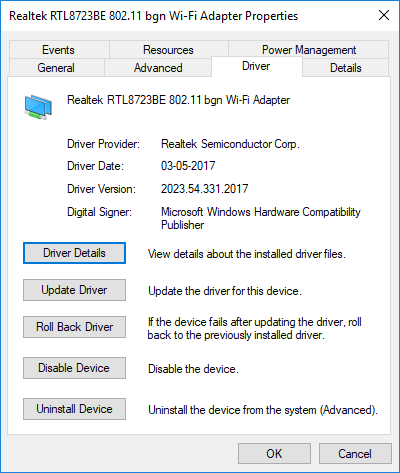
Open Control Panel and navigate to Device Manager. Click on Network adapters and select the network device from the drop-down menu
Right click on the network device and click on Properties. Go to Drivers tab and click on Roll Back Drivers.

Click Yes and restart the system.
3] Run SFC scan

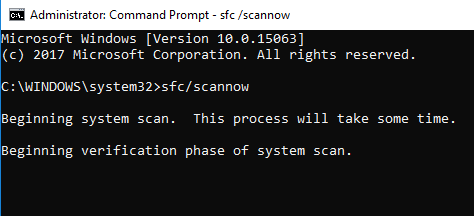
System File Checker is a command prompt tool that scans for corrupted system files including ndis.sys files as well as repair the corrupted system files. It is recommended to run an SFC scan in order to repair the problematic system files.
4] Run CHKDSK

The corrupt hard drive may lead to ndis.sys blue screen error. CHKDSK scans the disk to check if there are any corrupt hard drives.
Search Command Prompt in the Start Menu.
Right click on the Command Prompt and select the option Run as administrator from drop-down menu
Type the command CHKDSK and click Enter to check your disk. You may run the following command:
chkdsk /f /r
Restart your system.
5] Run DISM

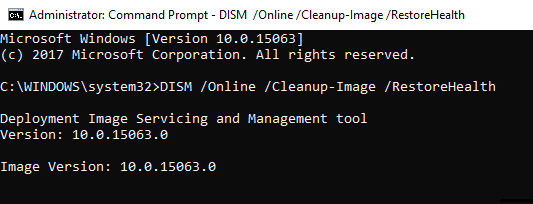
To repair a corrupt system image, search for Command Prompt in the Start Menu. Right click on the Command Prompt and select the option Run as administrator from the drop-down menu
Run this command-
DISM /Online /Cleanup-Image /RestoreHealth
Restart your system.
6] Perform System Restore
Performing System Restore can resume your system programs back to the time when the system was potentially working perfectly. It is recommended to perform System Restore to fix the blue screen issue that would return your programs and system files back to the time when the Windows PC was working properly.
Hope something helps!