We have noticed the Event ID 4307 related to NetBIOS in the Event Viewer indicating that there is some network issue with our system. This issue means that our computer is unable to access the network because its name does not match an IP address. In this post, we are going to talk about this issue and see what you can do if the Event Viewer log says Initialization failed because the transport refused to open initial addresses, Event Id 4307.
Initialization failed because the transport refused to open initial addresses
Source: NetBT
EventID: 4307

Fix Initialization failed because the transport refused to open initial addresses, Event ID 4307
To fix Initialization failed because the transport refused to open initial addresses, Event ID 4307 in the Event Log of Event Viewer in Windows 11/10, follow the solutions mentioned below:
- Reset Internet protocols
- Check the DHCP Client service status
- Reinstall the Network driver
- Restore your system back to a system restore point
- Reinstall or repair Windows
Let us talk about them in detail.
1] Reset Internet protocols
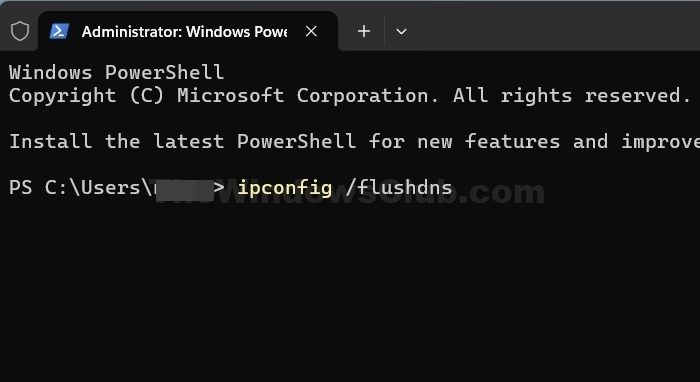
One reason you may encounter this issue is a glitch with your Internet protocols, such as TCP/IP, Winsock, and DNS. You can easily reset the protocols using some simple commands. So, launch the Command Prompt as an administrator and then run the following commands.
netsh int ip reset
ipconfig /flushdns
netsh winsock reset
You can also release TCP/IP, flush DNS, reset Winsock, and reset Proxy with a Batch file. Once you reset the Internet protocols, check if the issue is resolved.
2] Check the DHCP Client service status
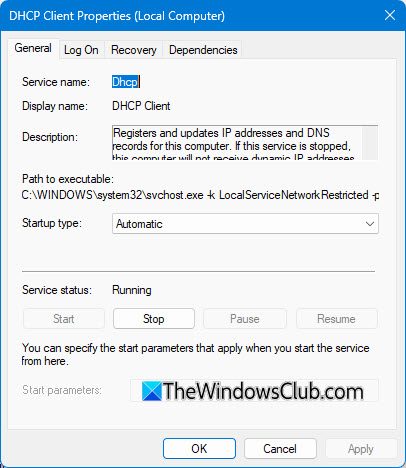
The DHCP Client service on Windows is responsible for obtaining IP addresses and other communication parameters from a DHCP (Dynamic Host Configuration Protocol) server. This service is essential for automatically configuring network settings on your computer, ensuring seamless connectivity to the network and the internet. In case, the server is not running or is not allowed to operate automatically, we will encounter this issue. To check and resolve this issue, you can follow the steps mentioned below.
- Open the Services app by searching it out of the Start Menu.
- Now, look for the “DHCP client” service, double-click on it, and see if the Startup type is Automatic.
- If it is Manual, set it to Automatic, and click on Start.
- Finally, click on Apply > OK.
Hopefully, this will do the job for you.
3] Reinstall the Network driver
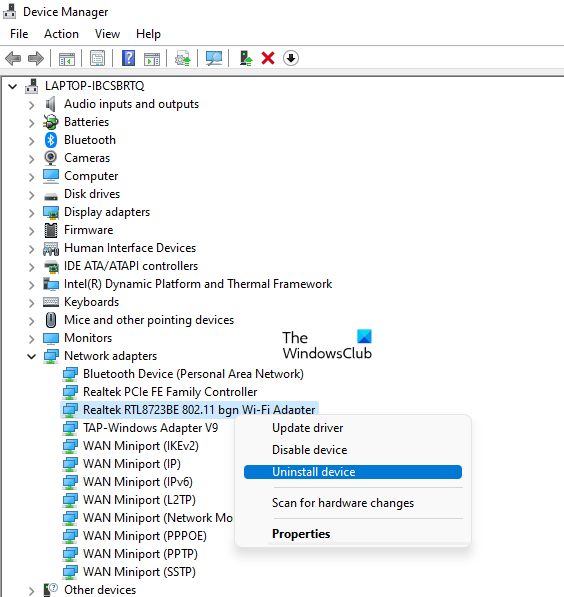
You may also encounter this issue if the network driver is corrupted. This problem is pretty common when we update our system. Therefore, we recommend you reinstall the network driver. However, before uninstalling the device, you need to visit the official website and download the latest version of the driver. Once done, follow the steps mentioned below.
- Open the Device Manager.
- Expand Network adapters, right-click on your network adapter, and select Uninstall device.
- Click on Uninstall again to confirm your action.
- After uninstalling the device, right-click on the Network adapters, and select Scan for hardware changes.
This should install back the driver that we just uninstalled, but if it doesn’t do that, you can install the driver we asked you to install earlier.
4] Restore your system back to a system restore point
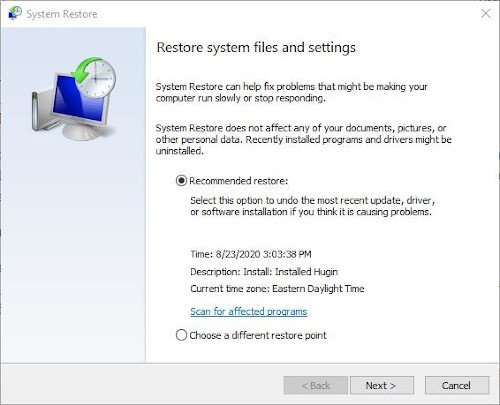
If you have created a system restore point, now is the time to use it. In case the solutions mentioned earlier didn’t resolve the issue for you, go ahead and restore your system, do keep in mind that this will eliminate any changes that you have made after the creation and it will only work if you have created a restore point. To deploy the restore point, follow the steps mentioned below.
- Search for “System Restore Point” in the Start Menu.
- You will be on the System Protection tab, from there, click on the System Restore button.
- Click on Next, select a restore point from the list, and then click on Next.
- Finally, follow the on-screen instructions to complete the restore.
Hopefully, this will do the job for you.
5] Reinstall or repair Windows
If all else fails, our last resort should be to reinstall Windows. You can reinstall Windows 11 using Windows Update or repair Windows 11 without losing data or programs. Additionally, try to repair Windows computers using the Installation Media. If the issue is due to a corrupted system image, this solution will do the job for you.
Hopefully, you will be able to resolve the issue using the solutions mentioned in this post.
Read: Fix Network & Internet connection problems in Windows
What causes Event ID 4307?
Event ID 4307 occurs when your computer’s network name does not match its IP address. This can happen for various reasons, such as an incorrect computer name, issues with the network adapter, or problems with the TCP/IP protocol settings. The error indicates that your computer cannot access the network because it couldn’t open the initial addresses needed for communication.
Read: Fix Invalid IP address problem in Windows
How can I resolve Event ID 4307?
If you want to resolve Event ID 4307, you should start resolving the issue by resetting the Internet protocols such as TCP/IP, DNS, and Winsock. Also check the DHCP Client service status and reinstall the Network driver if required.
Also Read: Troubleshoot TCP/IP connectivity issues in Windows.

Leave a Reply