Is your Netgear wireless adapter not working properly on Windows? Some users have reported that the Netgear wireless adapter won’t work on their PC. Many have complained that its is not even being detected by Windows. Now, why does this happen and how you can fix the problem, let us find out in this guide.
How do I enable my Netgear wireless adapter on my computer?
To set up your Netgear wireless adapter on Windows, first download and install NETGEAR adapter software or install a standalone network adapter driver on your computer. After that, connect the Netgear WiFi adapter to a USB port in your PC. Now, simply connect to the wireless network using the Windows configuration tool or the installed NETGEAR software.
Fix Netgear Wireless Adapter not working, connecting to internet or detected on Windows
Here are the fixes you can use if your Netgear WiFi adapter is not working properly or is not detected on Windows 11/10:
- Check if your PC meets the minimum system requirements for Netgear Wireless Adapter.
- Try these generic troubleshooting suggestions.
- Update or reinstall Netgear WiFi adapter drivers.
- Use NetAdapter Repair to fix adapter issues.
- Change your power settings.
- Start/restart the WLAN AutoConfig service.
- Temporarily disable your antivirus.
- Tweak the channel settings for your Netgear adapter.
1] Check if your PC meets the minimum system requirements for Netgear Wireless Adapter
If your PC cannot detect your Netgear WiFi adapter, the first thing you should do is check if your computer fulfills the minimum system requirements. Most Netgear USB WiFi adapters have minimum specifications that your system needs to meet. If that is not the case, the wireless adapter won’t be detected or work correctly on your PC. So, do check the Netgear WiFi adapter’s system requirements and ensure that your computer meets them.
2] Try these generic troubleshooting suggestions

- One of the tips you should follow is to keep your Windows OS up-to-date. Install all pending Windows updates from Settings > Windows Update and see if the problem is fixed.
- If your Windows is up-to-date, try running the Network Adapter troubleshooter to let Windows detect and fix issues with your network adapter. You can open Settings using Win+I, go to System > Troubleshoot, and click on Other troubleshooters. Now, press the Run button present next to the Network Adapter troubleshooter and follow the prompted instructions to complete the task. See if it helps in fixing the issue.
- The next thing you can do to fix the problem is to connect your USB WiFi adapter directly to the computer without using a cradle or extension cable. It might be the faulty cradle or extension cable, so the adapter is not detected on your PC.
- You can also check your adapter hardware and make sure it is in proper working condition or not. Insert the network adapter into a different PC and see if the same problem occurs. If yes, the problem is most likely with your adapter. You can get it checked by a technician or replace the device.
- If the problem remains, plug your USB wireless adapter into a different USB port and see if the problem is resolved. Furthermore, disconnect other USB devices and then check if Netgear wireless adapter is being detected or not.
- You can reset the network adapter in a different PCI slot in your motherboard and check if it helps.
If the above tips don’t help, you can move on to the next solution.
Read: Network Adapter missing or not showing in Windows
3] Update or reinstall Netgear WiFi adapter drivers
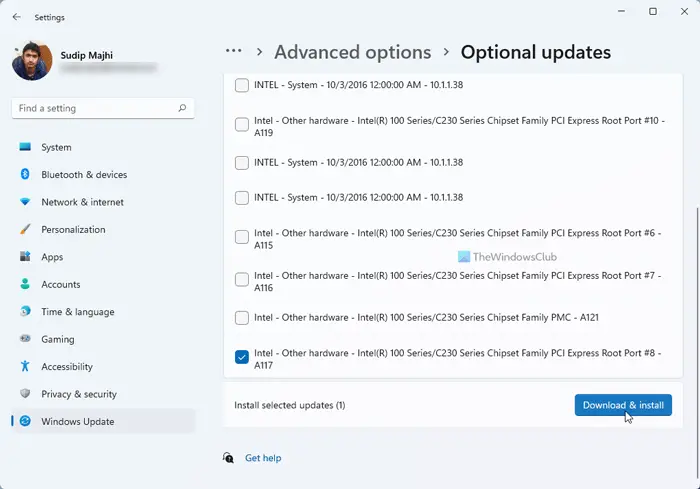
You need to have the latest network drivers installed on your PC to avoid issues with your network adapter. Outdated drivers will cause issues like this. Hence, update your Netgear WiFi drivers from Settings > Windows Update > Advanced options > Optional updates section. Once done, reboot your PC and check if the problem is resolved.
If the problem continues even after updating network drivers, it might be the case that the drivers are corrupted, which is why you are facing this problem. So, in that case, uninstall Netgear wireless driver, remove your PC, connect your USB network adapter, and install the latest version of drivers. Here are the steps to do that:
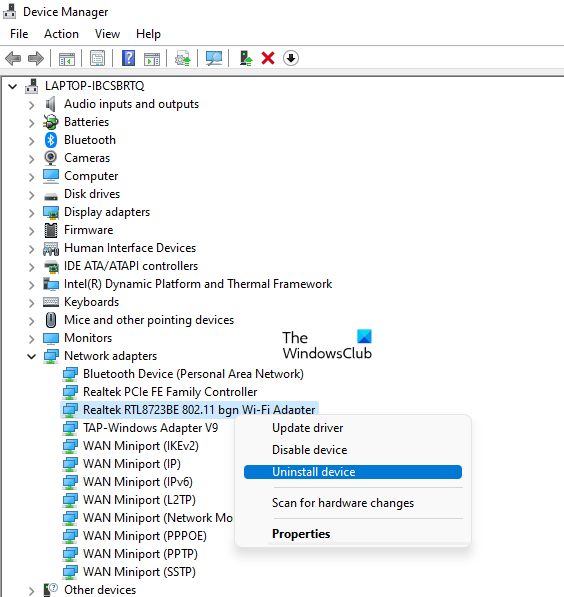
- First, press the Win+X hotkey to open up the shortcut menu and click on Device Manager to open the app.
- Now, expand the Network adapters category and locate your Netgear wireless adapter.
- Next, right-click on the adapter and choose the Uninstall device option from the appeared context menu.
- After that, follow the prompted instructions to uninstall the driver.
- Once done, reboot your computer and reconnect your Netgear USB network driver.
Windows will now detect the missing driver and reinstall the wireless network driver. You can also download the latest version of the Netgear wireless adapter driver from its official website and then install it on your PC.
See: TP-Link WN821N WiFi adapter not working or detecting networks.
4] Use NetAdapter Repair to fix adapter issues
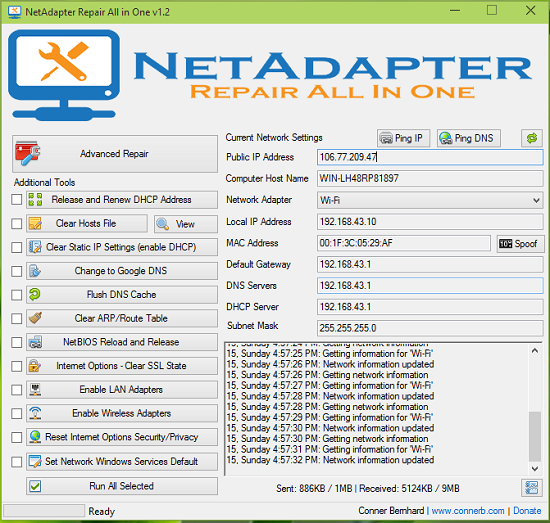
If you cannot fix the issue, use the NetAdapter Repair application to fix issues with your wireless adapter. It is a free tool to fix network adapter problems on your Windows PC. You can download and install it and then run it to troubleshoot network problems.
5] Change your power settings
It might be your power settings on Windows due to which your Netgear wireless adapter stops working. So, tweak your power settings and see if the issue is fixed. To do that, you can disable the USB selective suspend settings and Allow the computer to turn off this device to save power options to fix the issue.
Disable USB selective suspend:
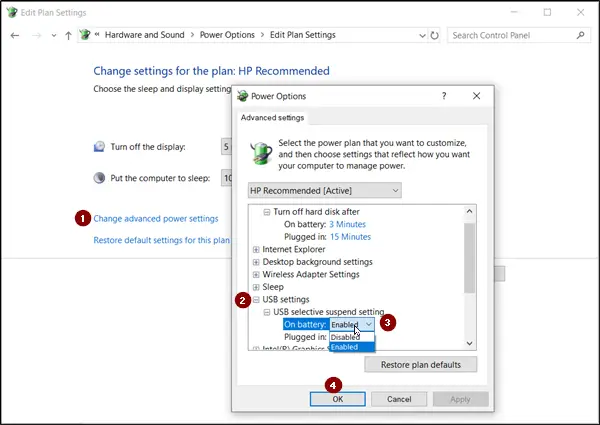
- First, open the Control Panel and go to the Hardware and Sound > Edit power plan option.
- Now, click on the Change advanced power settings button.
- In the appeared dialog window, expand the USB settings > USB selective suspend setting option.
- Next, set the above option to Disabled for both On battery and Plugged in.
- When done, press the Apply > OK button to save changes.
Disable the Allow the computer to turn off this device to save power option:
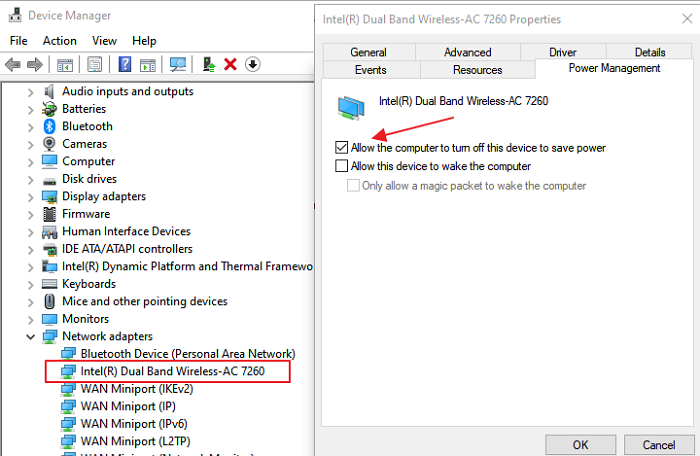
- First, open the Device Manager app and locate your USB Netgear wireless adapter device.
- Now, right-click on the device and select the Properties option.
- Next, go to the Power Management tab and uncheck the Allow the computer to turn off this device to save power checkbox.
- Once done, press the OK button and see if the issue is resolved.
Read: Fix Wi-Fi Networks not showing up on Windows PC.
6] Start/restart the WLAN AutoConfig service

If the WLAN AutoConfig service is disabled on your computer due to some modifications or is not running correctly, you might experience this issue. So, if the scenario applies, you can start or restart the WLAN AutoConfig service and check if the problem is resolved.
Here’s how:
- First, evoke the Run command box using Win+R and enter services.msc in it to launch the Services app.
- Now, locate the WLAN AutoConfig service and select it.
- Next, click on the Start button if it is not running. If the service is already running, click on the Restart the service button to restart the WLAN AutoConfig service.
- After that, double-click on the service to open its Properties window.
- Then, make sure the Startup type is set to Automatic.
- Now, press the OK button and exit the Services window.
Check if your Netgear WiFi adapter is working fine now.
See: You are currently not connected to any networks in Windows.
7] Temporarily disable your antivirus
Your overprotective antivirus suite might be preventing Windows from detecting your Netgear wireless adapter. Hence, if the scenario is applicable, you can disable your antivirus for some time, reconnect your USB network adapter, and then check if the problem is fixed.
Once the network adapter is detected, you can enable your antivirus protection. However, if the issue is the same, you can try the next fix.
Fix: Network & Internet connection problems
8] Tweak the channel settings for your Netgear adapter
If the above fixes didn’t work for you, try changing the channel settings of your Netgear adapter. 20 MHz of channel width and channels 1, 6, or 11 provide a good WiFi performance. So, try changing the settings accordingly and see if the Netgear network adapter starts working correctly. To do that, here are the steps to follow:
- First, open Run using Win+R and enter ncpa.cpl in it to open the Network Connections window.
- Next, right-click on your Netgear network and select the Properties window.
- Now, click on the Configure button and move to the Advanced tab.
- After that, set up the options accordingly and click on the OK button.
I hope this helps!
Related: Netgear Wireless Router not Working or Detected
Why is my desktop not detecting my Wi-Fi adapter?
If Windows does not detect your WiFi adapter, it likely means that your PC has corrupted or outdated network adapter drivers. Another common reason for the same is OS incompatibility issues. Your power management settings can be another potential cause. The problem might also occur because the minimum system requirements of the device are not fulfilled.
Now read: USB WiFi not working with 100417CF Access Violation error.