When querying the IP address of a website, if your nslookup works, but ping fails on Windows 11/10 PC, then there can be many reasons for that. Let’s try to resolve these issues, but before that here is what nslookup.exe and Ping means in simple words.
nslookup is a command-line tool that helps to find DNS records of a website. It sends a name server query to the DNS and obtains the corresponding IP address. It can also perform some complex functionality like finding details about FTP server, Mail server, and so on, but most of them are used by administrators. The best part of nslookup is it queries DNS server directly and doesn’t rely on the cache.
Another tool used to verify connectivity is PING. It sends a packet of information to the IP address or Domain and gets back a reply in the form of packets. If everything goes well, all packets are received, but if not, it will help you identify where exactly there is a delay in the network. However, the ping command doesn’t always attempt a DNS lookup. This means it might be using the DNS cache, and use the IP address available in that table.
While both of them helps you identify the host or IP address, but sometimes nslookup works, but ping fails in Windows 11/10.
NSLookup works but Ping fails in Windows 11/10
It may so happen that nslookup queries work for you, but when you try using PING, it fails. For example, if XYZ.com is the website name, here is how this situation will look like on command prompt.
nslookup xyz.com
Server: dns.company.com
Address: 192.168.1.38
C:\> ping xyz.com
Ping request could not find host xyz.com. Please check the name and try again.
When you use PING, the Domain name is converted into IP address, and then data is sent to that IP address. When a reply comes back, it means data is going back and forth to that domain without an issue. However, if the DNS fails to resolve the website’s IP address or if your computer doesn’t attempt a DNS lookup, you will receive a similar error message saying “Could not find host” and so on.
Try the following troubleshooting techniques to resolve this issue:
1] Flush DNS, reset Winsock and reset TCP/IP
Sometimes the websites don’t resolve because the DNS in your PC still remembers old IP. So make sure to Flush the DNS, Reset Winsock and Reset TCP/IP.
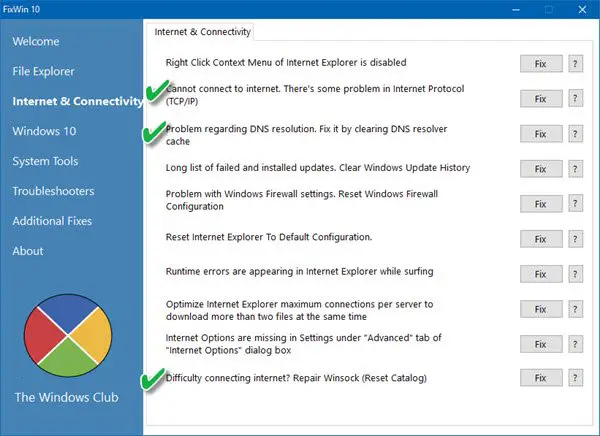
You can also use our freeware FixWin to carry out these three operations with a click.
2] Force Windows to do a DNS lookup by using FQDN
On your computer, go to Settings > Network & Internet > Status > Change adapter options.
- Right Click on the network, and then select properties.
- Select Internet Protocol Version 4 from the list of connections available in the list. In case you use IPv6, use that.
- Click Properties
- Click Advanced
- Switch to DNS tab, and select “Append these DNS suffices (in order)“
- Click on the Add button, and add . as a suffix.
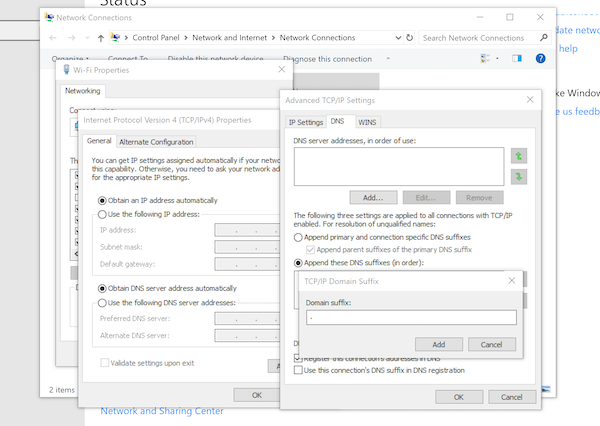
Every time you query using PING or any other tool, it will add a “.” at the end, and will force the lookup.
3] Multiple NIC Scenario
If the computer has more than one NIC connected and multiple default gateways exist, this is likely to create confusion. The solution is to remove all default gateways from the configuration of all NICs but only one default gateway.
4] Use Google Public DNS
If it does not help, use Google Public DNS and see if that works for you. You need to explicitly change the DNS settings in your operating system use the DNS IP addresses.
- First of all, right-click on the taskbar Network icon and select Network and Sharing Center.
- Select “Change Adapter Settings”.
- Search for the network connection that is used to connect to the internet; the option might be either “Local Area Connection” or “Wireless Connection”.
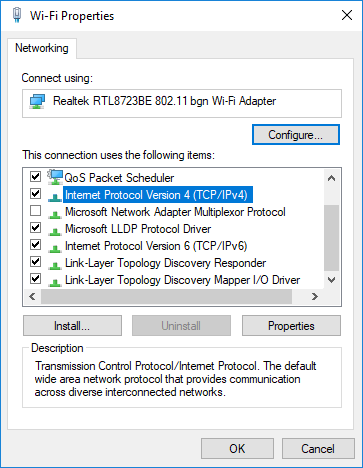
- Right-click on it and click Properties.
- Choose the new window to select “Internet Protocol 4 (TCP/IPv4)” and then click the Properties button.
- Click the checkbox for “Use the following DNS server addresses” in the new window.
- Enter in 8.8.8.8 and 8.8.4.4
- Finally, click OK and exit.
4] Check your Host File
Check your Host file to see if the website has been blocked. Many a time some third party application modifies the file to add blocklist of websites. If you find the entry, delete it.
5] Delete WLAN Profiles
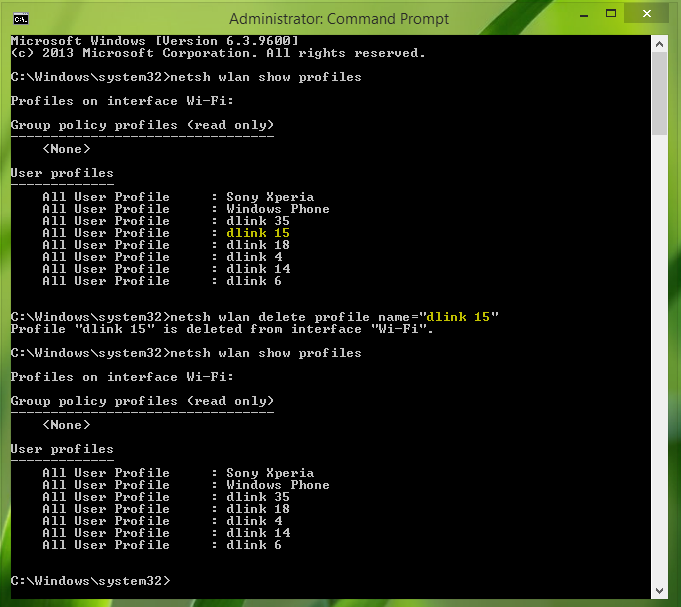
As you connect to multiple networks, all of them are saved on your PC. Next time you are around that network, it will automatically connect. It is possible that one of those networks have gone rogue, and it’s not connecting properly, or probably it keeps disconnecting from that network. It is best to delete all the WLAN Network Profiles, and start fresh,
6] Reinstall Network Adapter Drivers
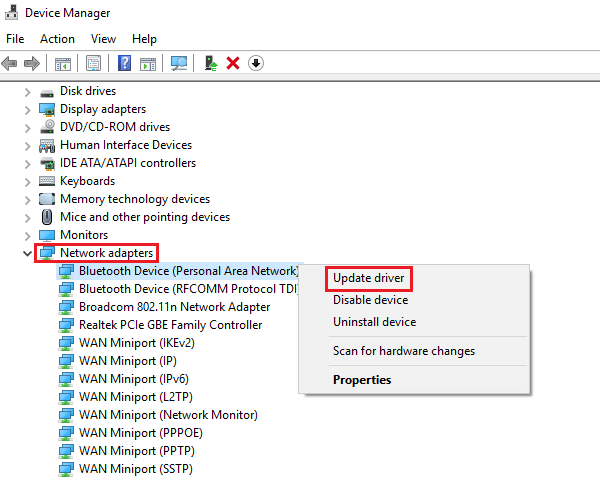
If deleting WLAN Profiles doesn’t work, the chances are that the network drivers are corrupted. You will need to reinstall the network adapters and reinstall the drivers as well for the best results. Follow the steps in the guides, and it will resolve the issue for you.
I am sure that for most of you, the first three troubleshooting tips will resolve the issue where nslookup works but ping fails. However, if its adapter driver is causing the issue, the rest of the tips will help you resolve it. Let us know which one worked for you?
Can Ping but NSLookup fails?
If you can Ping but NSLookup fails, common causes include missing DNS records for the host, misconfigured DNS server settings, or domain-search issues. Ensure DNS servers are correctly set and verify the network configuration, including the subnet mask, is consistent across all devices within the network or VLAN.
What is the difference between Windows NSLookup and Ping?
The main difference between Windows nslookup and ping is their function. Nslookup is used to query DNS to obtain domain name or IP address mapping information, while ping tests connectivity by sending packets to a host and measuring response times. Nslookup focuses on DNS resolution; ping assesses network connectivity and latency.
Leave a Reply