NVIDIA is a go-to GPU for a wide demographic of users. However, a lot of its users are complaining that NVIDIA Container stopped working on their computer. More often than not, this error appears when the computer boots, but sometimes, it also appears out of the blue. In this article, we are going to see some simple solutions that you can use to resolve the issue.

What is NVIDIA Container?
NVIDIA Container or nvcontainer.exe is meant to store processes and tasks related to your GPU. It is a step ahead of NVIDIA Docker as it supports more runtime technologies such as LXC, CRI-O, etc. It is important for your GPU and helps other programs and games to make use of the NVIDIA Graphics Card.
However, for a lot of users, NVIDIA Container fails to work. Because of this, they may or may not be able to access some graphically intensive games and apps. We are going to resolve the issue with some simple solutions.
How do I fix NVIDIA Container?
If you want to fix NVIDIA Container then you should follow the solutions that we have mentioned. But first, you should try to update your computer. Updating Windows will eradicate a bug that’s causing the issue as it will not only update your Graphics Driver but will also update all the related and unrelated services. There are some other methods by which you can update your drivers. Such as using a driver update software or from the Device Manager. If that is to no avail, then you see the solutions that we have mentioned hereinafter.
Fix NVIDIA Container stopped working
If NVIDIA Container has stopped working on your Windows 11/10 computer, then check out the following solutions mentioned below to resolve the issue.
- Reinstall Graphics Driver
- Restart NVIDIA Container Service
- Adjust Power Management
- Troubleshoot in Clean Boot
Let us talk about them in detail.
1] Reinstall Graphics Driver

You should start troubleshooting by reinstalling Graphics Driver. Before starting, you need to know that your computer can go blank for some time. So, do not panic.
Follow the given steps to uninstall the Graphics Driver.
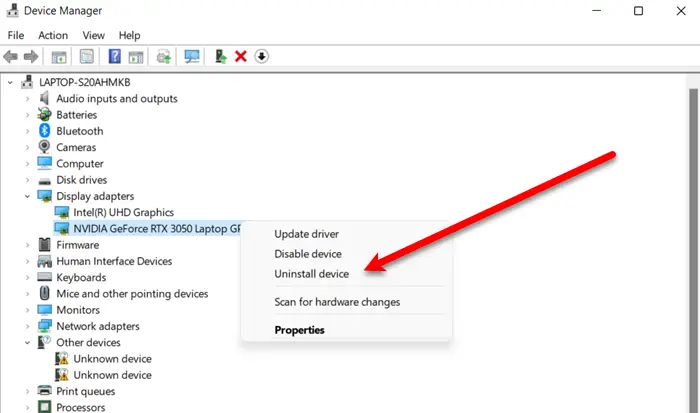
- Hit Win + X and select Device Manager.
- You should expand Display Adapter.
- Right-click on NVIDIA Graphics Driver and click Uninstall device.
- You will be asked to confirm, so, Uninstall.
Your screen will go black, so, wait for a few minutes and your Windows will automatically detect and install a Graphics Driver.
After reinstalling the Graphics Driver, reboot your computer and check if the issue is fixed. However, Windows will download a Generic Driver and that is not really what we want. So, go to the manufacturer’s website and download the latest version of the NVIDIA driver. Then you can install it on your computer and hopefully, the issue will be resolved.
2] Restart NVIDIA Container Service
Sometimes, the issue can be a glitch, hence, can be resolved easily by restarting a service. So, we need to restart NVIDIA Container Service and see if that works. Follow the given steps to do the same.
- Open Services by searching it out of the Start Menu.
- Right-click on the Nvidia Display Container Local System and click Properties.
- If it’s Stop, Start it. If it’s running, Stop and then Start it.
Wait for the process to complete and see if that works.
3] Adjust Power Management

We are going to change Power Management and see if that is to avail. We are not just going to change the setting through the Control Panel but also from the NVIDIA Control Panel.
Follow the given steps to change the Control Panel.
- Open Control Panel.
- Change View by to Large icons.
- Click Power Options.
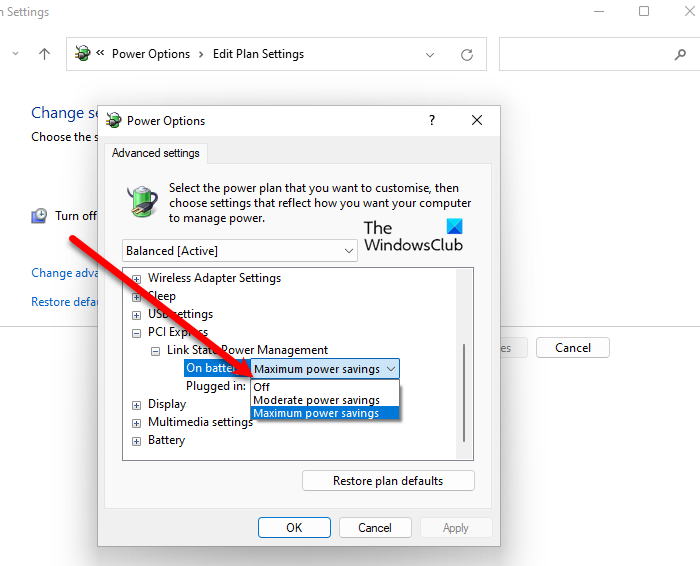
- Click Change plan settings from the selected Power Plan.
- Select Change advanced power settings.
- Expand PCI Express > Link State Power Management.
- Turn off the settings.
- Click Apply > Ok.
Now, we are going to open NVIDIA Control Panel and disable the same from there.
- Open NVIDIA Control Panel.
- Expand 3D Settings and click Manage 3D settings.
- Go to the Global Settings tab.
- Click on Power management mode and select Prefer maximum performance.
- Select Apply.
Finally, restart your computer and hopefully, the issue will be resolved.
Read: How to fix NVIDIA Control Panel not opening
4] Troubleshoot in Clean Boot
The issue can also appear because of a third-party application. These applications can interfere with your GPU causing the error in question. Since most of us have a lot of third-party apps, it is hard to point at one app. And no, we are not asking you to remove all of them. What you should do is troubleshoot in Clean Boot and find out the culprit. Then you can remove it and resolve the issue.
Hopefully, you are able to resolve the issue with the solutions that we have mentioned.
Related reads: NVIDIA Display settings are not available.