This post helps to solve NVIDIA Control Panel Manage 3D settings crashing problem on a Windows 11/10 system. Some users have complained that when they try to access the Manage 3D settings section in the NVIDIA Control Panel, it crashes the entire application instantly and this is repeated every time. While all other sections work fine, users are not able to change or customize Global Settings like Shader Cache, Low Latency Mode, Max Frame Rate, etc., and Program Settings as the Manage 3D settings section is crashing the application. If you also face this issue, then the fixes covered in this post will surely help you.

Why does my NVIDIA Control Panel keep crashing?
If the NVIDIA Control Panel keeps crashing while accessing the Manage 3D settings, then this could happen because the data files of Global settings and Program specific settings are corrupted. In addition, large paths or file names present on the desktop, and corrupt or outdated graphics card drivers can also cause NVIDIA Control Panel to keep crashing.
Why is my NVIDIA driver causing crashing?
If your NVIDIA driver keeps crashing on Windows 11/10, then check if your NVIDIA graphics card is enabled. For this, open the Device Manager, expand Display adapters, and open the right-click menu for your NVIDIA graphics card. If the device is disabled, then use the Enable device option to re-enable it. Also, use the Maximum Performance option for Power Management mode, and turn off Vsync using the Manage 3D settings section of the NVIDIA Control Panel to fix the issue.
NVIDIA Control Panel Manage 3D settings crashing
If NVIDIA Control Panel crashes when you access the Manage 3D settings section, then use the following solutions to fix this problem:
- Rename or delete nvdrsdb0.bin or nvdrsdb1.bin files
- Use the Process Monitor tool
- Update the NVIDIA graphics card driver
- Clean install NVIDIA Control Panel.
Let’s check these fixes one by one.
1] Rename or delete nvdrsdb0.bin or nvdrsdb1.bin files

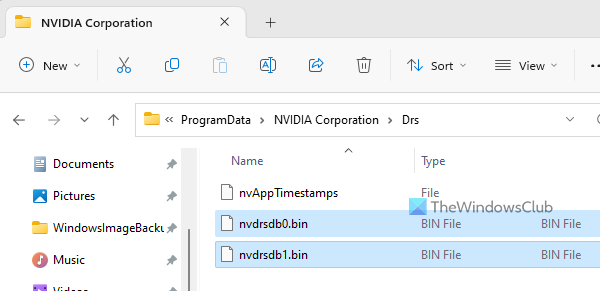
This is the most helpful solution to fix this problem. Here, nvdrsdb0.bin and nvdrsdb1.bin are data files associated with Global settings and Program specific settings. These files are stored under the Drs folder. If these files are corrupted, then it may result in crashing NVIDIA Control Panel on selecting the Manage 3D settings section. So, you need to rename or delete both of these files to rebuild Global settings and Program specific settings. Here are the steps:
- Press the Win+R hotkey to open the Run Command box
- Type
%programdata%\NVIDIA Corporation\Drsand press the Enter key - Under the Drs folder, you will see the nvdrsdb0.bin and nvdrsdb1.bin files. Copy and paste both files to some other location in case you need those files later
- Now rename both files one by one with any other name or delete them.
Launch NVIDIA Control Panel and select the Manage 3D settings section. Change any setting available there if needed. It shouldn’t crash the application anymore.
Related: NVIDIA Control Panel only shows 3D Settings
2] Use the Process Monitor tool
This is another handy solution that worked for some users. When you launch NVIDIA Control Panel, the nvcplui.exe (the main executable file) reads desktop items. And, when you switch to Manage 3D settings, if there are files and/or folders with large paths or names on the desktop, then it may crash. So, you need to identify those file(s) and/or folder(s) available on your desktop and take the necessary action. For that, you can use the Process Monitor tool. Here are the steps:
- Grab the ZIP archive of this tool from the official website and extract it
- Run its EXE file to open its interface. It will show running processes, time, path, and other information
- Launch NVIDIA Control Panel. Do not click on the Manage 3D settings yet
- In the Process Monitor interface, use the Filter option, and add the nvcplui.exe process to the Filter list so that you won’t see other running processes
- Now jump to the Manage 3D settings section in the NVIDIA Control Panel interface
- When the NVIDIA Control Panel crashes, look for Operation (ReadFile) column in the Process Monitor tool for the nvcplui.exe process and also check the Path column (that shows the paths of the files that the process tried to access), and the Results column to find if the process crashed while accessing a particular item. You should see a file/folder with a large path or name because of which the NVIDIA Control Panel crashed while reading that particular item
- Now either rename such file or folder, delete it from your desktop, or move it to some other location.
Repeat the above steps if needed and this should solve your problem.
3] Update the NVIDIA graphics card driver
The corrupt or outdated drivers for a device can cause trouble using it properly and the same goes for NVIDIA Control Panel. So, if this application is crashing when you access Manage 3D settings, it could be because there is some problem with the NVIDIA graphics card driver. In that case, you need to update the driver.
You can use NVIDIA GeForce Experience for automatic driver updates, manually download the driver from the official site and install it, or use the Optional updates section of Windows 11/10 in the Settings app to download and update the NVIDIA graphics card driver (if available).
4] Clean install NVIDIA Control Panel
If the above solutions don’t work, then you should clean install NVIDIA Control Panel. For this, first, uninstall NVIDIA Control Panel using the Settings app of Windows 11/10 and also manually remove leftover files after uninstall which include temporary files, Registry entries, etc. Or else, you can use Display Driver Uninstaller to uninstall the NVIDIA driver which will also remove NVIDIA Control Panel from your PC. Restart your system.
After this, download the NVIDIA driver for your graphics card from the official website. You need to select your graphics card type, product series, etc., to get the compatible driver, and install it. That will automatically install NVIDIA Control Panel.
Alternatively, you can install NVIDIA Control Panel app from the Microsoft Store. Since the standalone installer is no longer available, you have to install its Microsoft Store app.
Restart your Windows 11/10 PC after installation and open the NVIDIA Control Panel window. Access the Manage 3D settings section and it should work fine now.
Read next: How to fix NVIDIA Control Panel not opening on Windows PC.
Leave a Reply