NVIDIA Control Panel is a great way to adjust the size, orientation, scaling, etc., of your display and adjust to the graphics performance of the device. However, we have noticed the NVIDIA Control Panel is not opening on some Windows devices. In this post, we will discuss what you can do in order to resolve this issue.

NVIDIA Control Panel not opening
If the NVIDIA Control Panel is not opening, responding, or working on your Windows 11/10 computer, execute the following solutions.
- Restart the process for NVIDIA Control Panel
- Restart the Service for NVIDIA Display Driver
- Upgrade your NVIDIA Display Drivers Software
- End Nvidia Display Container Process
- Update NVIDIA Display Driver or Graphics Driver
Let us see these in detail. You will need admin permission to resolve this. The NVIDIA Control Panel is the driver software for its hardware in Windows for those who are not aware.
1] Restart the process for NVIDIA Control Panel

To restart the process for the NVIDIA Control Panel from your Task Manager, hit the CTRL + Shift + Esc button combinations on your Keyboard.
Look out for a process called NVIDIA Control Panel Application.
Expand it and right-click on the NVIDIA Control Panelsubprocess. Click on End Task.
Now try to open the NVIDIA Control Panel from the Start Menu and check if this fixes the issue or not.
2] Restart the Service for NVIDIA Display Driver

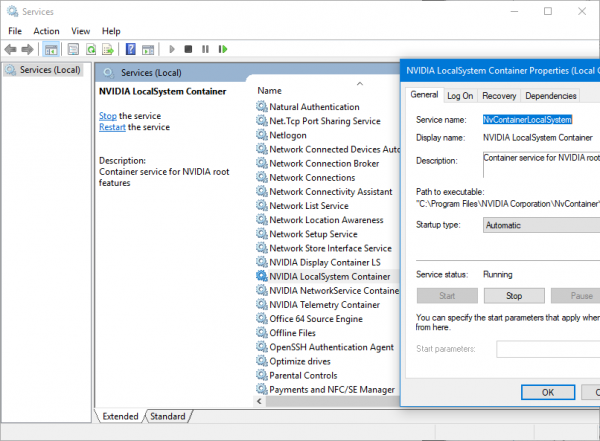
You will have to open the Windows Services Manager. Start by hitting the WINKEY + R button combination to launch the Run utility. Then type in, services.msc and then hit Enter. It will now launch the Services window and will populate a list of services.
Now, look out for services called NVIDIA Display Container LS. Double-click on it to open its Properties box.
Ensure that the service is Started. If not, Start it. If it is already started, Stop it and then Start it again. Also, ensure that the Startup Type is Automatic.
Do the same for the NVIDIA LocalSystem Container service.
Check if this fixes your issue.
Read: NVIDIA Control Panel missing.
3] Update your NVIDIA Display Drivers Software
One of the main things that you should be doing is updating your NVIDIA Display Drivers.
For that, you need to head to their latest Display Driver Download Website to download the NVIDIA driver software.
From the drop-down menus, you need to select the exact model of your Graphics Card. Then upon hitting the Search button, you should be able to see the latest release of the driver for your graphics card. Accept the terms of use and then download the driver. Finally, run the downloaded file to install your latest drivers.
Reboot your computer for the changes to take effect.
Your NVIDIA Control Panel should be working just fine!
PS: TheReduxPL suggests in the comments below: “Update the Nvidia Control Panel with the Microsoft Store app…and the app immediately started working”.
4] End NVIDIA Display Container Process
One of the known culprits behind the high CPU usage is the nvdisplay.container.exe application. If you open Task Manager and sort them based on CPU, you will notice that this application takes a toll on the computer.
Sometimes applications get stuck, and they cannot close resulting in resources stuck for a long time. All this eventually results in the bottleneck. The best way to get rid is to right-click on the Nvidia Display Container Process and end it using the Task Manager.
5] Update NVIDIA Display Driver or Graphics Driver

Usually, an outdated driver has all sorts of problems. A fresh installation or update might help. You can update the graphics card driver using one of the following methods.
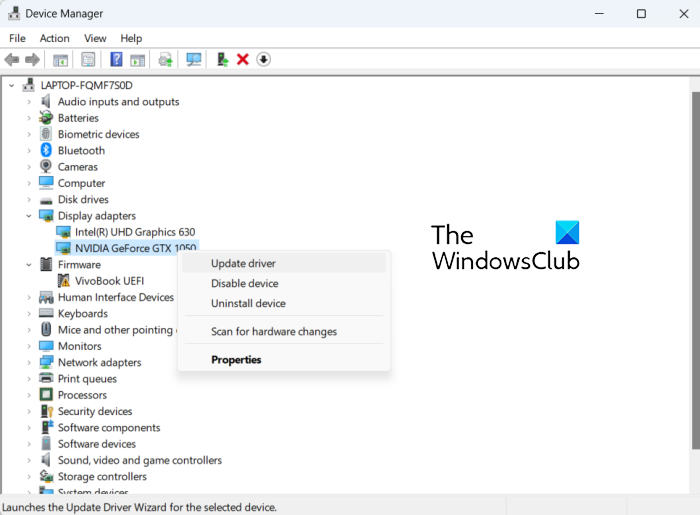
Device Manager
Open Device Manager using WIN + X followed by pressing the M key. Next, please navigate to the display adapters list, and expand it. Right-click on the Nividia listing, and choose to update the driver. It will ask you to search for the driver automatically and then point you to search for an updated driver in Windows update. Click on it, and then click on Optional Update under the Windows Update button. It will be enabled only when there is an update. Locate the driver update, and install it.
OEM Website
You can install it manually if you know the driver version. Use Device Manager to go to the Properties of the display adapters, and switch to the Driver tab. Check for the version.
Next, visit the OEM website, and download the driver based on your version of Windows. Install it, and check if the issue is resolved.
I hope the post was easy to follow, and that you were able to resolve where the NVIDIA Control Panel was not opening.
How to fix NVIDIA control panel not opening windows 11?
If you cannot open the Nvidia Control Panel, you may want to update your drivers and system. Check your antivirus. You can also try to disable the Fast Boot option in Windows 11/10. If that does not work, try starting the application directly from the installation directory.
How do I force open the Nvidia Control Panel?

To force open the Nvidia control panel, restart the Process for NVIDIA Control Panel. Then, press Ctrl + Shift + Esc at the same time to launch Task Manager. Next is to locate the NVIDIA Control Panel Application, expand it, and right-click the NVIDIA Control Panel sub-process to choose End Task. After you have done these steps, open the NVIDIA Control Panel to see if you can access it.
Related read: NVIDIA Control Panel Access denied.
NVIDIA Display Container LS fail …or no…is random
ddu and the last drivers…the same !
i work in nvidia surround , the taskar is not centered and control panel dont open ,
I have to raise several times the nvidia display container ls in services , and taskbar center control panel work…
is not the drivers , win10 upgrade
in my opinion , since creator..but where is the problem and the fix ????
win 10 pro creator…the last version.
display drivers 416.34