Is your camera or webcam not showing up or working in OBS Studio on Windows 11/10? Many OBS Studio users have complained that their cameras won’t work on the app. When adding a Vidoe Capture Device on OBS Studio, their camera or webcam won’t show up or doesn’t work properly. This prevents users from recording a video using the camera. Now, if you are one of the affected users facing the same problem, here is a complete guide. In this post, we will discuss working fixes to help you fix the “OBS camera not showing up or working” issue on your PC.

Why is OBS Camera Not Showing up or Working?
There can be different reasons why your camera or webcam is not working properly in OBS Studio. If you are using a USB camera, make sure it is in proper working condition and is properly connected to your computer. Else, your camera won’t work anyway. Apart from that, here are some potential causes:
- A lack of required administrator permissions can also cause the issue at hand. So, run the app with admin rights to fix the issue.
- You might have disabled camera permission for OBS Studio knowingly or unknowingly. Hence, grant the camera access to OBS to fix the problem.
- Your output recording settings in OBS might not be compatible with the laptop camera or webcam you are using. In that case, try making changes to the output settings.
- An outdated or faulty camera driver can be another reason for the same issue. You can try updating or reinstalling your camera driver.
- It can also be caused if you are using an outdated OBS Studio app. So, update your app to its latest version.
OBS Camera Not Showing up or Working in Windows 11/10
If your camera/ webcam is not showing up or working properly in OBS Studio on your Windows 11/10 PC, you can use the below fixes to resolve the problem:
- Restart OBS Studio / your PC.
- Relaunch OBS as an administrator.
- Make sure camera permission is enabled for OBS Studio.
- Ensure that the OBS Virtual Camera is activated.
- Try modifying webcam settings like video format, quality, etc.
- Update/ reinstall camera driver.
- Update OBS Studio to its latest version.
- Reinstall OBS Studio.
1] Restart OBS Studio / your PC
At first, you should try closing the app and then relaunching it to see if the problem is fixed or not. This works when the app becomes unresponsive or some feature is not working correctly due to a glitch. So, completely close OBS Studio from Task Manager and then restart it.
This issue could also be caused due to a temporary glitch with your system. In such cases, there are chances that the problem will be fixed by a simple restart of your PC. Hence, before getting into advanced troubleshooting methods, try rebooting your PC and then open OBS Studio to check whether the issue is fixed or not.
If the OBS camera is still not working, you can use other fixes from this post to fix the problem.
2] Relaunch OBS as an administrator
If a simple restart doesn’t work, try relaunching OBS Studio with administrator privileges. It might be the case that the OBS camera/ webcam is not working properly because of a lack of required administrator permissions. Hence, if the scenario is applicable, you can run OBS Studio as an administrator and see if the problem is fixed or not.
Just right-click on the OBS Studio executable and select the Run as administrator option from the context menu. Try using your camera and see if it works fine or not. If yes, you can use the below steps to always launch OBS Studio with admin rights on your Windows 11/10 PC:
- Firstly, go to your desktop and right-click on the shortcut of OBS Studio.
- Now, from the appeared context menu, click on the Properties option.
- In the Properties window, go to the Compatibility tab.
- Next, under the Settings section, you will find a checkbox called Run this program as an administrator; simply tick this option.
- After that, click on the Apply and then OK button to save changes.
If the problem remains the same, you can go ahead and use some other fix to resolve the issue at hand.
See: Fix OBS not capturing Game Audio on Windows
3] Make sure camera permission is enabled for OBS Studio
The next thing you should do is ensure that you have granted camera access to OBS Studio. There might be some changes to your system due to which the camera access is disabled for all apps or OBS Studio intentionally or unintentionally. Hence, open your Privacy & security settings and check if the camera permission is turned on for OBS Studio or not. If not, enabled it and see if the problem is resolved.
Here are the steps to enable camera access for OBS Studio on Windows 11/10:
- Firstly, press Win+I to open the Settings app.
- Now, go to the Privacy & security tab and select the Camera option under the Apps permission section.
- Next, look for the OBS Studio app and make sure the toggle associated with it is enabled. If not, set it to On.
- Once done, open OBS Studio and see if the camera starts working or not.
If you still face the same issue, we have some fixes that you can use to resolve the problem.
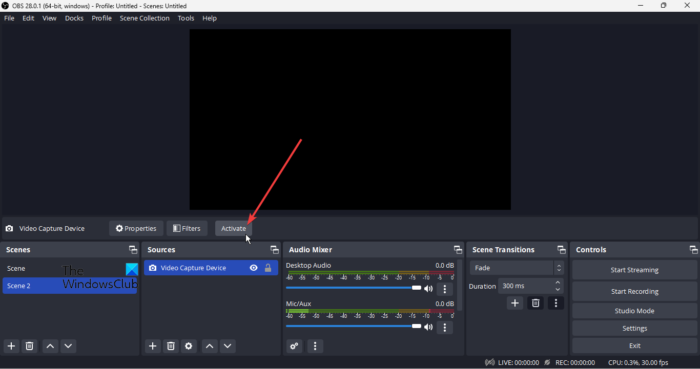
4] Ensure that the OBS Virtual Camera is activated

The OBS Virtual Camera might be deactivated which is why you are experiencing the issue at hand. So, if the scenario is applicable, you just need to enable Virtual Camera on OBS Studio and the problem will be fixed. Here are the steps to do so:
- Firstly, open the OBS Studio app on your PC.
- Now, you will see a Start Recording button at the bottom-right side of the window; simply press this button.
- Next, to verify whether OBS Virtual Camera is activated or not, check if the option besides the Filters button reads Deactivate or not. If not, the virtual camera is not enabled. So, press the Activate button and it will be enabled.
You can now start using the camera or webcam on OSB Studio. However, if the scenario doesn’t apply to you, try the next potential fix.
Read: Fix OBS Studio keeps crashing on Windows PC.
5] Try modifying webcam settings like video format, quality, etc.

You can also try adjusting your webcam settings on OBS Studio and see if it helps. Some output configurations on OBS Studio like video format, resolution, FPS, etc., might not work fine with your laptop camera or webcam. And thus, you are experiencing the issue at hand. So, in that case, modifying the camera settings in the app should fix the problem for you.
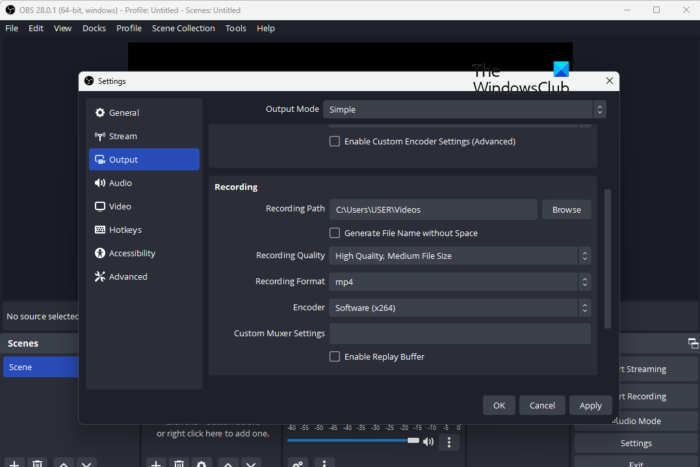
Here are the steps you can follow to tweak camera output settings on OBS Studio:
- Firstly, open OBS Studio and click on the File > Settings option.
- Now, in the Settings window, go to the Output tab from the left pane.
- Next, under the Recording section, set up the configurations which are compatible with your webcam.
- Once done, try adding a Video Capture Device and see if your webcam is working fine or not.
In case this method gives you no luck in fixing the issue, try the next potential solution to fix the problem.
6] Update/ reinstall camera driver

The problem at hand might occur if you have out-of-date camera drivers. So, make sure that you have up-to-date camera drivers installed on your PC. Here are the different methods to update your camera/ webcam driver on Windows PC:
- You can go to the official website of the device manufacturer and download the latest version of your webcam. After that, run the driver installer and follow the onscreen instructions to complete the installation.
- Open the Settings app by pressing the Win+I hotkey and move to the Windows Update > Advanced options section. Next, click on the Optional Updates option and download and install driver updates available for your camera or webcam.
- You can also use the Device Manager app to update the webcam driver.
- There are some free third-party driver updaters that detect the outdated camera and other device drivers on your PC and then automatically update them.
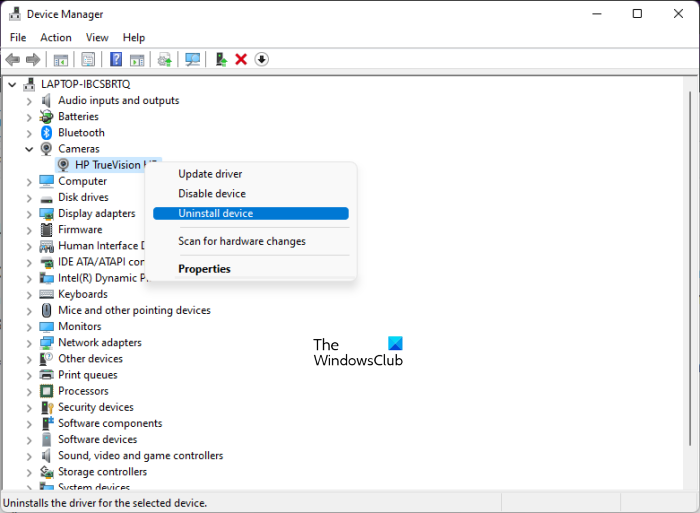
Check if the problem is resolved after updating the webcam driver. If not, you can also try reinstalling the driver as there might be some corruption associated with the driver installation that is causing the issue at hand. Here are the steps to do that:
- Firstly, open the Device Manager app from the Windows+X shortcut menu.
- Now, under the Cameras category, find your webcam or camera device and right-click on it.
- Next, from the opened context menu, choose the Uninstall device option.
- When the driver is successfully uninstalled, press the Action > Scan for hardware changes option. This will allow Windows to reinstall the missing camera drivers on your system.
- Once done, restart your PC and check whether the “OBS Camera/ Webcam Not Working” issue is fixed or not.
If the problem persists, move on to the next potential fix to resolve it.
See: Fix Webcam keeps turning off and on again.
7] Update OBS Studio to its latest version
The app is likely to malfunction if you are using its outdated version. If you have an old version of OBS Studio, you might deal with the issue at hand. So, if the scenario is applicable, update OBS Studio to its latest version and then check if the problem is gone or not. Here’s how to do that:
- Firstly, open the OBS Studio app and go to its Tools menu.
- Now, from the appeared options, click on the Check for Updates button.
- OBS Studio will look for available updates and when done, it will prompt you with an Update Now option; simply click on it.
- Once it finished installing all the pending updates, the app will restart. You can then check if the problem is fixed or not.
RELATED: Fix OBS not capturing Game Video on Windows PC.
8] Reinstall OBS Studio
The last resort to fix the issue is to reinstall the OBS Studio app. The installation of OBS Studio might have gone corrupted or there might be some infected or broken installation files associated with it. And thus, certain functions of the app are not working fine. Hence, if the scnerio applies, you should be able to fix it by reinstalling OBS Studio.
You will first need to uninstall OBS Studio from your PC. To do that, open Settings using Win+I and go to the Apps > Installed apps section. Now, look for the OBS studio app and press the three-dot menu button present next to it. Next, click on the Uninstall option to remove the app. Once done, make sure you also delete all the leftover residual files from your PC. After that, download the latest version of OBS from its official website and install it on your PC. Open the app and add Video Capture Device to check if the camera is working fine now.
Why is my webcam not working Windows 11/10?
Your webcam might not be working if it is physically damaged or is not properly connected to the PC. Also, if you haven’t enabled camera access permission on your computer, your webcam won’t work. Apart from that, outdated camera drivers, antivirus interference, etc., can also cause the same problem.
Why is my camera a black screen on OBS?
The black screen issue on OBS Studio might occur due to missing admin rights to run the app, outdated graphics and device drivers, enabled overclocking, or compatibility issues. It might also be caused because of conflicting third-party applications.
How do I enable camera access on OBS?
You can enable or add a camera device on OBS Studio using the below steps:
- First, open OBS Studio and click on the + button inside the Sources section.
- Now, from the available options, select the Video Capture Device option.
- After that, name your device and press the OK button.
- Next, set up the capture properties including Device (camera device), resolution, FPS, video format, etc., and press the OK button.
- Once done, click on the Start Recording button from the bottom right side and start using your camera to record a video.
Leave a Reply