This post features solutions to fix Office 365 Update Error 0x80200061. Office 365, now called Microsoft 365, includes the most collaborative, up-to-date features in one seamless, integrated experience. It contains various Office desktop apps like Word, PowerPoint, Excel, etc. But recently, many users have complained about Office 365 Update Error 0x80200061. Fortunately, you can follow some simple methods to eliminate this issue.
Fix Office 365 Update Error 0x80200061
Follow these methods to fix Office 365 update error 0x80200061:
- Run Windows Update Troubleshooter
- Restart Microsoft Office Click-To-Run Service
- Use Microsoft Support and Recovery Assistant for Office 365
- Use Disk Cleanup Tool to clear junk files
- Run Office Update manually in Clean Boot State
- Enable Automatic Updates for Office
- Repair Office 365 Online
Now let us see these in detail.
1] Run Windows Update Troubleshooter
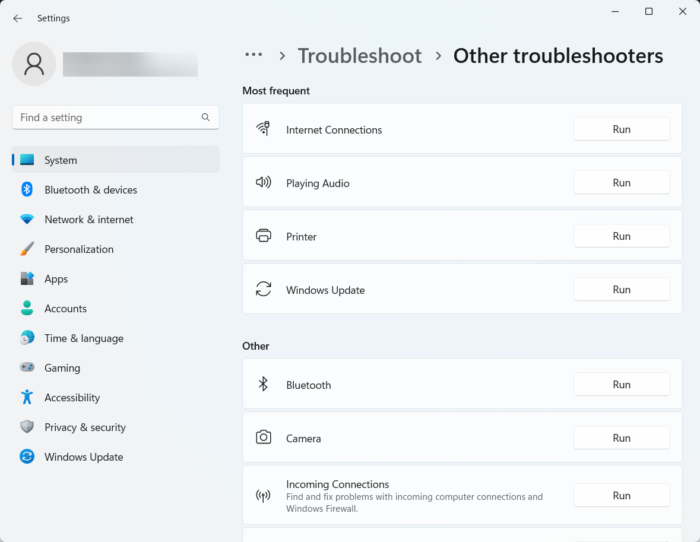
Before getting started with different methods to fix this issue, run Microsoft’s built-in Printer troubleshooter. Here’s how:
- Press Windows Key + I to open Settings.
- Scroll down and select Troubleshoot > Other Troubleshooters.
- Click on Run beside Windows Update.
- Once the process is complete, restart your device to see if the printer error has been resolved.
2] Restart Microsoft Office Click-To-Run Service
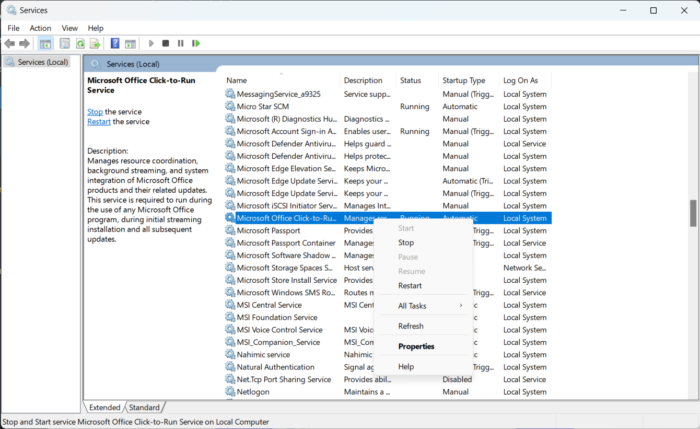
Microsoft Office Click-To-Run Service downloads update files for Office using automatic Windows updates. It uses your internet connection to download files in the background silently. Restarting the service resets all its components. Here’s how you can do it:
- Press the Windows key, type Services and click on open.
- Search for the Microsoft Office Click-To-Run Service.
- Right-click on the service and select Restart.
3] Use Microsoft Support and Recovery Assistant for Office 365
Microsoft Support and Recovery Assistant helps resolve Office 365 apps, Outlook, OneDrive, & other problems. The tool can help you resolve problems with windows Activation, Updates, Upgrade, Office Installation, Activation, Uninstallation, Outlook email, folders, etc. Here is how you can use the Microsoft Support and Recovery Assistant.
4] Use Disk Cleanup Tool to clear junk files
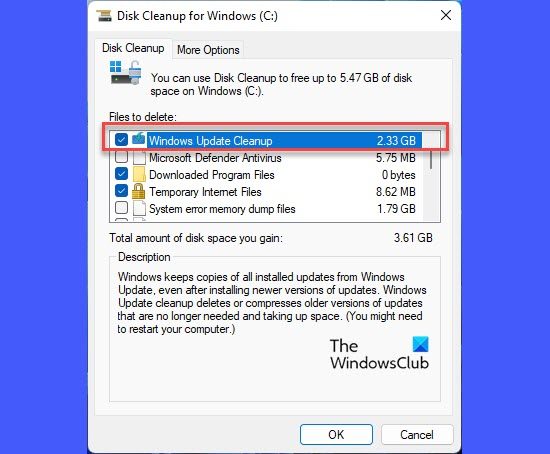
Office 365 can have trouble downloading updates if your device is clogged up with Temporary and Junk files. Windows stores these temporary files automatically to enhance one’s experience. These files serve no purpose and should be deleted from time to time. Here is how you can do it using Disk Cleanup Tool:
- Search for Disk Cleanup and click open it
- Select the files that you want to delete
- The Disk Cleanup system will now ask for confirmation.
- Click on Delete Files to proceed.
- Do note that if you click on Clean up system files, you will see more options.
- Using this option, you can delete all but the latest system restore points, Windows Update Cleanup, Previous Windows installations, etc.
5] Run Office Update manually in Clean Boot State
Third-party applications installed on your device can be responsible for Office 365 update error 0x80200061. Perform a Clean boot of your PC to restrict all third-party applications.
Once done, you can manually update your Office installation and see if that works.
6] Enable Automatic Updates for Office
Windows automatically keeps all apps and services on your device updated using the Automatic Updates feature. However these services can sometimes get disabled and not allow updates to download and install automatically. Here is how you can you can enable automatic updates on your Windows 10/11 device:
- Press the Windows key + I to open the Run dialog box.
- Type regedit and hit Enter.
- Once the Registry Editor opens, navigate to the following path:\
HKEY_LOCAL_MACHINE\software\policies\microsoft\office\16.0\common\OfficeUpdate
- In the right-pane, right-click on the EnableAutomaticUpdates, select Modify and set the value data to 1.
- Do the same for HideEnableDisableUpdates and set the Value Data to 0.
- Click on Ok to save your settings, restart your device and check if the error gets fixed.
You can also Enable Automatic Updates using the Group Policy Editor.
7] Online Repair Office 365
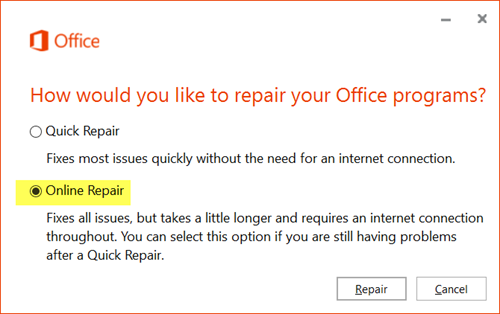
If none of these steps could help you, consider repairing Office 365. It has been known to help most users get over this error. Here’s how to do it:
- Press Windows Key + I to open Settings.
- Click on Apps > Apps & Features.
- Now scroll down, click on the office product you want to repair, and select Modify.
- Click Online Repair and follow the instructions on-screen.
Fix: Microsoft Office cannot verify the license for this product
How do I fix Office 365 installation error?
To fix Office 365 installation error, try starting your computer and installing Office again. However, installation errors can occur if your device Runs slow on disk space. Use the disk cleanup tool to clear junk files and fix the error.
Does Office 365 need update automatically?
Yes, updates for Office 365 are downloaded and installed automatically without any user or administrator intervention. These are downloaded along with the Windows Updates for the device. However, you can modify the settings to change the behavior and set how the apps are updated.
Do I need to uninstall old Microsoft Office before installing 365?
It’s recommended to uninstall any previous versions of Microsoft Office before installing Office 365 apps. However, you can simultaneously run different versions of Microsoft Office on your device.
Why has Office 365 stopped working?
To fix this error, ensure that network access to Microsoft servers is not blocked. Also, check the firewall settings of your device, the router and the DNS configuration. See if your office 365 subscription is active or not if it’s expired by a new license and extend the subscription.