There are quite a few cloud storage options available to computer users, and one of them is pCloud. We’ve been using their free plan for over a month now and can say for certain that it’s worth using. Since OneDrive, Google Drive, and iCloud are widely available and some of the most popular cloud services today, you might be wondering why anyone would want to use pCloud. Well, it’s all about privacy, from our point of view.
Secure cloud storage service
Here’s the thing: cloud services based in the United States are not safe where privacy is concerned. Therefore, if you care a lot, then pClould, which is based in Switzerland, is one of the best.
pCloud for Windows review
When you launch pCloud for the first time, you are required to sign in or create an account. Creating an account is very easy, and there’s no need to launch the email app to verify the account before being given the ability to log in.
After entering the account, you are required to click the Verify button to get things running as smoothly as possible.
It should be noted that, similarly to OneDrive and Dropbox, the pCloud services install a folder on your machine. From there, you can upload content to the cloud and download it whenever you like.
Sync

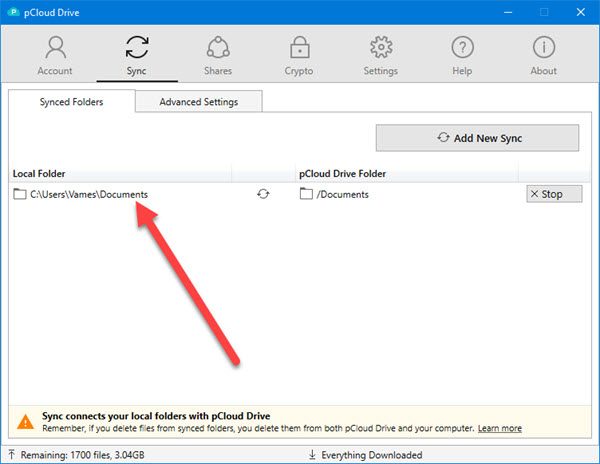
Synchronizing content between your computer and pCloud is crucial to keep files updated on both platforms. Select the folder you want to sync and add it to the app to get it working.
Click on the Sync tab, then select Add New Sync. Click on Choose Local Folder and search for your preferred folder to get things started. After locating the folder, click on Add Sync to upload it to pCloud.
If you have folders on pCloud that are not available on your computer, simply click on Choose pCloud Drive Folder, select the folder you want, and hit Add Sync.
Depending on the size of the documents and files inside the folder and the speed of your internet connection, it might take a while for everything to synchronize fully.
Shares

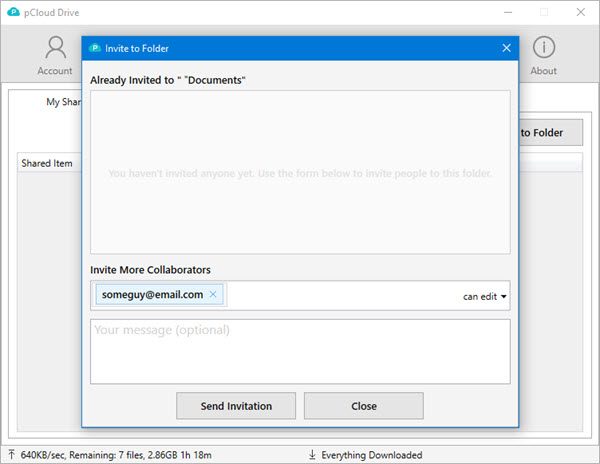
When it comes to sharing content with others, this option is located beside the Sync tab. Here, you can see the folders you’re sharing alongside those being shared with you. To share one or more folders, click on Shares, then Invite to Folder.
Select the folder you want to share, tap the Select button, then add the type the email address of the other party. Finally, choose the button that says Send Invitation and you’re good to go.
Overall, we enjoyed using pCloud despite it not being one of the big boys. You only get 10GB of free storage, lower than what Microsoft offers as its default. However, it should be noted that 6GB is locked away; therefore, only 4GB is available immediately.
To gain the additional 6GB, you are required to perform six tasks, each of which will give you 1GB free storage after completion. These tasks are verifying email, downloading the pCloud mobile app, turning on automatic upload, inviting friends, uploading a file, and downloading pCloud Drive.
You can sign up for pCloud and download their mobile and desktop application for free from the official website. The Basic pCloud account which is Free Forever comes with 10 GB of free space.
Leave a Reply