PCR7 Binding is a technology that helps users encrypt hard drives on their Windows computers. It is different from the Bitlocker technology. To use Bitlocker technology, you should have Windows 11/10 Pro, Enterprise, or Education edition. Windows 11/10 Home users cannot use Bitlocker because it is not supported by Windows 11/10 Home edition. Instead, they can use PCR7 Binding technology to encrypt their drives. The PCR7 Binding technology requires some hardware specifications. If your system has these hardware specifications, you can use the PCR7 Binding technology to encrypt your drives. In this case, you will see the PCR7 Binding is not supported message in the System Information.

However, despite having PCR7 Binding support, some users are not able to enable the device encryption on their Windows 11/10 device. In this article, we will see how to enable device encryption if your laptop or desktop supports the PCR7 Binding technology or what you can do to fix the “PCR7 Binding is not supported” issue.
PCR7 Binding is not supported in Windows 11/10
You can see if your system supports PCR7 Binding or not in the System information. To do so, follow the steps written below:
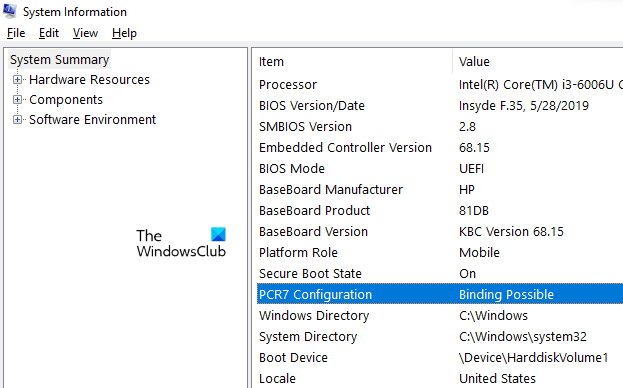
- Click on Windows Search and type System Information.
- Now, right-click on the System Information app and select Run as administrator. Click Yes in the UAC prompt.
- In the System Information app, make sure that the System Summary is selected on the left pane.
- If your device supports PCR7 Binding, you will see Binding Possible in PCR7 Configuration.

If your system shows a Binding Possible message in the System Information, the next step is to check if you can enable the device encryption or not. To check this, scroll down the System Information page and locate Device Encryption Support. If your device does not support device encryption, you will see a message showing the reason for that (see the above screenshot).
You may see any of the following messages:
Reasons for failed automatic device encryption: TPM is not usable, PCR7 binding is not supported, Hardware Security Test Interface failed and device is not Modern Standby, Un-allowed DMA capable bus/device(s) detected, TPM is not usable.
Reasons for failed automatic device encryption: Hardware Security Test Interface failed and device is not Modern Standby.
Now, here are two cases:
- Your device does not meet the hardware requirements for Device Encryption.
- Your device meets the hardware requirements for Device Encryption but you have disabled some of the required features.
If you fall under case 1 described above, nothing can be done (we will discuss it later in this article). If you fall under case 2, you have to enable the required features to use Device Encryption. Let’s see what these features are and how to enable them.
To use Device Encryption on Windows 11/10, your device should have:
Let’s understand these requirements in detail.
1] Secure Boot
Secure Boot is a standard developed by members of the PC industry. It enables Windows devices to boot using only the software trusted by OEM (Original Equipment Manufacturer). When you start your PC, the firmware first checks the signature of each piece of boot software. If the firmware finds the signatures valid, it boots your system and gives control to the operating system.
Secure Boot is one of the requirements for Device Encryption on Windows 11/10 devices. If you have Windows 11, the secure boot is already enabled on your device. To check whether the Secure Boot is enabled on your system, follow the steps given below:
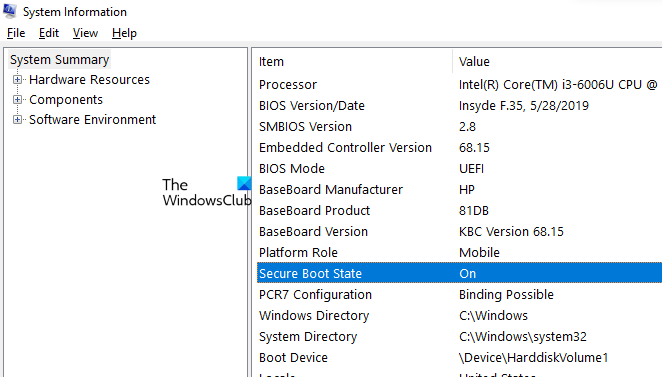
- Open the System Information.
- Select System Summary from the left pane.
- Find Secure Boot State on the right side. It should say On.
If the Secure Boot State is off on your device, you have to enable Secure Boot in your BIOS settings. Enter into the BIOS of your PC. PCs of different brands have a different function key to enter into BIOS. Refer to your user manual to know how to enter into BIOS. Once you enter into BIOS, you will find an option to enable Secure Boot under the System Configuration tab.
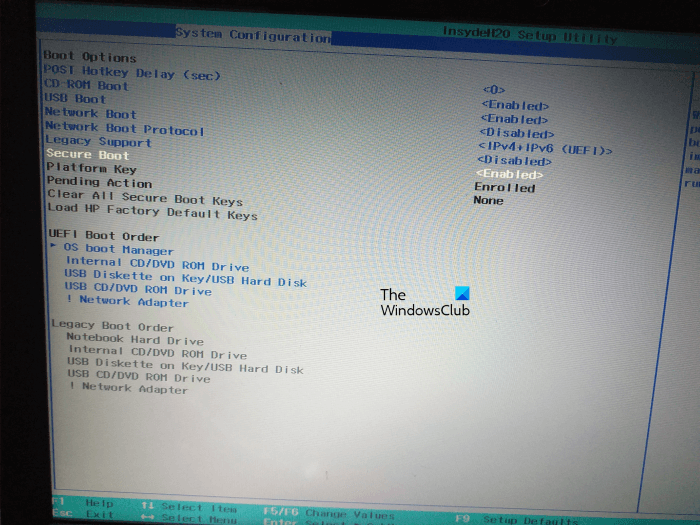
Do note that, you will not be able to turn on Secure Boot if your BIOS mode is Legacy. In this case, first, you have to change it to UEFI. We have discussed this in detail below.
2] UEFI support

Another requirement to enable Device Encryption on Windows 11/10 is UEFI support. Your BIOS mode should not be Legacy. You can check this in System Information. Open the System Information app and see if your BIOS mode is Legacy or UEFI. If your BIOS mode is Legacy, you have to change it to UEFI.
To change your BIOS mode from Legacy to UEFI, your disk partition style should be GPT instead of MBR. You can check the partition style of your disk in Disk Management. The following steps will help you with that:
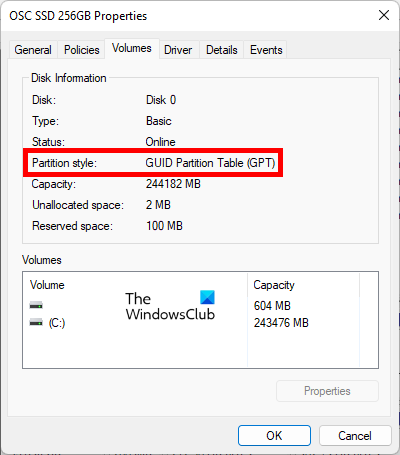
- Press the Win + X keys and select Disk Management.
- When Disk Management appears, right-click on your disk and select Properties.
- When the Properties dialog box appears, select the Volumes tab. There, you will see the partition style of your disk.
If your disk partition style is MBR (Master Boot Record). convert it from MBR to GPT. After that, you will be able to change your BIOS mode from Legacy to UEFI.
3] TPM (Trusted Platform Module)
TPM or Trusted Platform Module is a chip designed to provide hardware-based and security-related functions. It stores cryptographic keys to provide endpoint security to the devices. TPM is another requirement for Device Encryption on Windows devices. Check if your device has a TPM chip installed or not.
4] Modern Standby support
The message in the System Information also indicates that the device is not Modern Standby. This message means that Modern Standby mode is either disabled on your device or not supported by your system. If you want to use the Device Encryption on your system, you should enable Modern Standby mode.
To check if your system supports the Modern Standby mode, open an elevated Command Prompt. After that, copy the following command, paste it into the Command prompt as admin, and press Enter.
powercfg /a
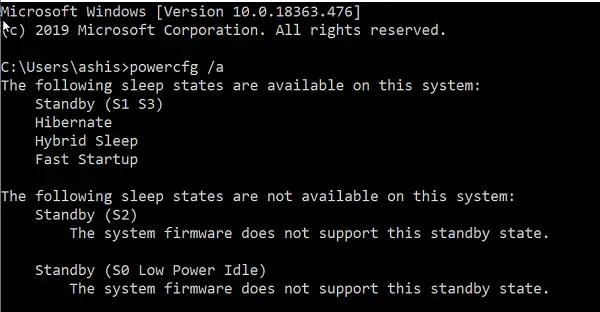
The Modern Standby mode is also called the S0 Low Power Idle mode. If the sleep state S0 is supported by your device, you will see it in the result after executing the above command.
If your device does not meet the hardware requirements for Device Encryption, you can use third-party software to encrypt your hard drive. VeraCrypt and DiskCryptor are some powerful disk encryption software for Windows devices.
Read: How to add Encrypt or Decrypt item to right-click context menu
How do I fix PCR7 Binding is not supported?
If the BIOS mode of your Windows 11/10 device is UEFI, Secure Boot is enabled on it, and it supports Modern Standby mode, it will support PCR7 Binding. in addition to this, your device should also have a TPM 2.0 or higher. We have explained all about this in detail in this article.
Why is Device Encryption not available?
If the Device Encryption is not available or not working on your Windows 11/10 device, make sure that your system is compatible with the Device Encryption technology. One of the requirements for Device Encryption is the Modern Standby mode. All Windows devices do not support Modern Standby mode. You have to execute a command in an elevated Command Prompt to know whether your device supports Modern Standby mode or not.
In addition to the Modern Standby mode, there are some other requirements that your device should fulfill to make Device Encryption available. Your BIOS mode should not be Legacy. If it is Legacy, change it to UEFI. A TPM 2.0 or the higher version of the TPM chip is installed on your device. You can check this in the Device Manager. Your system should also have Secure Boot enabled. If it is disabled, enable it in BIOS.
I hope this helps.
Read next: Fix Device encryption is temporarily suspended error in Windows 11/10.