An essential part about working with Skype for Business is to know how to use its interactive elements. The enterprise service supports some very interactive features like Poll, Q&A, Whiteboard that can be added to a meeting or call. You can also use them as tools to collect data or encourage participation with the participants in your meetings. Here’s a short tutorial describing you how to start and use Poll, Q&A, and Whiteboard features in Skype for Business meetings.

Use Skype for Business meetings – Poll, Q&A & Whiteboard features
It should be noted that these interactive features aimed at improving collaboration work only on the Windows application and not the Mac.
- Begin, by creating a poll. For this,
- Click the ‘Present Content’
- Navigate to ‘More’ menu and choose ‘Poll’ icon.
- In the ‘Create a Poll’ window, type your question and the answer choices.
- To manage the poll, click the ‘Poll Actions’ drop-down arrow.
- When done, stop presenting or remove the poll.
- To start the Q&A session, click the ‘Present Content’ button.
- Go to ‘More’ options.
- From the options displayed, select ‘Q&A’
- For Whiteboard, click ‘Present Content’ button.
- Choose Whiteboard
- Select the tools to annotate on the whiteboard
Now let us see the steps in a bit more detail!
1] Creating a poll
It is one of the most useful features for involving people and effectively interacting with them. Also, you can get a clear picture of what your colleagues think about the idea/s you intend to share with them during the meeting.
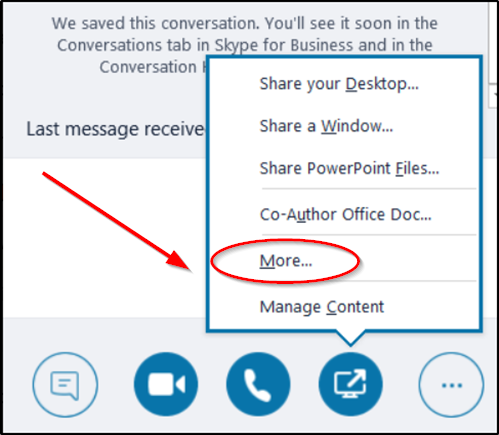
In the meeting window, click the ‘Present Content’ button and choose ‘More’ menu.
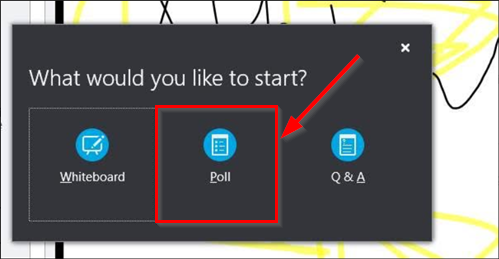
Select ‘Poll’ option.
The option will direct you to a ‘Create a Poll’ window where you can type your question and the answer choices.
After having done this, hit the ‘Create’ button to create the poll.
When done, the poll page will open in the meeting.
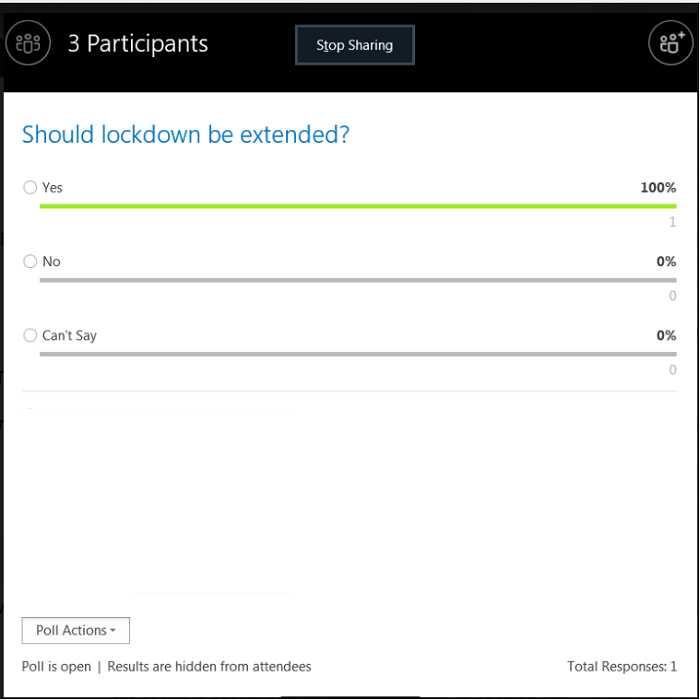
Now, when the participants select an option it will be displayed as the results to everyone.
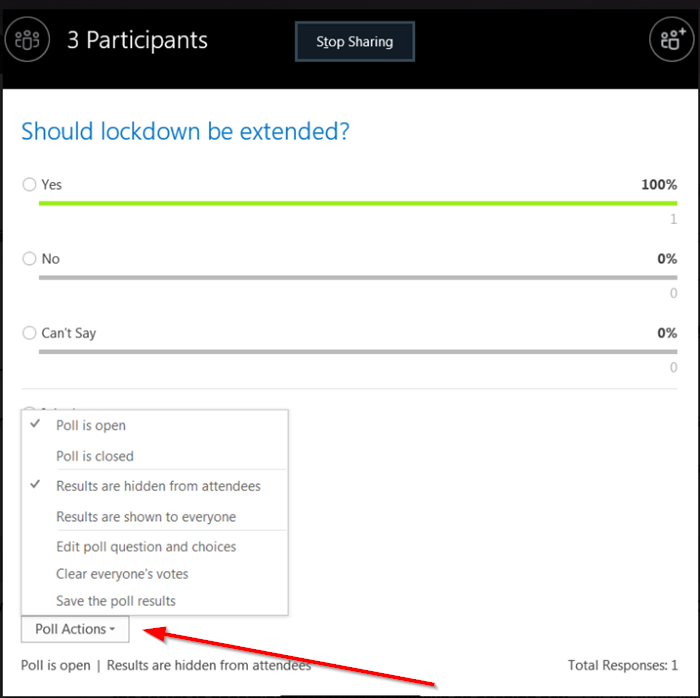
To manage the poll, i.e., if you would like to edit or hide the results, access the ‘Poll Actions’ menu.
When you’re finished with the job, click ‘Stop Presenting’ option seen at the top of the meeting room.
To delete a poll page, click the ‘Present’ button > ‘Manage Content’ > ‘Remove’.
2] Start Q&A
If there is no other content visible, the content stage will open the Q&A session directly for all participants. If other content is active, the Q&A section will be shown as a small tab, adjacent to the ‘Presentation’ tab at the bottom of the Q&A window. The Meeting IM is disabled by default until you stop the Q&A session.
When one of the meeting presenters submits a question, any presenter can click the ‘Answer’ link and type their reply. After that, they must hit the ‘Enter’ key to post the answer.
If you’re presenting content when a question is submitted, a notification will popup, prompting you to check it. You can click the Q&A tab to answer the question right away and when done, go back to the Presentation tab to continue your presentation.
When a question is posed to you, an ‘All’ tab and an ‘Unanswered’ should be visible to you at the top of the Q&A window. Click the ‘Unanswered’ tab to filter for the questions that haven’t been answered yet.

When the session has ended or completed, click ‘Stop Q&A’.
If you would like to keep a record of the Q&A session, click ‘Save As’, type a name, and save the file on your computer.
Q&A is saved in Notepad and contains the following,
- Questions
- Answers
- Time stamps
- Names of attendees
- Name of presenters who participated
When a presenter shares the Q&A session, all the meeting attendees can see and ask questions.
3] Open a new whiteboard
A whiteboard, as the name suggests, represents a blank page that you can use to collaborate with other meeting participants. For instance, you can type notes, draw, or import images and do other things.
Even when the meeting is over, you can save the whiteboard with the data from the participants’ collaboration. Here’s how to get started with it!
In the meeting window, click the ‘Present Content’ button.
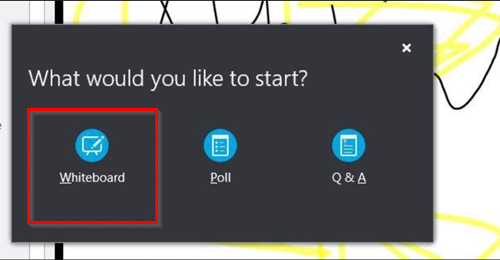
Choose, ‘More’, and then select ‘Whiteboard’ option.
Upon confirming the action, a blank whiteboard will open on the meeting stage of everyone’s screen.
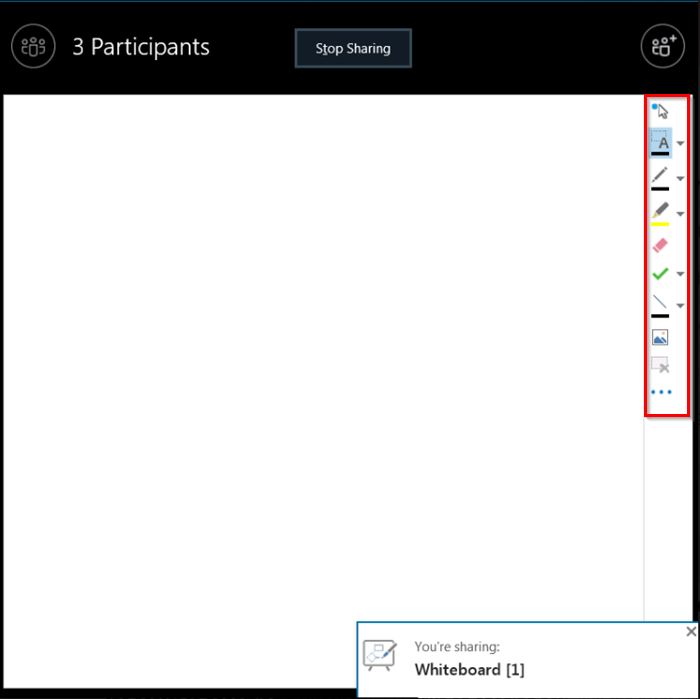
On the right side of the whiteboard, a set with the complete list of Annotation tools, such as a pointer, pen, highlighter, eraser, and so on, will open.
Select any of the tools to annotate on the whiteboard.
The whiteboard will close automatically when you switch to another presenting option. However, it will be readily accessible at the meeting. Just click ‘Present’ > ‘Manage Content’ option and you should see the whiteboard again.
I hope this helps!
Leave a Reply