Visual representation of things makes learning an easy process. So, if you are looking to create a video clip via screen recording with all the instructions look no further than PowerPoint. The app makes the task of recording practically simple and straightforward. Here’s a post describing you how to record and customize your screen with Office PowerPoint.
How to record screen using PowerPoint
With Microsoft Office installed on your PC, you can record your computer screen and related audio, and embed it in your PowerPoint slide. For convenience purposes, let’s divide the topic of discussion in two parts,
- Create your screen recording
- Control your screen recording
After you are done with screen recording, you can save it as a separate file.
1] Create your screen recording

Launch Office PowerPoint app and select the ‘Insert’ tab from the ribbon menu.
Next, go to the ‘Media’ section located on the extreme right and select ‘Screen recording’ option.

Instantly, the background area will be blurred, and you’ll see a Control Dock with few options displayed like,
- Select Area
- Record
- Audio Pointer
Choose ‘Select Area’ (Windows logo key+Shift+A) or if you want to select the entire screen for recording, press Windows logo key+Shift+F (The minimum limit available for screen recording is 64×64 pixels).
If you have opted to select an area, simply drag the cross-haired cursor to choose the area of the screen you want to record.
2] Control your screen recording
Once you are done with recording, hit the ‘Pause’ button visible under the Control Dock. Click Stop to end your recording.

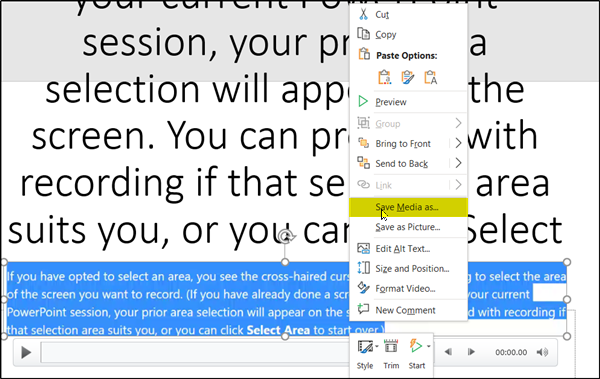
Now, to save the recording as a separate file on your computer, right-click the picture on the slide that represents the recording and select ‘Save Media as’ option as shown in the screenshot above.
In the Save Media As dialog box, specify a file name and folder location, then click Save.
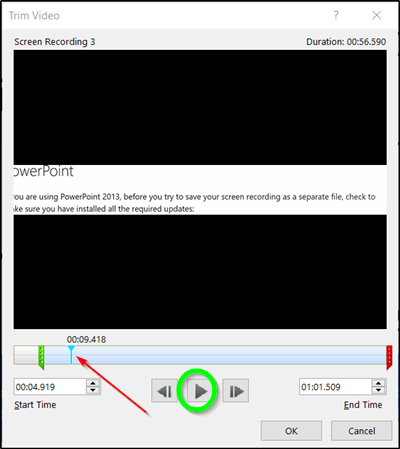
Lastly, if you would like to make some changes to the clip, right-click the video frame, and click Trim.
To fix the spot where you would like to trim your video footage, in the Trim Video box, click Play. Just when you reach the point where you want to make the cut, click Pause.

Then, to trim the beginning of the clip, click the start point (green marker). When you see the two-headed arrow, drag the arrow to the desired starting position for the video.
Similarly, to trim the end of the clip, click the endpoint (red marker). When you see the two-headed arrow, drag the arrow to the desired ending position for the video.
That’s it!
Leave a Reply