If you do not want to allow users to add, remove, or adjust Toolbars on the Windows Taskbar, here is what you need to do. It is possible to create this restriction with Registry Editor as well as Local Group Policy Editor. If you follow this tutorial, the add new Toolbars option will be grayed out or non-clickable.
Toolbars help you to launch programs and files from Taskbar. It is straightforward to add or remove a toolbar in the Taskbar. Whether you want to insert a preset Toolbar or add a custom one, it is possible to do both.
There are two ways to do the same – using Local Group Policy Editor and using Registry Editor. If you use the Registry Editor, don’t forget to backup all registry files and create a System Restore point before getting started.
Prevent users from adding, removing, and adjusting Toolbars
Using Group Policy Editor
To prevent users from adding, removing, and adjusting Toolbars, follow these steps-
- Search for gpedit.msc in the Taskbar search box.
- Click the Edit group policy in the search result.
- Navigate to Start Menu and Taskbar and Desktop folder.
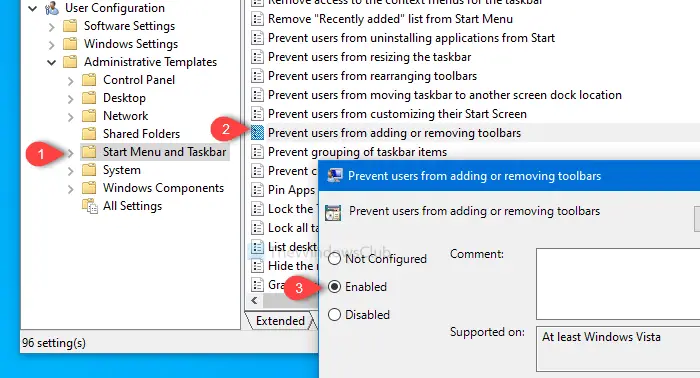
- Double-click on Prevent users from adding or removing toolbars option.
- Select Enabled.
- Click Apply and OK.
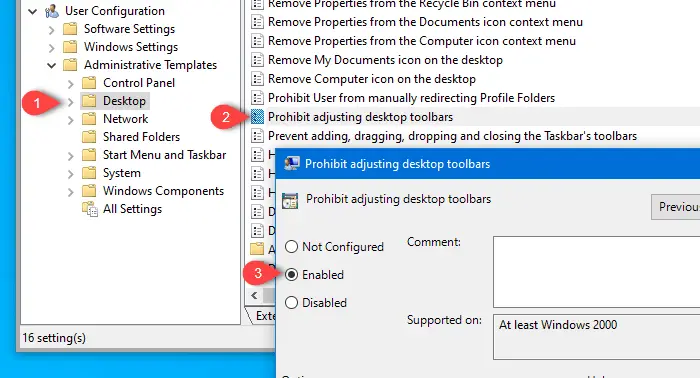
- Double-click on Prohibit adjusting desktop toolbars.
- Select Enabled.
- Click Apply and OK.
Let’s check out these steps to know more.
At first, search for gpedit.msc in the Taskbar search box, and click on Edit group policy in the search result. Following that, navigate to this path-
User Configuration > Administrative Templates > Start Menu and Taskbar
Double-click on Prevent users from adding or removing toolbars, select Enabled, and click on Apply and OK buttons, respectively.

Following that, navigate to this path-
User Configuration > Administrative Templates > Desktop
Double-click on Prohibit adjusting desktop toolbars, select Enabled and click on Apply and OK buttons one after one.

After doing this, you won’t be able to add a new toolbar or remove the existing one.
Using Registry Editor
To prevent users from adding, removing, and adjusting Toolbars, follow these steps-
- Press Win+R to open the Run prompt.
- Type regedit and hit the Enter button.
- Click on the Yes button in the UAC prompt.
- Navigate to Explorer in the HKCU and HKLM.
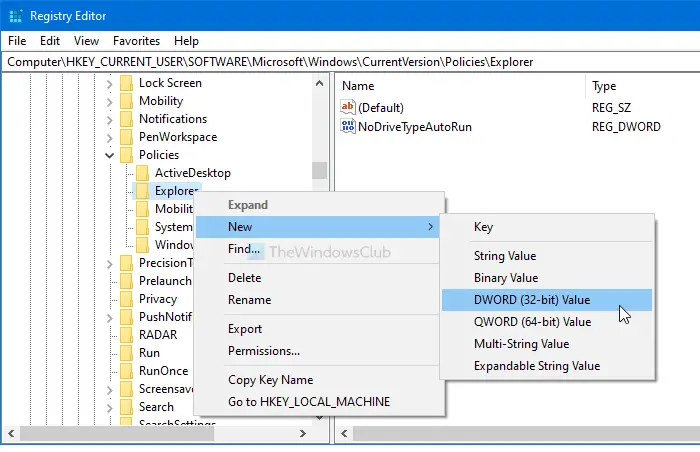
- Right-click on Explorer.
- Select New > DWORD (32-bit) value.
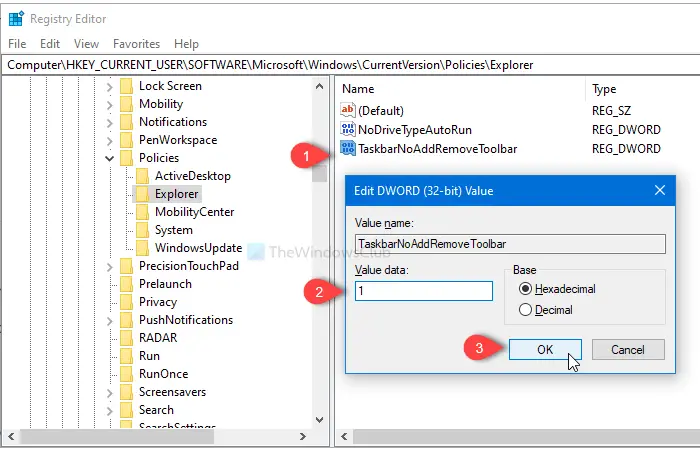
- Name them as TaskbarNoAddRemoveToolbar and NoMovingBands.
- Set the value as 1.
- Click OK to save the change.
Press Win+R, type regedit, and hit the Enter button. Following that, it shows the UAC prompt where you will click the Yes button to open Registry Editor. Then, navigate to this path-
HKEY_CURRENT_USER\Software\Microsoft\Windows\CurrentVersion\Policies\Explorer
In the Explorer key, it is required to create two REG_DWORD values. For that, right-click on Explorer, select New > DWORD (32-bit) value, and name it as TaskbarNoAddRemoveToolbar.

Then, repeat the same steps to create another DWORD (32-bit) value and name it as NoMovingBands.
By default, they both carry 0 as the value.
However, double-click on each REG_DWORD value, and set the value as 1. Click OKto save changes.

Now, navigate to this path-
HKEY_LOCAL_MACHINE\SOFTWARE\Microsoft\Windows\CurrentVersion\Policies\Explorer
You will make another DWORD (32-bit) value by following the same steps as mentioned above and name it as TaskbarNoAddRemoveToolbar.
Double-click on it, and set the value as 1. Click the OK button to save it.
P.S. It is not required to create NoMovingBands REG_DWORD value in the HKEY_LOCAL_MACHINE.
That’s all! Now, users will not be able to add or remove toolbars from the Taskbar.
Read next: How to backup and restore Taskbar Toolbars in Windows.