In this post, we will help you with how to prevent webpages from showing images in Google Chrome on Windows 11/10 computers. To do this, you can use two built-in features of Windows 11/10 OS. Once you have set the required action, no webpage will be able to display or load the images. Instead, a broken image icon will be visible along with alt text (alternative text, if added) for all the images present in the web pages opened by you.
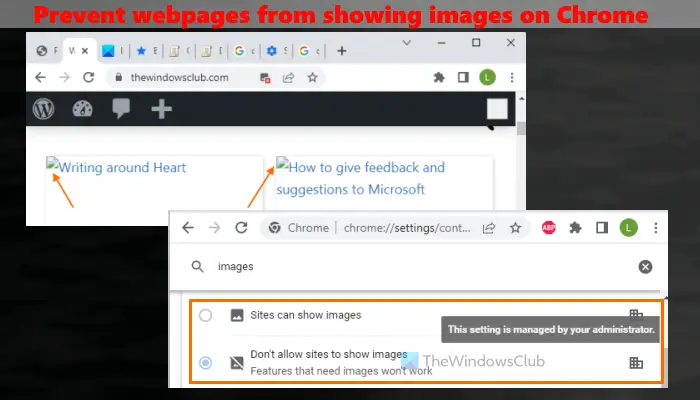
By default, like any other modern browser, Google Chrome shows all the images for all websites. Also, there is a setting present in Google Chrome to allow/disallow sites to show images and set which sites are allowed or not allowed to show images. But, once your trick is applied, that setting along with all such options will be disabled completely and no site will be able to show images at all. You can also undo all the changes when you need.
Prevent webpages from showing Images in Google Chrome
Here are two native options of Windows 11/10 to disable webpages from showing images on the Chrome browser:
- Group Policy Editor
- Registry Editor.
It is advised to create a system restore point first so that you can easily recover from unexpected changes (if any). Now let’s check these two options.
1] Prevent webpages from showing images on Google Chrome using Group Policy Editor
Before trying this option, you first have to integrate Google Chrome with Group Policy so that you can have Group Policy settings for the Chrome browser. After that, you can follow these steps:
- Open Group Policy Editor
- Select the Content settings folder
- Open Default images setting
- Use the Enabled option
- Select Do not allow any site to show images option
- Press the OK button.
Let’s check all these steps in detail.
Use Windows 11/10 Search box, write gpedit, and hit the Enter key to open the Group Policy Editor window.
Now select the Content settings folder. To do that, use this path:
Computer Configuration > Administrative Templates > Classic Administrative Templates (ADM) > Google > Google Chrome > Content settings
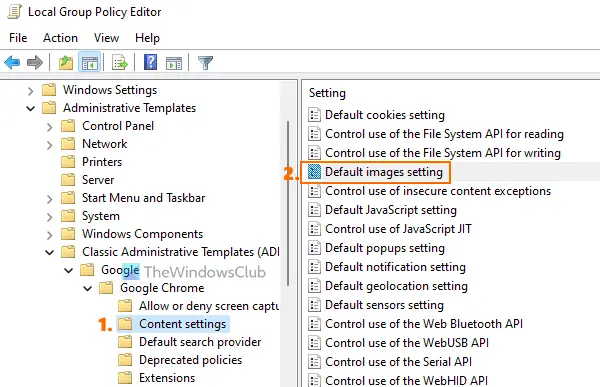
Open the Default images setting from the right section by double-clicking on it. This will open a separate window for that setting. There, first, select the Enabled option. After that, use the drop-down menu available on the left-middle part of that window, and select the Do not allow any site to show images option.
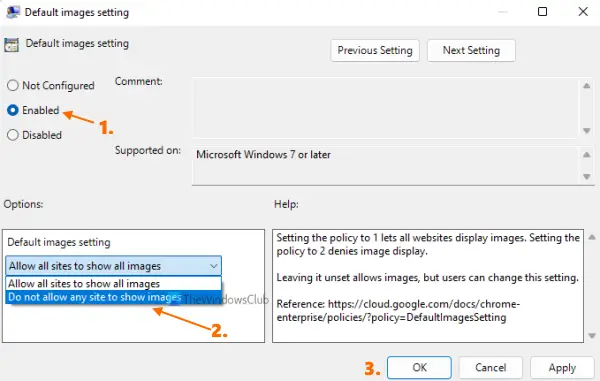
Press the OK button.
Refresh the opened tabs (if any) and you will find that images are not opening for any webpage. If the changes are not visible for some reason, then you should restart your Chrome browser and then try it.
To enable webpages from showing images on Google Chrome again, just repeat the above steps, and open the Default images setting window. After that, use the Not Configured option, and press the OK button. Restart the Chrome browser to apply the changes.
Related: How to browse in Text-Only Mode in Chrome, Edge, or Firefox.
2] Disable webpages from showing images on Google Chrome using Registry Editor
The steps are as follows:
- Open Registry Editor
- Select the Policies key
- Create a Google key
- Generate a Chrome key
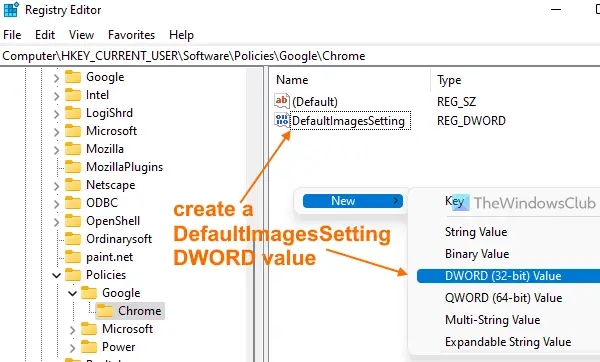
- Create a DefaultImagesSetting DWORD value
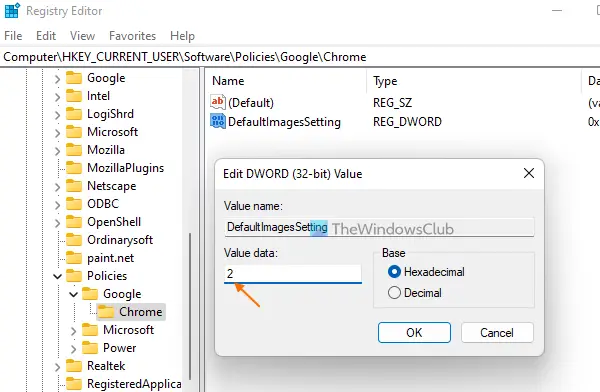
- Add 2 in its Value data
- Use the OK button
- Restart the Chrome browser.
In the first step, type regedit in Windows 11/10 Search box, and press the Enter key to open Registry Editor.
In that window, select the Policies key. Here is its path:
HKEY_CURRENT_USER\Software\Policies
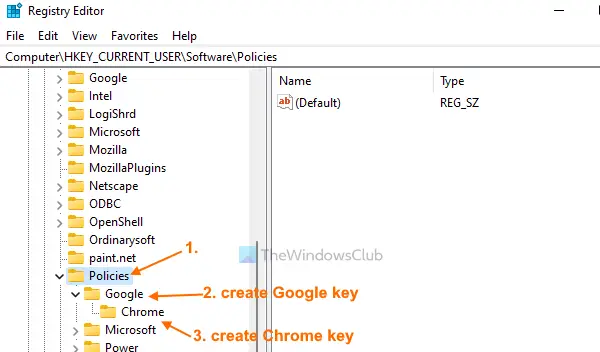
Create a new Registry key under the Policies key and rename it as Google. After that, create another Registry key in Google key and rename it to Chrome.
Under the Chrome key, create a DefaultImagesSetting DWORD value on the right-hand section. For that, open the right-click menu, expand the New menu, and use the DWORD (32-bit) Value option. When the new value is added, change its name to DefaultImagesSetting.
Now add Value data for DefaultImagesSetting. In order to do that, double-click on that DWORD value. You will see a small box with Value data filed. Add 2 in that field, and use the OK button to close that box.
Finally, restart the Chrome browser to apply the changes and sites will not show images anymore.
To enable sites to show images again on Google Chrome, just follow the steps explained above, and delete/remove the Google key.
Restart Google Chrome and you will be able to see webpage images once again.
How do I stop websites from loading images?
There is a native way to block or disable images in Chrome, Firefox, and Microsoft Edge. If you use these browsers and want to stop websites from loading images, then you can do this by accessing the Settings page of your browser.
Each browser has different steps to do that. For example, if you want to turn off loading images on the Chrome browser, then you can do this by accessing the Images section available under the Site Settings page. Similarly, you can find the associated setting for the browser you are using and prevent websites from loading images.
How do I stop Chrome from saving images on a WEBP?
If you want to stop the Chrome browser from saving images as WebP, then you can try the following options:
- Change the file extension or file format to JPG, PNG, etc., while downloading the images from the Chrome browser to your computer. For example, while saving an image from Chrome using right-click menu, you can save it as abc.png
- Use some free Chrome extension that lets you convert WebP images to some other format images. One of such extensions is Save Image As PNG. That extension provides a right-click menu option to convert WebP to PNG so that you can download a WebP image as a PNG format file.
Read next: Can’t download or save images from Google Chrome.
Leave a Reply