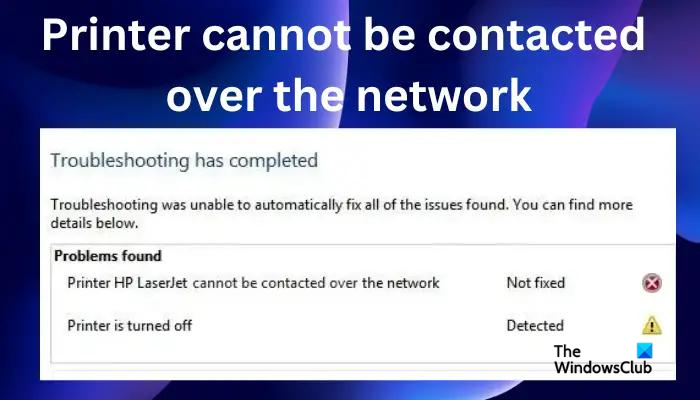
If you see a message Printer cannot be contacted over the network after running the Printer Troubleshooter, it means there is no communication between your computer and the printer. It is frustrating, but we have the best solutions in this post to ensure you resume your printing within no time.

The error always affects the network printers, making them fail to print anything. When you run a Windows printer troubleshooter, the tool cannot fix the issue but report back that your printer cannot be contacted over the network. A printer in a network is very crucial as it makes it easier for several users to print documents without worrying about a wired connection.
Why can’t my printer be contacted over the network?
Your printer may not be contacted over the network if some services are disabled on your PC, the IP address is not static, or some minor connection issues. Network printers depend on several services on your computer to run the printing process; if they are disabled, the printer will not be contacted. The printer may fail to print if its IP address is dynamic; it won’t be contacted. Minor connection issues in the printer network can also cause the error.
Fix Printer cannot be contacted over the network
To fix the error message Printer cannot be contacted over the network that you may see after running the Printer Troubleshooter, follow these suggestions:
- Start with preliminary steps
- Disconnect and reconnect your printer
- Change the printer IP address to Manual or Static
- Enable specific Printer services on your PC
Lets us dig deep into these solutions, one by one.
1] Start with preliminary steps
Before proceeding to more advanced solutions, it’s advisable to do some preliminary steps. For instance, Ensure your network connection is correct, and if you use a Wi-Fi connection in the network, remove and use Ethernet, or vice-versa. Also, check if the issue is only with one device because you might be dealing with a device-specific error; try print from any other device. If the error persists, you may proceed to perform the suggestions below.
2] Disconnect and reconnect your printer

Removing and re-adding the printer can resolve the issue of your printer not being contacted over the network. Some users have reported that this method worked for them, and they resumed normal printing immediately after that. Use the steps below to disconnect and reconnect your printer on the network:
To remove your printer from your computer, follow these steps:
- Launch the Run dialog box by pressing the Windows key + R.
- Type control printers and then hit OK or press Enter on your PC keyboard.
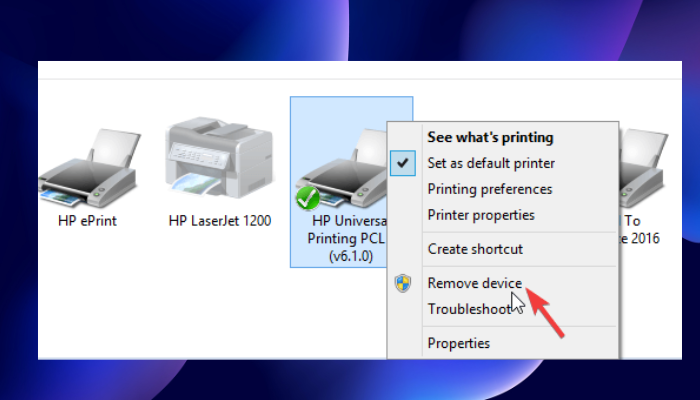
- Now, you are on the Devices & Printers windows. Go ahead and locate the printer that is not being contacted over the network and right-click on it.
- Select Remove device and when a confirmation prompt shows up, confirm Yes to continue. This will disconnect your printer from the system.
- Next, remove all cables connecting your printer to your computer. If you use Ethernet or Wi-Fi, disconnect them, as well.
- Wait for about 3 minutes and start the reconnecting process.
To reconnect your printer to the system, follow the steps below:
- Return all the USB cables you removed, Wi-Fi, or Ethernet cables.
- Open the Run dialog box again as we did before.
- Type control printers and press Enter or OK.
- On the new windows, select Add a printer. Windows will detect the printers connected to the system.
- Select the printer that you want and then click Next.
- Use the onscreen directions to set up your printer, and complete the process.
This method clears any bugs or glitches that might be causing the error to occur on your printer. Test your printer by printing a page to see if all is well.
3] Change the printer IP address to Manual or Static
Your computer gets a specific IP address from the router. The printer may misconfigure the IP address and use another one. This will prevent your printer from being contacted over the network. Follow the steps below to configure the IP address and fix your printer if it cannot be contacted over the network:
- First, we need to open the Device & Printers window. To do so, open the Run dialog box and type control printers.
- From the list of printers, locate the one you want and right-click on it.
- Select Properties and then head to the Ports option.
- Scroll down until you see a port entry that looks like an IP address, something like 20.476.365.23. In many cases, it’s indicated as Standard TCP/IP port.
- Note down the IP address. Open your computer browser and put the IP address on the URL address bar and press Enter. This will open the printer’s settings page.
- Here, put your printer credentials ie name and password then click OK to continue.
- Navigate to the IP configuration and click on it. You will find something like IP Address Configuration or TCP/IP.
- Change the settings here and put either Static or Manual; it can be either of them.
- Next, set the static IP address and finally click Apply to make the changes.
- Go back and test if the printer is okay by printing a document.
4] Enable specific Printer services on your PC

If some services are disabled, your printer might not be contacted over the network. To fix this error, you need to check if certain services are enabled or disabled. Follow the steps below to fix the printer not being contacted over the network error:
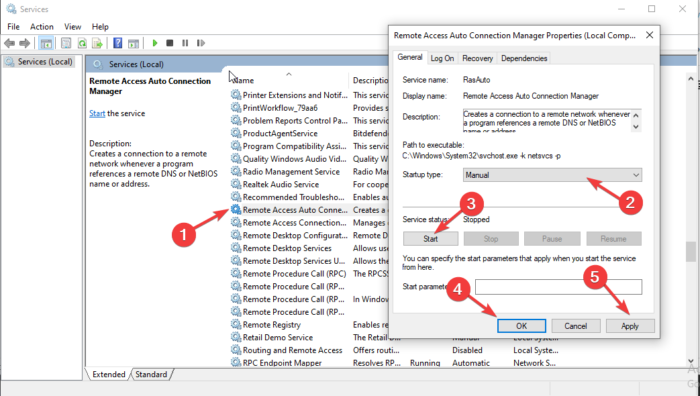
- To open Services, press Win + R and type services.msc in the dialog box and press Enter.
- First, look for Remote Access Auto Connection Manager and double-click on it to open.
- Check if the service is indicated as Running. If so, right-click on it and select Stop. If the service was already stopped, move on to the next.
- Locate the Startup type and set it to Automatic. Then click Start to continue.
- Perform the same steps above for the following services:
- Remote Access Connection Manager
Secure Socket Tunneling Protocol Service
Routing and Remote Access
- Remote Access Connection Manager
Also, make sure that the following Services are set to start as follows:
- Print Spooler – Automatic
- Printer Extensions and Notifications – Manual
- PrintWorkFlow – Manual (Triggered)
In some cases, there is an error that may appear when enabling some PC services. The error prompts a message like this:
Windows could not start the service on Local Computer. Error 1079: The account specified for this service differs from the account specified for other services running in the same process.
Read this article to fix Error 1079 while starting a Windows Service.
We hope one of the solutions helps you fix your printer if it’s not contacted over the network.
Why is my HP printer not connecting to my network?
Your HP printer might fail to connect to your network because there are temporary bugs, glitches, or network connection issues. To fix a printer that is not connecting to a network, restart your computer or mobile device and the printer itself. You can also restore the Wi-Fi setup mode using the restore settings on the printer touchscreen.
Read: Common Print Security Threats and How to Protect against them
How do I reset the printer network?
To reset the printer network, go to the touchscreen and head to the printer control panel. Tap on the Wireless icon or the Setup icon. Go to Settings/ Network Setup. Touch the Restore Network Settings button and select Restore. If you get a prompt, tap Yes. Wait for about one minute and reconnect to the network.
Related: Printer Error 0x000006BA, Operation could not be completed
Leave a Reply