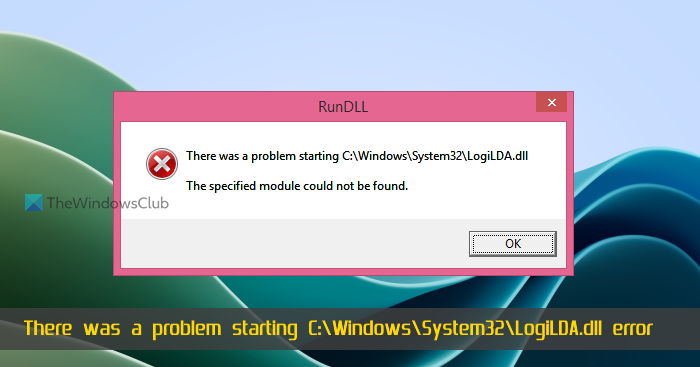
Whenever there is a major update in Windows 11/10, some users tend to run into issues. Not that the update is bad, it’s mostly because of software conflicts or other issues. Today we will discuss a LogiLDA.DLL error that mostly occurs after you boot into Windows:
There was a problem starting C:\Windows\System32\LogiLDA.dll The specified module could not be found.
This RunDLL error could occur after you upgrade your Windows version to Windows 10 or install a Feature Upgrade.

There was a problem starting C:\Windows\System32\LogiLDA.dll
This error occurs due to the incompatible version of Logitech software, more specifically Logitech Download Assistant. This belongs to the Logitech mouse, one of the most commonly used mice among PC users. So naturally, a lot of users have reported this error message. After some research, I found out the ways to fix this problem. To resolve this problem, please follow these steps:
- Edit Registry
- Remove Logitech from Startup
- Re-install Logitech mouse device drivers.
Let’s check these steps in detail.
1] Edit Registry
- Open the Task Manager on your Windows 11/10 PC
- Go to the Startup tab (or Startup apps) and find LogiLDA.DLL
- Right-click on LogiLDA.DLL and click on Disable.
Now we have temporarily disabled the Logitech Download Assistant from starting with the computer. Now we have to delete the associated Registry entry or key so we won’t be bothered with it again. You should backup the Windows Registry before making any changes to it. Once done, follow these steps:
- Press Win+R, type regedit and hit Enter.
- Go to the Run Registry key:
HKEY_LOCAL_MACHINE\Software\Microsoft\Windows\CurrentVersion\Run
- Find Logitech Download Assistant and delete the entry.
Now reboot the system for changes to take effect.
2] Remove Logitech from Startup
If you don’t want to go through the whole Registry entry, then I’ll suggest a simpler way.
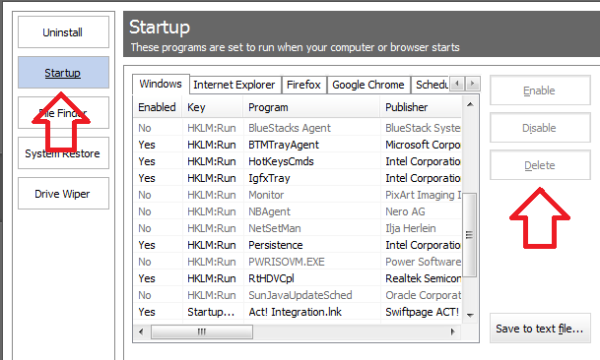
- Download CCleaner
- Now install CCleaner and open it
- Click on Tools –> Startup
- Select Logitech Download Assistant from the list and click on Delete
This process is much simpler and less complicated. Once you have done this, you need to reboot your computer to take effect.
I hope you find this article helpful. In case of any issues, please feel free to drop a comment in our comments section. We will be more than happy to assist you.
3] Re-install Logitech mouse device drivers

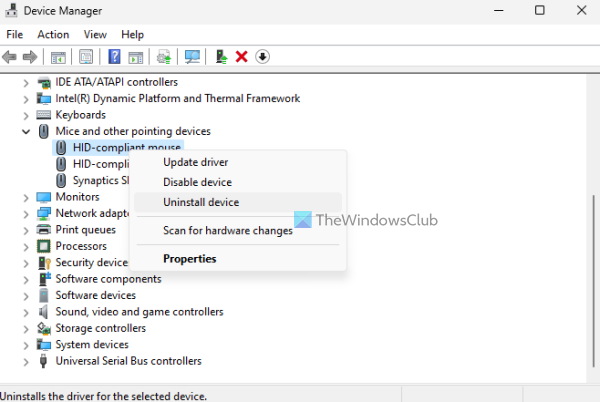
This LogiLDA.DLL can also occur because of the device drivers installed for your Logitech hardware (mainly the mouse in this case). If this is the reason, then you should re-install the Logitech mouse device drivers on your Windows 11/10 PC. Here are the steps:
- Open the Device Manager window
- Expand the Mice and other pointing devices section
- Right-click on the device name
- Select the Uninstall device option
- Press the Uninstall button in the confirmation box
- Restart your Windows PC.
After this, Windows will automatically install the drivers for your device again. This should fix the problem.
Hope this helps.
Now read: Logitech keyboard not working on Windows PC
How do I fix Windows DLL error?
If you want to fix missing DLL file error(s) or DLL not found error on your Windows 11/10 system, then the built-in System File Checker tool and DISM tool can come in handy. Additionally, if the DLL file error is related to some third-party software, then you should re-install its device drivers or the software itself. If this doesn’t help, try to copy the same DLL from some other computer and restore it to your PC (if possible).
How do I reset a DLL?
If you are looking for a native option to register or re-register a DLL file on Windows, then open an elevated Command Prompt window, and use the following command:
regsvr32 "Enter the path and filename of DLL file"
In the above command, provide the original path along with the name of that DLL file that you want to re-register.
Read next: MSVCP100.dll missing or not found in Windows PC.

