Screen Mirroring is a feature that lets users share the screen of one device with another device by using wireless technology. For example, if your Android smartphone and your computer support the Screen Mirroring feature, you can share the screen of your smartphone with your computer and watch the content on a larger screen. If you see the “Protected content cannot be viewed on this device” error message while mirroring your screen to your computer, the solutions provided in this article will help you.
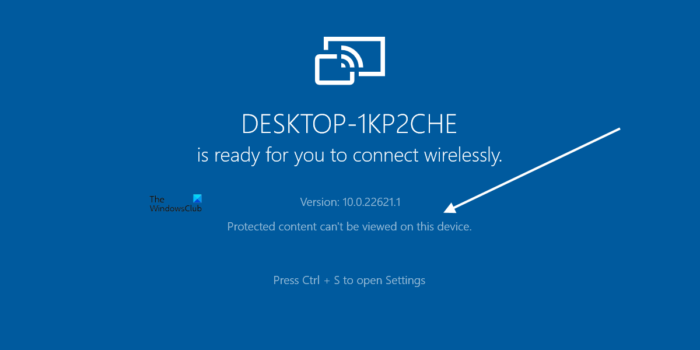
Protected content cannot be viewed on this device
Use the following solutions to fix the “Protected content cannot be viewed on this device” error on your Windows device.
- Check if your system supports the Screen Mirroring technology
- Check your network connection
- Is your Network adapter enabled?
- Disable your Firewall temporarily
- Turn on the Media Streaming
- Update or reinstall the Network and Display drivers
- Uninstall and reinstall the Wireless Display feature
Let’s see all these fixes in detail.
1] Check if your system supports the Screen Mirroring technology
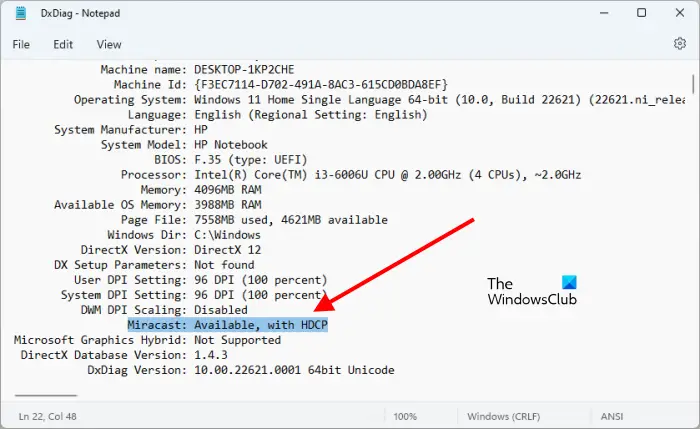
Before you use any of the solutions provided in this article, it is necessary to check if your system supports the Screen Mirroring feature or not. You can check this by using the DirectX Diagnostics Tool.
Follow the steps written below:
- Open the Run command box (Win + R).
- Type dxdiag and click OK.
- The DirectX Diagnostic Tool will appear on your screen.
- Click on the Save All Information button at the bottom.
- Name your file or save it with the default name.
The saved file will be in plain text format. Double-click on it to open it in Notepad (Windows default text editor tool). Look for Miracast in the Notepad file. You can also use the Ctrl + F to find Miracast in the file. If you see Miracast unavailable or missing in the Notepad file, your system does not support the Screen Mirroring technology.
2] Check your network connection
To cast your screen from one device to another by using the Screen Mirroring technology, both of your devices should be connected to the same network. Check if both your devices are connected to the same network or not.
Also, check if your laptop is in flight mode or not. The flight mode disconnects a laptop from all wireless connections automatically. If you are in flight mode, turn it off.
3] Is your Network adapter enabled?
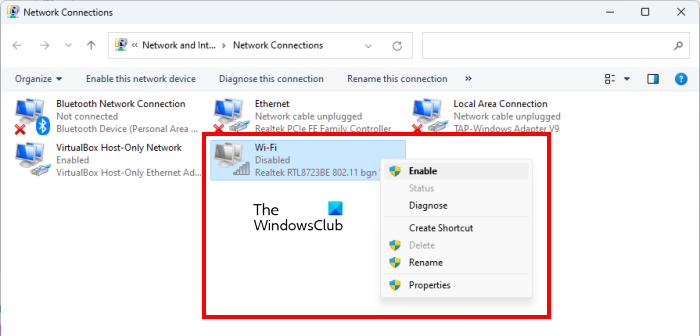
The root cause of this error message is the network issue. Hence, you have to troubleshoot your network in order to fix this problem. The network adapter is responsible for connecting your system to the wireless network, like WiFi. If it is disabled, you will not be able to connect to any WiFi signal until you enable it.
The steps are provided below:
- Open the Control Panel.
- Select Category in the View by mode.
- Go to “Network and Internet > Network and Sharing Center.”
- Click Change adapter settings on the left side.
- If your WiFi adapter is disabled, right-click on it and select Enable.
After enabling the WiFi adapter, your system will connect to your WiFi network and you should be able to cast your screen.
4] Disable your Firewall temporarily
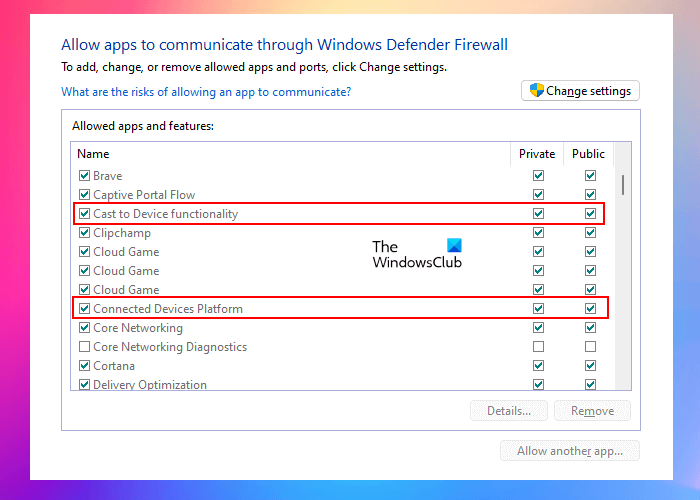
A Firewall is also one of the causes of the “Protected content cannot be viewed on this device” error on a PC while casting the screen. Temporarily disable your Firewall and see if it helps. If this works, you have to allow Cast through Windows Firewall. The steps for the same are explained below:
- Click on Windows Search and type allow an app through Windows Firewall.
- Select the same option from the search results.
- Select the following options:
- Cast to Device functionality
- Connected Devices Platform
- Select both the Private and Public checkboxes next to these options.
- Click OK to save the changes.
If you are using a third-party Firewall, contact their support to know how to allow a program.
5] Turn on the Media Streaming
Media Streaming allows users to send videos, music, and pictures to other computers and devices connected to the same network. You may not be able to use the Screen Mirroring feature on Windows 11/10 if this feature is turned off. The following steps will help you enable Media Streaming on Windows 11/10:
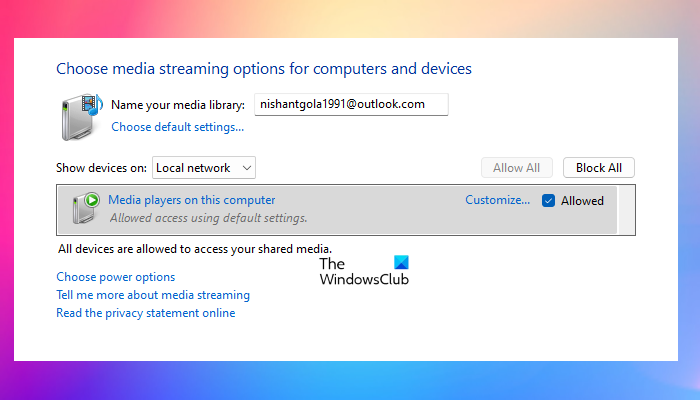
- Open the Control Panel and switch your view to the Category mode.
- Go to “Network and Internet > Network and Sharing Center.”
- Select Media streaming options from the left side.
- If it is turned off, click on the Turn on button.
- After turning it on, click Allow all.
- Click OK to save the changes.
After performing the above steps, check if the issue persists.
6] Update or reinstall the Network and Display drivers
Corrupted or outdated device drivers cause problems on a Windows device. Hence, it is suggested that all your device drivers should be up to date. The issue might also be occurring due to corrupted wireless or display drivers. Open the Optional Updates page in Windows 11/10 Settings and see if any update for your drivers is available. If yes, install it.
If an update is not available there, uninstall your Network and Display drivers, and reinstall them. After uninstalling the Network driver, you will not be able to access the internet. Therefore, first, visit the official website of the manufacturer and then download the latest version of the Network and Display drivers. After that, follow the steps written below:
- Open the Device Manager.
- Expand the Display adapters and Network adapters nodes.
- Uninstall your display and WiFi divers.
- Run the installer files to install these two drivers again. If the drivers are in INF format, use the Device Manager to install them.
7] Uninstall and reinstall the Wireless Display feature
If the issue still persists, uninstall and reinstall the Wireless Display feature. In Windows 11/10. Wireless Display is a built-in optional feature. Hence, users can install it if they want to do so. Uninstalling and reinstalling this feature can fix the issue. Go through the following instructions:
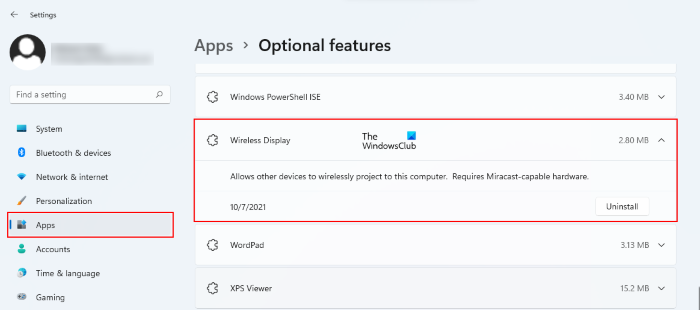
- Open Windows 11/10 Settings.
- Go to “Apps > Optional features.”
- Scroll down and locate Wireless Display and uninstall it.
- Once you uninstall it, restart your computer.
After restarting your computer, install Wireless Display again via Optional features. This should help.
Sometimes, Windows displays this error message but still, the users are able to connect their phones via Screen Mirroring. Open Settings and go to “System > Projecting to this PC” and check your settings. After that connect your smartphone to your computer.
Read: How to improve Wireless Network Signal on Windows.
How do you fix protected content cannot be viewed on this device?
If you see the “Protected content cannot be viewed on this device,” first, check if your device supports Screen Mirroring or Miracast technology. If yes, it may be the fault of your display and network drivers. We have explained some fixes in this article to resolve this issue.
Why won’t my computer connect to my wireless display?
To connect your computer to your wireless display, make sure that both devices are connected to the same network. Also, it might be the fault of your network driver. Update or reinstall your network drivers. You can also use the solutions provided in this article to fix the issue.
Read next: Wireless Display not working on Windows.
Leave a Reply