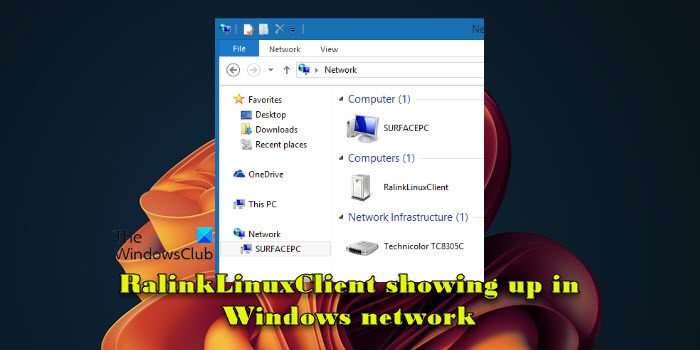
If RalinkLinuxClient is showing up in your Windows Network, read this post to learn what is RalinkLinuxClient and why is it appearing as part of your computer network. Many Windows users have reported an entry named RalinkLinuxClient is listed among Computers as a part of the network upon opening This PC. Upon observing the same, the first perception is that the system might be hacked. We cannot deny that possibility and will make sure that the system is not compromised for any reason. However, in the usual scenario, it might be another device connected to the same network.

What is Ralink Linux Client?
Ralink Linux Client is basically an internal chipset used by many devices like routers, etc. Ralink is the manufacturing company of the chipset and holds the largest share in the market. Since it is an internal chip, we would never know which product is using it since the brand of the product would be different. For example, a Samsung television might use a Ralink chipset.
Why is Ralink on my network?
If a wireless router with RalinkLinuxClient internal chipset uses the same IP address range as your router, RalinkLinuxClient may appear as part of your network. This typically happens when both routers work with their default IP address range. Ralink can also appear on your network if you’ve enabled two different Wi-Fi networks within the same router.
Fix Ralink Linux Client showing up in Windows network
If RalinkLinuxClient is showing up in the Network section on your Windows 11/10 PC, take the following steps to fix the issue:
- Check if RalinkLinuxClient is another device connected to your network
- Rename your WiFi network and change the password
- Disable the Windows Connect Now service
Let us see this in detail.
1] Check if RalinkLinuxClient is another device connected to your network
To rule out the possibility of a malicious threat or a breach in your network security, keep a record of the MAC addresses of your devices. You can compare the MAC address of RalinkLinuxClient with the MAC address of your external device to see if there’s a match. In many cases, it was found that the Ralink client was nothing but a Smart TV connected to the same network and in other cases, an outdoor camera.
Another way to check this is to temporarily switch off these external devices and observe whether the RalinkLinuxClient entry remains under the Network section.
2] Rename your WiFi network and change the password
If you do not know which device connected to the router’s network has the Ralink Linux Client chipset, it might be possible that someone might be trying to intrude into your system using the name RalinkLinuxClient to avoid suspicion.
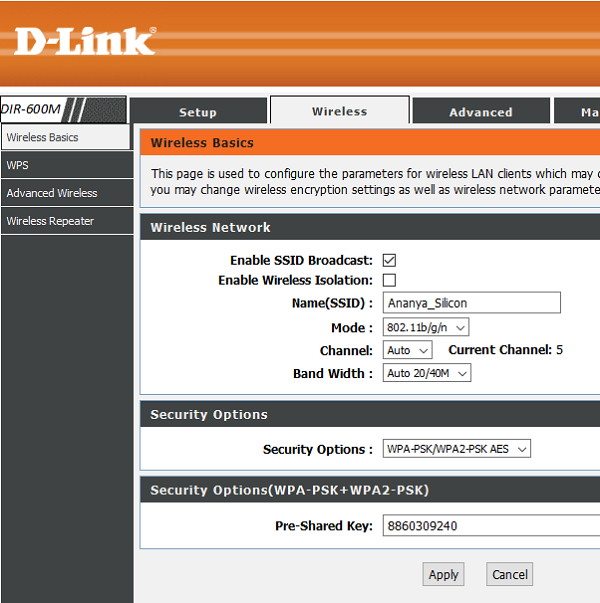
In such a situation, we could assume that the cyber intruder knows your router’s password and can thus intrude into your network. Thus, we would have to change the router’s SSID and password before doing anything else. When we change the SSID, all devices connected to the router get disconnected and need to be connected again. In case any person was trying to enter your system via the router, he/she would have to connect through the same path again with the new router password.

You might need to contact your router’s manufacturer for assistance with the same. However, since I have worked with many routers, I could suggest the general method to change the SSID and password of the router.
- Press Win+R to open the Run window and then type CMD. Press Enter and it will open the Command Prompt window.
- Type the command ‘ipconfig‘ and press Enter. It would display a set of information. Please note down the value of the default gateway – that’s the IP address of your router. For my router, it is 192.168.0.1.
- Open your browser and type the default gateway in the address bar and press Enter. It would open the router’s graphic user interface.
- It would ask for the login details which are usually written on the back side of the router.
- Once you log in to the GUI, navigate to the Wireless tab and change the SSID and password. Hit Apply to save the settings and it will disconnect your system from the wireless network. If your computer was connected to the router through a LAN cable, it would remain connected despite the change, else restart the system and reconnect to the new SSID using the new password.
Please note that steps post login may vary depending on your router manufacturer. If you get stuck anywhere, we advise you to refer to the official documentation associated with your router model for help.
Once you’ve changed the name and password of your Wi-Fi network, no outsiders will be able to connect – you won’t notice a Ralink Linux Client entry if your network was compromised. If you still continue to see the RalinkLinuxClient entry under your Network list, follow the next method to prevent these ghost entries from showing up on your PC.
3] Disable the Windows Connect Now service
Once you change the SSID and password of the router, you have eliminated any external intrusion into your system. If the RalinkLinuxClient reappears after reconnecting your home devices to the router again, it is probably one of your own devices. Though harmless, if you really need to remove the RalinkLinuxClient from appearing on your system, try the following steps:

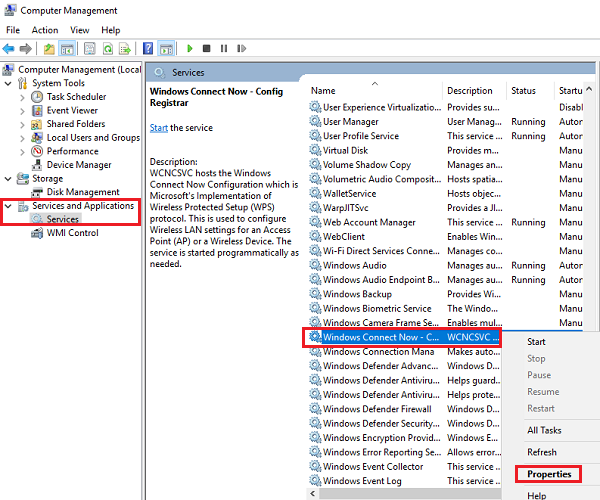
- Open the File Explorer. Right-click on This PC in the list and then select Manage. If you are not logged in as the administrator, you would have to click on Yes on the prompt window.
- Select the Services and Applications tab on the list on the left-hand side and then double-click on Services.
- The list of services on the screen will be in alphabetical order. Scroll through the list to find the Windows Connect Now service and double-click on it to open its properties.
- Change the Startup type to “Disabled” and then click on Apply, followed by OK.
- Restart your system and the RalinkLinuxClient would not appear upon opening This PC.
The above steps will disable the Windows Connect Now service, which aims to streamline the setup process for wireless networks on a Windows 11/10 PC. Without Windows Connect Now, you have to manually configure the network settings on each device you want to connect to your wireless network. This can be more time-consuming, especially if you have multiple devices or you frequently add new devices to your network, but this will prevent ghost RalinkLinuxClient entries from appearing as part of your Network.
That’s how you can easily deal with RalinkLinuxClient entries showing up in your Windows Network. I hope you find this useful. If you have any doubts or queries, feel free to share them in the comments section below.
Read Next: Network and Sharing Center not opening in Windows.
I changed my router’s Id and password and the Ralink disappeared. I checked later and it was back. I clicked on it to show details and it vanished. I doubt it is anything I’m using. Something tells me a hacker knows I saw the Ralink and shut down. What do I do now?