If you want to know how to download, install and use Razer Synapse on a Windows PC, then this article will help you. Razer Synapse for Windows is a unified configuration tool designed to enhance your experience with Razer peripherals. It lets you configure controls and assign macros to any of your Razer peripherals. By default, Razer Synapse is set to launch on Windows startup. This means that whenever you turn on your computer, Razer Synapse will start automatically.

How to download and install Razer Synapse on Windows PC
Use the following instructions to download Razer Synapse on your Windows PC. In this article, we will talk about how to download and use the latest version of Razer Synapse 3. Razer Synapse is compatible only with Windows 11/10 64-bit architecture.

- Go to the Razer Synapse 3 official website, razer.com.
- Click on DOWNLOAD NOW.
- Run the installer.
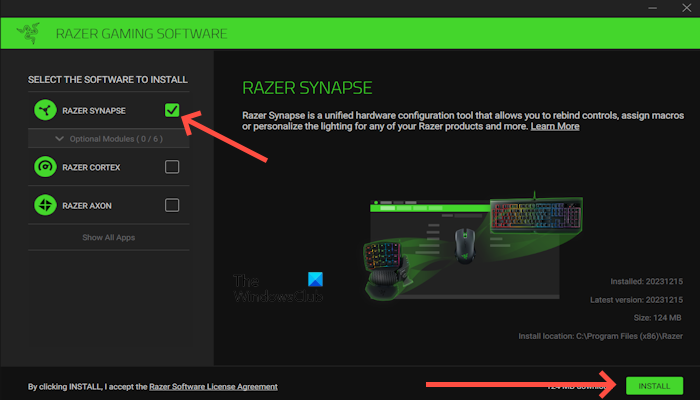
- Select “RAZER SYNAPSE“.
- Now, click on “INSTALL“. This will take a few minutes to complete.
- Sign in with your Razer ID to automatically sync your settings to the cloud.
If you don’t have a Razer ID, you can continue as a GUEST. Also, you can log in with a Facebook, Google, or Twitch account and follow the on-screen instructions.
Razer Synapse features
Let’s talk about its amazing features:
- Amazon Alexa: The Razer Synapse 3 has a nice Amazon Alexa feature that lets you control certain aspects of your smart home setup via voice commands. You can open programs and files with simple voice commands like “Hey Alexa.”
- Chroma Connect: Chroma Connect is a great feature that takes your RGB lighting experience to the next level by synchronizing the lighting effects of your Razer devices with third-party hardware and apps. This essentially opens up a whole new world of lighting possibilities beyond your Razer gear.
- Chroma Studio: Chroma Studio is the ultimate playground to unleash your creativity and create custom lighting effects for your Razer Chroma-enabled devices. Think of it as your personal light show director, allowing you to go beyond pre-programmed effects and design something truly unique. You can drag and drop different effects from a library to create your lighting sequence. Plus, you can share your Lighting profile with other Razer Synapse users and explore community-created ones for inspiration.
- Chroma Visualizer: Chroma Visualizer analyzes the audio playing on your computer, detecting bass, treble, and other audio elements. You can adjust the sensitivity of audio analysis and choose from various pre-configured lighting profiles. You can also create your custom profile for a truly personalized experience. Chroma Visualizer only works with Razer Chroma-enabled devices.
- Philips HUE: The Philips Hue feature allows you to synchronize the lighting of your Philips Hue bulbs with your Razer Chroma-enabled devices for an immersive and multi-sensory experience. It lets your entire lighting setup, both ambient and on your peripherals, react to your games, music, and even your PC activity.
- Macro Module: The Macro module is a powerful tool that allows you to record and execute complex sequences of keystrokes and mouse clicks with a single press of a button. It lets you automate repetitive tasks or create custom actions for your games and apps.
How to use Razer Synapse on your Windows PC
Razer Synapse software allows you to customize the Razer devices connected to your system. If you have a Razer device, like a Razer mouse, Razer keyboard, etc., you can connect them to your PC and customize their settings, such as changing the RGB patterns, mapping the keys, etc.
First, you have to connect your Razer device to your PC. After connecting it, Razer Synapse will automatically detect the connected device. If it fails to detect the device, repair it in Windows 11/10 Settings. All the connected Razer devices will be available on the Dashboard in the software. Now, select the device that you want to customize.
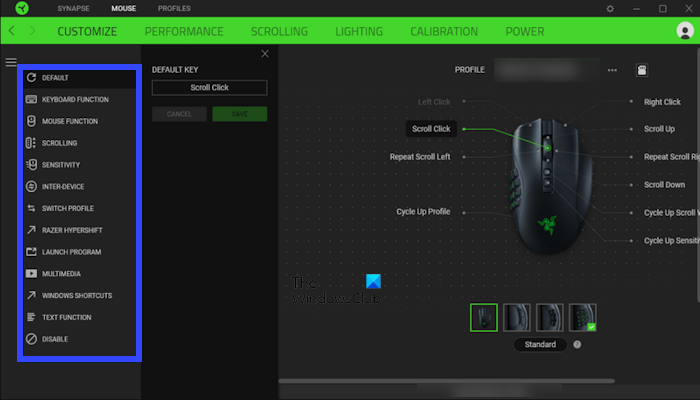
If you connect your mouse, you can remap your keys or buttons. Click on the dashboard it will show you the connected device. Select the key or button you want to remap. It will show you your preferred function to assign to the key or button you want to remap.

In the performance tab, you can change the DPI settings of your mouse. You can also customize lightning effects from the lightning tab. This feature allows you to adjust your lighting or brightness effect. Also, you can optimize the Razer Precision Sensor to your specific mousepad surface for improved tracking accuracy and performance. It’s especially beneficial for non-Razer mousepads as it calibrates to the unique texture and friction of the surface. To do so, go to the calibration tab.
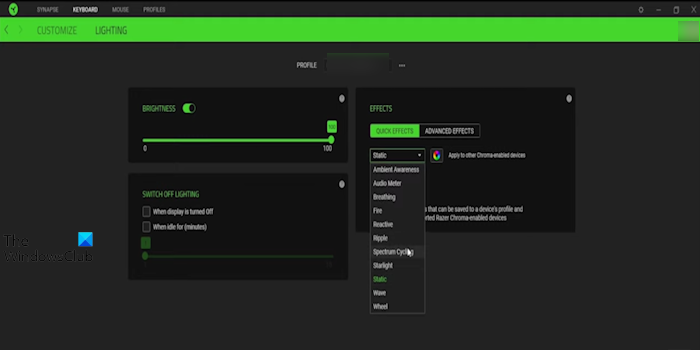
If you connect your keyboard. You can enable or disable Gaming Mode so you can experience an uninterrupted gaming experience with your keyboard. You can adjust the frequency at which your keyboard reports the keystrokes to the computer for faster response times. If you want to customize your keyboard light you can do so from the Lighting tab. You can create vibrant lighting experiences with a wide range of preset effects like Wave, Breathing, Reactive, Spectrum Cycling, and more. The process is the same for both mouse and keyboard. There are many effects for customizing your keyboard light.

I hope this helps.
Why won’t Razer Synapse open on my PC?
There can be a few reasons why your Razer Synapse is not opening on your PC. The most common reasons are corrupted files or corrupted installation, conflicting background processes, etc. To fix this issue, you can do some fixes like checking for updates manually, repairing Razer Synapse, uninstalling and reinstalling Razer Synapse, etc.
Can I Uninstall Razer Synapse?
Yes, you can uninstall the Razer Synapse easily from your Windows Settings. To do so, open your Windows Settings > Apps > Installed apps. Scroll down and look for the Razer Synapse. Click on three dots and now, click on Uninstall.
Read next: Razer Synapse does not recognize or detect my Razer device.
Leave a Reply