On purchasing a brand new computer, the hard drive usually has a single partition. However, you may need multiple partitions to organize your data and even protect it from data loss.
You can view partitioning your hard drive as creating sections within it, with each partition being independent of others. A fear when partitioning your hard drive, or performing any such intrusive operation on your hard disk, is that you may accidentally erase data stored on it.
In this guide, I’ll break down the process of partitioning your hard drive in a way that you don’t erase your data. The first section shows you how to do this using the Disk Management tool with an easy-to-use GUI, and then we’ll move on to how to partition your hard drive using the recommended DISKPART tool.
Create partitions using the Disk Management Tool
1] Confirm that the file system is NTFS
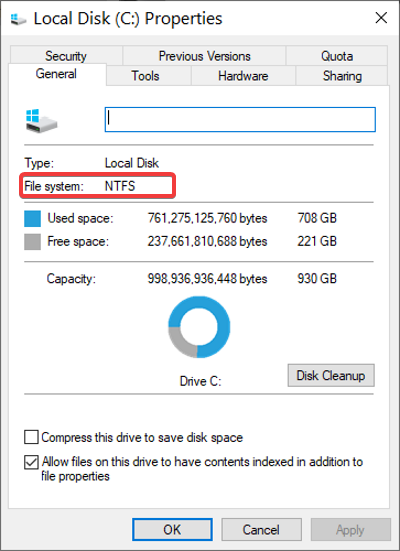
Open Windows Explorer and click on My PC. Right-click on the drive that you wish to partition and select Property.
Navigate to the General tab. Here, you will find the file system format of the selected volume. Confirm that the file system of the volume is NTFS.
Read: How to partition C drive in Windows without formatting.
2] Convert FAT32 file system to NTFS
If the file system is NTFS, then you can proceed with the instructions that will follow. However, if the file system is FAT32, the operation will not work unless you convert it to NTFS. Here’s how to convert the FAT32 file system to NTFS.
Open Command Prompt as an Administrator by right-clicking it and selecting Run as administrator.
Enter the following code in Command Prompt and hit ENTER:
convert d: /fs:ntfs
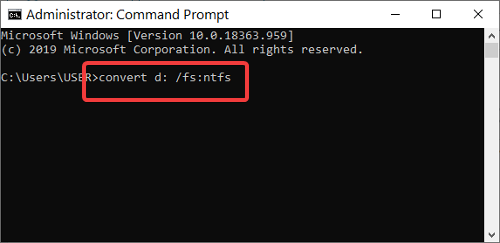
NOTE: In the code above, replace d: with the letter of the drive you wish to convert to NTFS.
Read: How to delete a Volume or Drive Partition.
3] Create a new partition
Open Windows Explorer and right-click on This PC (this is called My computer on earlier Windows editions).
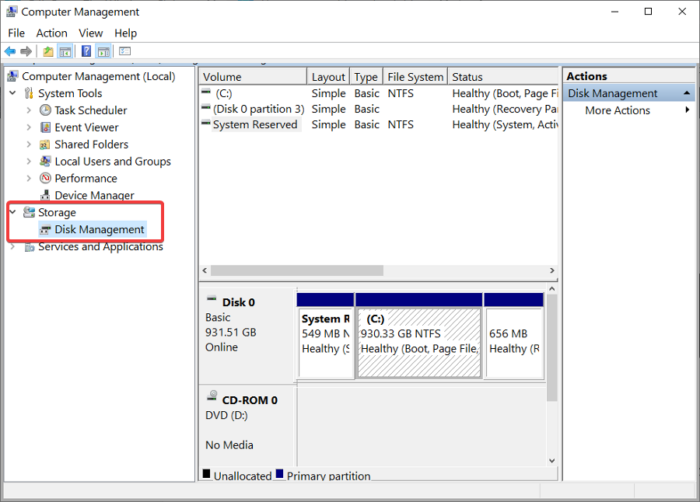
From the context menu, click on Manage. This opens the Computer Management window. Find and select Disk Management under Storage in the left-hand pane.
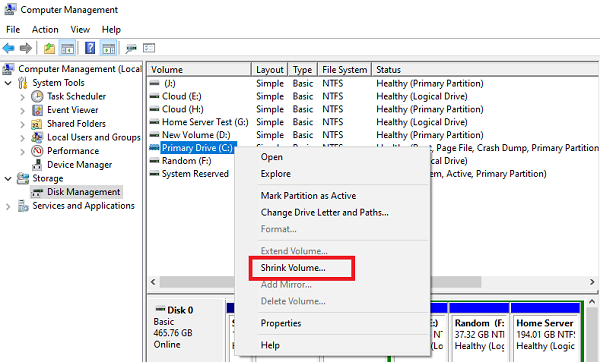
Find the partition that you wish to move—Right-click on it and select Shrink Volume.
By default, you’ll see the maximum available size in the box labeled Enter the amount of space to shrink in MB. But you can enter any size you want in this field.
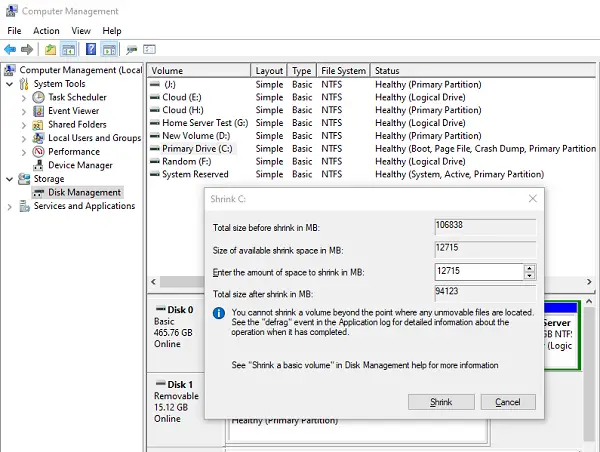
Hit the Shrink button when you’re done, and the system will release the space immediately. With this done, you can now create additional partitions from the empty space labeled Unallocated.
Right-click on the Unallocated space and select New Simple Volume…. Hit the Next button on the New Simple Volume Wizard window.
Specify the space you wish to allocate to the new partition (the maximum available size is entered by default) and hit Next.
Next, assign a drive letter to the partition and click Next to continue. Review your settings on the last page and then click Finish.
Alternatively, you can merge the unallocated space to the drive letter next to it in Disk Management tool. To do this, right-click on the partition with a drive letter with an unassigned space right after it and hit Extend Volume.
In the Select the amount of space in MB field, set a preferred size for the partition. By default, the maximum available size is entered in this box. Click the Next button to complete the operation.
Read: How to create New, Resize, Extend Partition using Disk Management Tool.
Create partitions using DISKPART
If you want more than 4 partitions then you must use the DISKPART utility to create an extended volume that can hold any number of logical partitions as there are available drive letters.
DISKPART is a disk management tool that is built-in on Windows computers. It lets you create and manage hard drive partitions on Windows PCs and servers. Although you can repeat the steps in the guide above to create multiple partitions, we recommend that you make use of DISKPART.
Many server applications also recommend that you use this tool, and a reason is that it increases the I/O performance of hard disks that are added to a RAID array newly. Here’s how to create partitions using the DISKPART tool.
Open Command Prompt as an Administrator. In Command Prompt, enter the following command and press ENTER to invoke the tool:
diskpart
On the DISKPART prompt, run the following command to show all the disks found on your system:
list disk
Next, select one of the listed disks using the command below:
select disk 1
NOTE: In the command above, change the 1 part to the disk number from the list in DISKPART.
To create a partition from the selected disk, use this command:
create partition primary size=20000
NOTE: To create an extended partition instead of a primary one, replace primary with extended. Also, the size indicated in the above command (20000) should always be in MB. If you don’t set a size, then DISKPART will assign to the partition the entire available empty space.
Next, you have to assign a drive letter to the partition. In the example command below, we will give it the D letter, but you can use any unused letter:
assign letter=d
You can create more partitions by repeating the steps above. Finally, leave the DISKPART tool by running the EXIT command:
exit
Additional DISKPART commands
Now, you’ve learned how to create disk partition using the DISKPART tool. But it doesn’t end there. In this section, I’ll show you other useful commands for manipulating your disk partitions using this tool.
First, launch the elevated Command Prompt and enter the DISKPART tool, list out the partitions, and then select one using the commands in the previous section. With a partition selected, use the following commands to manipulate it.
-
Extend a partition:
Extend size=10000
NOTE: Replace 1000 with your preferred size in MB.
-
Delete a partition:
DELETE partition
-
Wipe a disk
clean all
This guide explains in detail how to re-partition a hard drive without losing your data. However, you must be cautious when using the DISKPART tool on dynamic disks.
Before running any command on this page, be sure to check with your disk vendor. If you’re not sure about the Windows Command Prompt and commands, you may make use of the Disk Manager. Otherwise, we recommend the DISKPART tool for these operations.
Leave a Reply