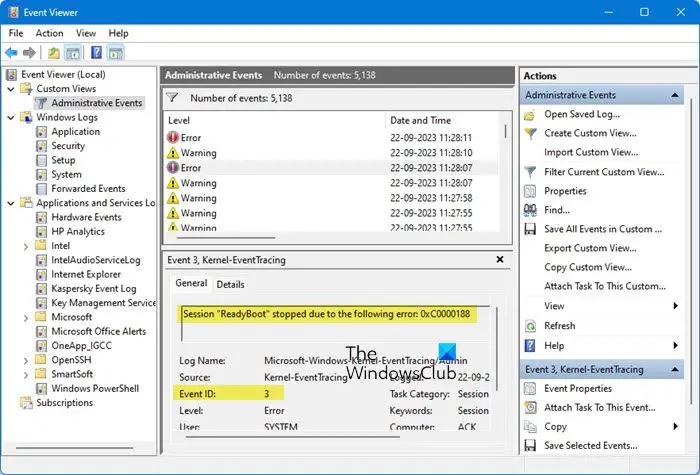
ReadyBoot, as the name suggests, is a service that allows your computer to boot quickly. So, if your system has some issue booting up or restarts automatically, ReadyBoot is at fault. When some users, investigated the issue in Event Viewer, they found an incident that stated the following error message.
Session “ReadyBoot” stopped due to the following error: 0xC0000188
Event ID: 3

In this post, we will see what you can do if ReadyBoot stopped due to the following error 0xC0000188.
What is Windows ReadyBoot?
ReadyBoot is boot acceleration technology that maintains an in-RAM cache used to service disk reads faster than a slower storage medium such as a disk drive. It prefetches data into the cache before it is requested. ReadyBoot keeps track of 5 previous boot-ups and analyzes them to structure a program for boot-time memory cache. The memory that ReadyBoot uses is released immediately if needed by another process or after 90 seconds of the completion.
ReadyBoot is especially useful when on a slow system. But even if your computer has an SSD, ReadyBoot can be useful. It uses your RAM to decrease the time required to boot the system up.
You must keep in mind that ReadyBoot is not the same as ReadyBoost. ReadyBost is intended to use the flash memory for the swap file.
Fix ReadyBoot stopped due to the following error 0xC0000188
If you see Event ID 3, ReadyBoot stopped due to the following error 0xC0000188 in Event Viewer of Windows 11/10, follow the solutions mentioned below.
- Increase the default size of ReadyBoot
- Enable or restart the Superfetch service
- Repair System Files
- Do nothing!
Let us talk about them in detail.
1] Increase the default size of ReadyBoot

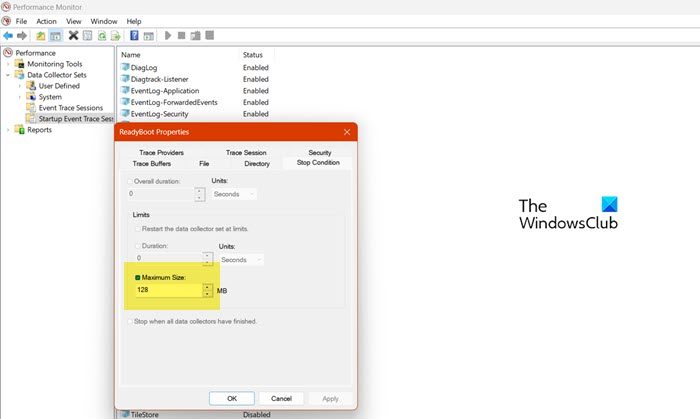
If the ReadyBoot service’s memory is not sufficient to carry out the task it’s assigned to do, it will throw an error. Initially, ReadyBoot is set to 20 MB, and since it is less than what your system requires, we will increase it from the Performance Monitor. To do the same, you need to follow the steps mentioned below.
- Open Performance Monitor by searching it out of the Start Menu.
- Now, expand Data Collector Seats from the left panel.
- You then have to go to Startup Event Trace Sessions.
- Then look for ReadyBoot and double-click on it to open its properties.
- Next, go to the Stop Condition tab and change the Maximum Size to 128.
- Finally, click Apply > Ok.
You can now, reboot your computer, then open the Event Viewer and check if the issue is resolved.
2] Enable or restart the Superfetch service

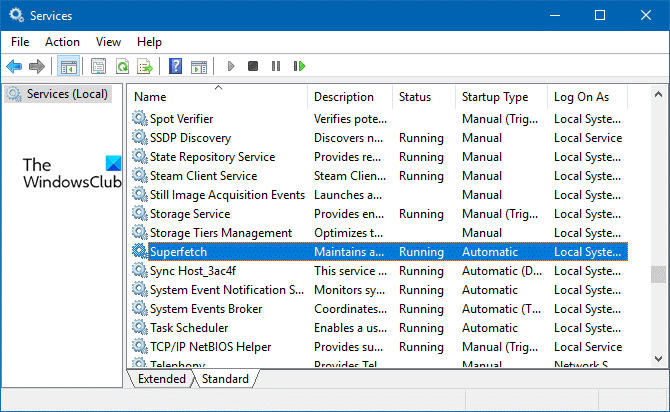
The Superfetch service manages the RAM, since, ReadyBoot makes use of the system’s memory to improve boot time, it is essential to keep the service in check. So, that is why, we will check if the service is enabled and if it is enabled, we will restart it. You need to follow the steps mentioned below to do the same.
- Open the Services app from the Start Menu.
- Now, search for the Superfetch service.
- Right-click on it and select Properties.
- Change the Startup type to Automatic and click on Start if the service is stopped. In case, the service is running, click on Stop and then once it has stopped, enable it again.
Finally, close Services, reboot your computer, and check if the issue is resolved.
3] Repair System files

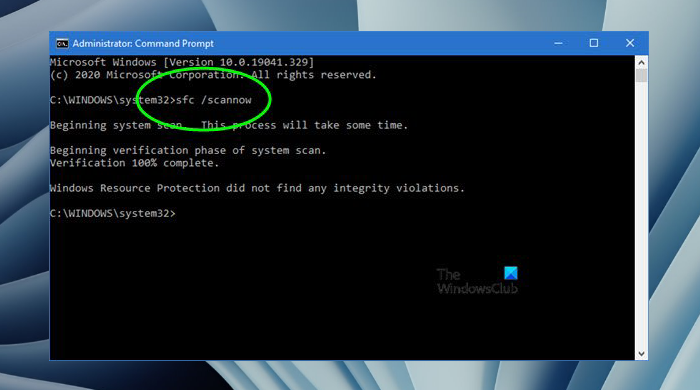
You will also get the booting issue when the system files are corrupted. However, we can easily repair the system files using SFC and DISM Command. So, open Command Prompt as an administrator and then run the following command.
sfc /scannow
If this doesn’t work, execute the following command.
Dism /Online /Cleanup-Image /RestoreHealth
Finally, check if the issue is resolved.
4] Do nothing!
This may not make any sense to you, but if you are not able to resolve the issue, you don’t have to do anything, as this issue won’t bother you. Microsoft, when addressing this issue, has released the following statement.
The logging of this error will not affect the operation of your computer. ReadyBoot is used by the ReadyBoost service that optimizes the boot time of your computer to a minimum.
This error does not have any impact on your computer’s operations or result in any loss of functionality. Its purpose is to enhance your computer’s boot time and decrease the time required to start the system. Since ReadyBoot works, Windows will use the default method to start your computer.
Hopefully, you can resolve the issue using the solutions mentioned in this post.
Read: Best free Boot Repair Tools for Windows
How do I disable ReadyBoot?
We can pretty easily disable ReadyBoot from the Performance Monitor. So, first of all, open ReadyBoot from the Start Menu. Now, go to Data Collector Sets > Startup Event Trace Session. Look for ReadyBoot, and double-click on it to open its properties. Finally, go to the Trace Session tab, untick Enabled, and click on Apply > Ok to disable ReadyBoot.
Read: Fix Windows Startup and Boot problems Advanced Troubleshooting.
Leave a Reply