If you have noticed that in the Realtek Audio Console, there is no Equalizer in Windows 11/10, you are not alone. Many users are in the same boat, and this can be due to various reasons. It can be outdated drivers, incorrect settings, or even software conflicts. Fortunately, there are several ways to resolve the issue which we are going to explore in this article.

Realtek Audio Console No Equalizer in Windows 11/10
If Realtek Audio Console has no Equalizer in Windows 11/10, execute the solutions mentioned below.
- Disable DTSAPO3Service
- Update or reinstall the audio driver
- Install Custom Realtek audio drivers
- Roll back to the previous version of the driver
- Enable or disable Audio Enhancement
- Reinstall Realtek software
- Use Realtek alternatives
Let’s get started with the troubleshooting guide.
1] Disable DTSAPO3Service
DTSAPO3Service can often override or interfere with Realtek’s built-in features and, therefore, cause conflicts between DTS audio processing and the Realtek Audio Console. In this solution, we will disable the service to regain control over audio settings.
- Click Win + R to open the Run dialog box, type services.msc, and hit the OK button.
- Find DTSAPO3Services, double-click on it, and navigate to the Startup Type drop-down menu.
- Set it to Disabled mode, click on the Stop button, and hit the Apply and OK buttons to save the changes.
Once done, check whether the Equalizer is visible. If it is still missing, slide to the next solution.
2] Update or reinstall the audio driver
Next up, you need to check if there is an update available for your audio drivers and install it. You can download the latest version of the Audio driver and see if that helps. In case that is to no avail, let us remove the current installation of the audio driver and install a fresh one. To do so, follow the steps mentioned below.
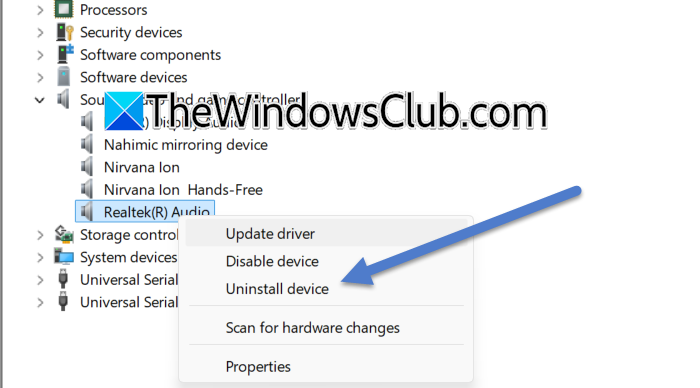
- Open the Device Manager.
- Expand Sound, video, and game controller.
- Right-click on the Realtek audio driver and select Uninstall device.
- Click Yes when the prompt appears.
- Finally, run the Audio driver we asked you to download earlier to install it.
Hopefully, this will do the job for you.
3] Install Custom Realtek audio drivers
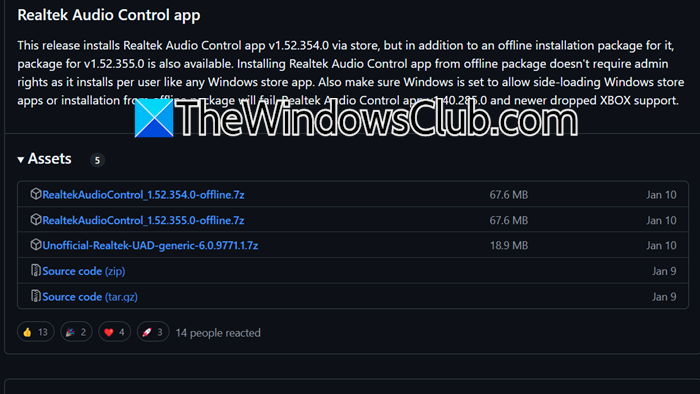
When standard drivers fail to provide full functionality or compatibility, installing custom Realtek audio drivers is necessary. To proceed, first uninstall any existing Realtek drivers and remove premium audio software, if any, as such apps may interfere with Realtek features. Once done, visit github.com to view Realtek UAD Github page to download the required files and refer to the instructions provided for the proper installation. Navigate to the next solution if the issue persists after installing the custom Realtek audio drivers.
4] Roll back to the previous version of the driver

If the issue started right after updating the driver, it could be due to compatibility issues or bugs introduced by recent updates. To rule out this possibility, follow the steps mentioned below, as we will roll back to the previous version of the driver.
- Click Win + X to open the Quick Link Menu, and select Device Manager.
- Next, expand the Sound, video, and game controllers category and right-click on the audio device.
- Once the Properties window appears on the screen, navigate to the Driver tab, and click on the Roll Back Driver option.
See if the Equalizer is available; proceed to the next step if the issue persists.
5] Enable or disable Audio Enhancement
Audio Enhancement is a feature that improves sound quality by applying processing effects. These enhancements can sometimes cause conflicts. In our situation, we recommend disabling the feature to revert to basic sound processing to resolve conflicts or compatibility issues that may cause the equalizer to disappear. However, if it is disabled, enable it to potentially restore the equalizer.
- Open the Control Panel, go to Sound, and go to the Playback tab.
- Right-click on the default device and then navigate to the Advanced tab.
- In the Signal Enhancement section, uncheck the Enable audio enhancement option to disable it, and if it was already disabled, tick the box to enable it.
- Lastly, click the Apply and OK buttons to save the changes.
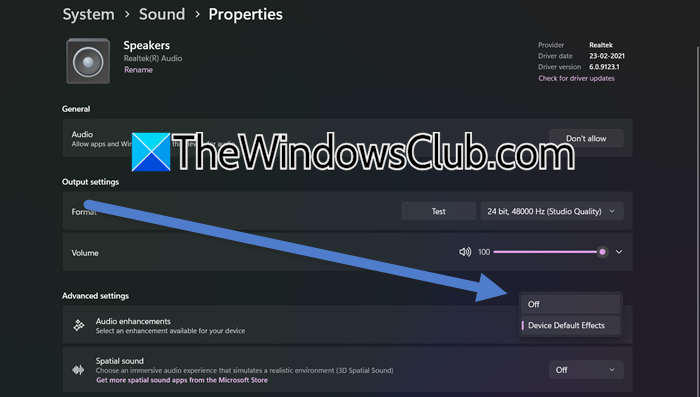
- Alternatively, users can navigate to Settings > System > Sound. Under the Output section, select the audio device, navigate to the Audio Enhancement option, and set it to Off.
After completing the process, see if the Equalizer is now accessible. If it’s still missing, continue with the next solution.
6] Reinstall Realtek software
A corrupted installation or stubborn residual files can prevent the equalizer from appearing in the Realtek Audio Console. However, this can be easily fixed through a fresh installation, which removes corrupted configurations and reinstalls necessary drivers. Here’s how to do the same.
- Click Win + I to open Settings, go to Apps, and then click on Installed apps.
- Find the Realtek Software, and click on the three dots option.
- Select Uninstall and follow the on-screen procedure to do the same.
- Now, go to the Microsoft Store, download Realtek Audio Console, and follow the steps to complete the process.
The problem should be resolved.
7] Use Realtek Alternatives
Last but not least, don’t fret if the equalizer continues to be invisible in the Realtek Console; there are several options available in the market that users can explore. Dolby Atmos stands out as one of the top-notch contenders, which is known for its premium sound quality and advanced customization features, and therefore provides immersive audio experiences. Next, we have EqualizerAPO, which is favored by users for its lightweight nature and extensive audio customization capabilities.
There are more options, such as FxSound, previously known as DFX Sound, which offers user-friendly presets and customizable settings, whereas Boom 3D excels in delivering 3D surround sound and comes equipped with an auto-calibration feature. Lastly, we have EasyEffects, an open-source tool that offers flexibility and advanced features like a parametric equalizer and dynamic range compression.
Read: Realtek Audio Console not detecting Headphones
How to fix Realtek audio No sound in Windows 11?
To fix the No audio issue in Realtek audio, proceed by checking connections and volume settings. If there are no issues with the settings, run the Audio Troubleshooter, ensure that Realtek is set as the default, and update the drivers. If needed, restart the Windows Audio services, and hopefully, there won’t be any problems regarding the sound.
Read: Realtek Audio Console doesn’t support for this machine
What equalizer setting is best for music?
The best equalizer settings vary from person to person since they depend on personal preference and genre. However, a flat ‘EQ’ where all frequency bands remain at their default levels is often recommended for the most accurate and natural sound reproduction.
Also Read: Realtek Audio Console Connector Retasking greyed out.
